Email Discovery Mgmt & Litigation Hold Recovery
This document is the guide to do the emails discovery on the litigation hold mailboxes. This is a very handy feature of exchange 2010 which is a plus for security and HR team. The search eases the investigation by the accurate search result for investigation which saves a lot of time of the investigator. The most important fact we should know is about the below differences:
- Deletions Items removed from the Deleted Items folder or soft deleted from other folders are moved to the Deletions subfolder and are visible to the user when using the Recover Deleted Items feature in Outlook. By default, items reside in this folder until the deleted item retention period configured for the mailbox expires.
- Purges When a user deletes an item from the Recoverable Items folder (by using the Recover Deleted Items tool in Outlook or Outlook Web App), the item is moved to the Purges folder. Items that exceed the deleted item retention period configured on the mailbox database or the mailbox are also moved to the Purges folder. Items in this folder aren’t visible to users if they use the Recover Deleted Items tool. When the mailbox assistant processes the mailbox, items in the Purges folder are purged from the mailbox database. When you place the mailbox user on litigation hold, the mailbox assistant doesn’t purge items in this folder.
-
Versions In Exchange 2010, when a user who is placed on litigation hold changes specific properties of a mailbox item, the original item is preserved to meet discovery obligations. A copy of the original mailbox item is created before the changed item is written. The original copy is saved in the Versions folder. This process is known as copy on write. Copy on write applies to items residing in any mailbox folder. The Versions folder isn’t visible to users.
-
Assign the Rights to Create a Search Query
-
This is a one-time step that needs to be performed to give someone the rights to create a search query. By default, NO ONE in the organization, including the Exchange Administrator, has the rights to create search queries. However, even though the Exchange Administrator doesn’t have the right to create a search query, the Exchange Administrator can go into the Exchange Control Panel and give themself (and anyone else) rights to create the query.
To assign the rights to create a search query, do the following:
1. Logon to Outlook WebApp with a user that has administrator rights (just like you are logging in to check your email).
2. On the upper right corner, select “Options” and “See All Options”
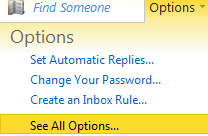
Or
We can access ECP directly at https://owaurl/ecp
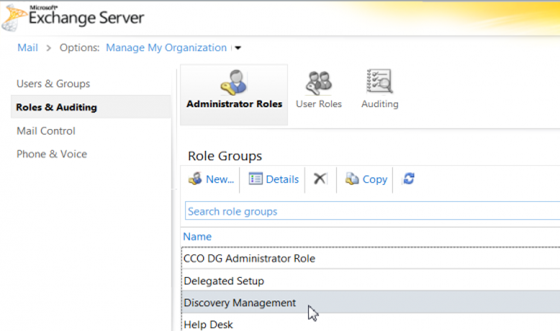
3. In the upper left corner, select “Manage” “My Organization”

4. In the Roles & Auditing / Administrator Roles section, select the “Discovery Management” role and click on “Details”
5. In the Discovery Management details, under “Members”, add the person (or people) in your organization that you want to have the ability to create Search Queries as well as be able to put mailboxes on Litigation Hold, then click Save.
If we need to remove any user from discovery management then select the user and click remove then save.
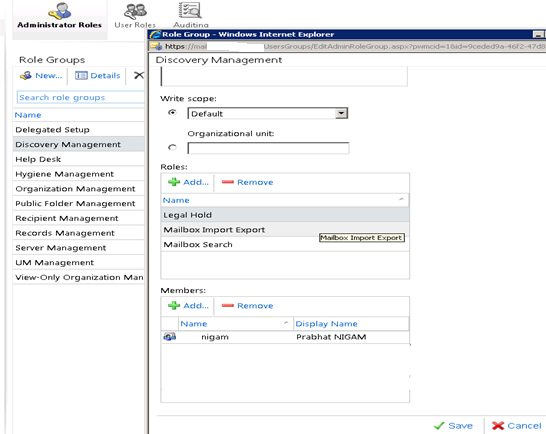
This individual (or individuals) now have the ability to go to Step 3 to create and initiate a Search query (and put someone’s mailbox on Litigation Hold)
-
Create and Initiate a Search Query
The next step is to have the individual who has the right to create a query (the person in e-Discovery Step 1) to actually create a query. The process is as follows:
1. Logon to Outlook WebApp with a user who was given Discovery management rights from e-Discovery Step 1 (just like the user is logging in to check their email)
2. On the upper right corner, select “Options” and “See All Options”

Or
We can access ECP directly at https://owaurl/ecp
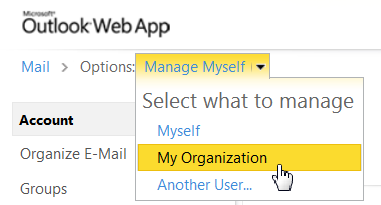
3. In the upper left corner, select “Manage” “My Organization”
4. In the Mail Control / Discovery section, under the Multi-Mailbox Search section, click on “New” to create a new search query
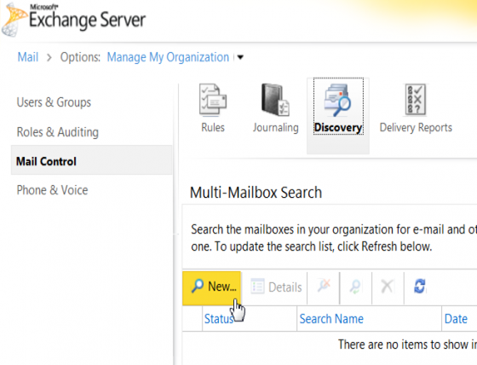
5. For the Search Query, enter in the keywords you want to search for:
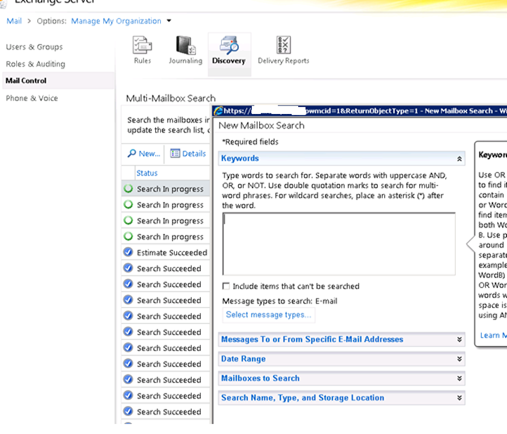
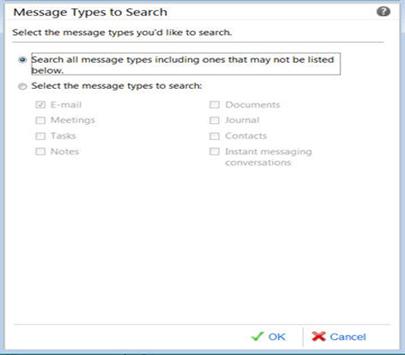
6. In the Keywords section, click on the “Select message types…” and typically select “Search all messages types including one that may not be listed below” so that EVERYTHING is returned in the search results including email messages, posts, calendar appointments, notes, tasks, etc. (by default, only “E-mail” is selected, thus Notes, tasks, IM Conversations, etc are skipped, which is usually not a good search result, so likely Search all message types)
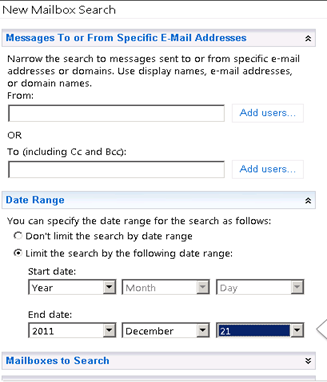
7. In the Message from and to/cc/bcc we can type email addresses if we are searching for specific email address emails else we can leave them blank.
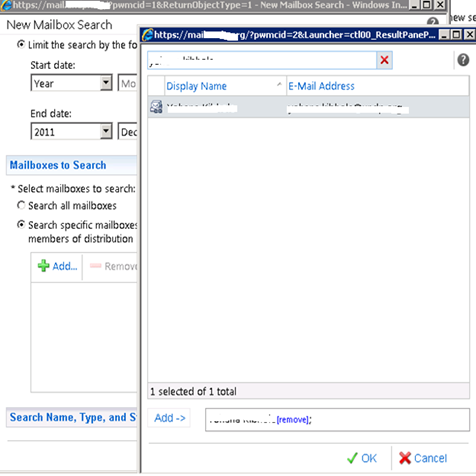
Date Range, we have to select the required range of date or select don’t limit the search by time range. If there is no date mention then it will search the mailbox till today from the date of creation.
8. In the “Mailboxes to Search” section, Add the mailbox/es that you wish to be searched and click OK
9. In the “Search Name Type, and Storage Location”, enter in a name of the search (something that will help you remember what this search is about, such as “Ticket number” or “UserId” or Date. Select the “Copy the search results to the destination mailbox”.
Check the “Enable deduplication” when are doing for one mailbox and uncheck when you are doing for multiple mailbox and Enable Logging then select mailbox in which to store the search results as “DiscoverySearchMailbox” or any other mailbox (this is a recommended approach as to create a temporary mailbox and delete with TT closure) which is enabled for discovery from powershell.
To create a new dedicated mailbox for a Discovery Search we can run the following cmdlet:
It will be a good to have all Search mailboxes in a dedicated database because they will be huge in size so that we can configure short retention for this DB and keep it out of DAG.
“New-Mailbox NewDiscoverymbxmailnickname -Discovery –UserPrincipalName mailnickname@domainname.com”
Note: Once mailbox is created, we need to ensure that the non-system inherited permissions are removed (use EMC – Manage Full Access), e.g BESAdmin. We also need to add the account we require with Full Access same as primary discovery search mailbox.
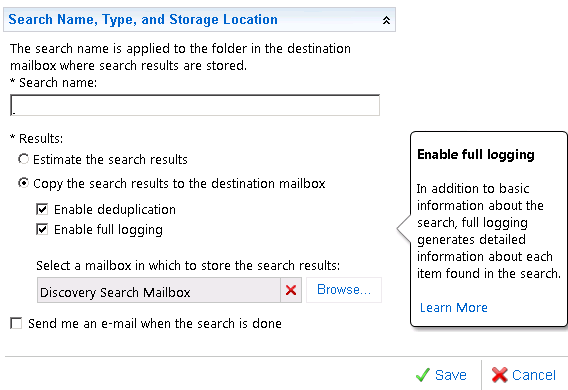 note: while choosing to Enable deduplication saves space, you don’t end up with the key results in ALL mailboxes, and thus if you are searching in 7 different mailboxes, there’s only 1 copy of the message which isn’t good for true discovery. If you are concerned about disk space, click on the “Estimate the search results” and run the estimate first to see how much space is needed which merely comes up with an estimate number and does not actually extract any information). However, if you are good to start the search, then click on Save.
10. The search (or estimate) will begin as soon as you click Save and dependent on how much information is being searched could take a few seconds or could take an hour.
In the Discovery page, you will see the search query noted. Remember, this is a WebPage, so the page won’t automatically refresh with an update on the %-age of completion, so click on the Refresh icon periodically to see whether the search has “completed” or the %-age of the search.
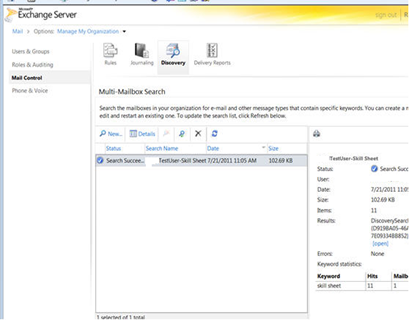
11. At any point, you can highlight the search query, click on the Details option, and change the keywords on the query. Click the “Start Search” option to begin the new search, and remember to periodically click the refresh button option to check the status.
Once the Search has been Successful, we can give manage full permission to manage the discovery to any client user who is from security team
-
Grant and removing access to Search results:
Before granting the permission to any user, please ensure HR or Security team has approved it.
Open Exchange Management console à recipient configuration à right click and select find à then search for “discovery search mailbox” à right click on “discovery search mailbox” and select “Manage full access permission”. We will see the below screen shot.
- Granting access
Click on + here and add the user then click on manage.
- Removing access
Select the user and click on red x to remove the user then click on manage.

But sometimes this does not work or take time to give permission.
If this is not working then add the user to the discovery management as the heading 2 “Assign the Rights to Create a Search Query”
-
To restore items to a user’s mailbox from the Discovery Search mailbox:
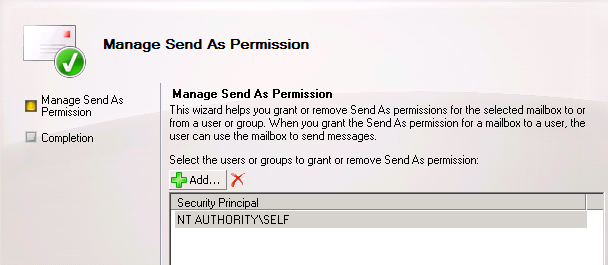
Step 1 Assign the permission:
Add and remove sendas permission to the account on source and destination mailbox to export the mails to the user mailbox or PST using EMC.
Open Exchange Management console à recipient configuration à right click and select find à then search for “discovery search mailbox” à right click on “discovery search mailbox” and select “Manage Send As permission”. We will see the below screen shot.
- Granting access
Click on + here and add the user then click on manage.
- Removing access
Select the user and click on red x to remove the user then click on manage.
OR
We can assign permission to a user for import and export of the emails using the below cmdlet:
New-ManagementRoleAssignment –Role “Mailbox Import Export” –User “<username>”
Step 2 Export the emails
Now we can run the below cmdlet to export to the user mailbox.
“Search-Mailbox “Discoverynnnnnn” -SearchQuery <search query> -TargetMailbox <user> -TargetFolder Restorefoldername”
Or
Export the emails to PST using following cmdlet. This cmd only works with the file share:
New-MailboxExportRequest -Mailbox “Discovery Search Mailbox” –FilePath “servernamesharefoldernamepstname.pst” -SourceRootFolder “SearchQueryname” –verborse
-
Removing new discovery search mailbox
To remove 2nd discovery mailbox run the following cmdlet
Remove-mailbox –identity “mailnickname of the 2nd discovery search mailbox”
Prabhat Nigam (Wizkid)
Team@ MSExchangeGuru
")


August 9th, 2012 at 12:26 am
Do litigation require enterprise license.
September 24th, 2012 at 3:39 pm
No it does not required any additional license
March 2nd, 2013 at 8:32 am
Can litigation hold be only applied to single mailbox databases, or can I apply to an entire database with multiple mailboxes as well?
March 2nd, 2013 at 10:46 am
Hi Zay,
This is a mailbox level configuration.
You can apply to all the users of the same database or one mailbox or multiple mailboxes.
hope this helps.
March 2nd, 2013 at 10:51 am
Hmm, so how would I apply that to a database that affects all the users’ mailboxes of that database at the same time?
March 2nd, 2013 at 11:49 am
I figured it out , thanks.
All: Get-Mailbox | Set-Mailbox -LitigationHoldEnabled $true
Database: Get-Mailbox -database “DB Name” | Set-Mailbox -LitigationHoldEnabled $true
DL: Get-DistributionGroupMember –Identity “DG-Name” | Set-Mailbox -LitigationHoldEnabled $true
March 2nd, 2013 at 11:49 am
Get-MailboxDatabase -Identity dbname | Set-Mailbox -LitigationHoldEnabled $true
March 2nd, 2013 at 11:50 am
Lol, I guess we both responded at the same time, either way, thanks
May 15th, 2013 at 4:11 pm
what is the difference between having a retention period or, a legal hold.
May 15th, 2013 at 4:56 pm
@Hanna:
The basic layman difference is below:
Retention is visible to the user
Legal hold is hidden to the user but administrator can recover these emails and check.
The practice difference check below:
https://msexchangeguru.com/2012/09/04/single-item-recovery-architecture/
http://blogs.technet.com/b/exchange/archive/2011/08/16/retention-hold-and-litigation-hold-in-exchange-2010.aspx
August 29th, 2013 at 12:03 pm
What is difference between mails going to purges and version folder and how we can get the stats for paricular folder.
August 30th, 2013 at 4:58 pm
@Gagan
Check the below links:
https://msexchangeguru.com/2012/09/04/single-item-recovery-architecture/
http://blogs.technet.com/b/exchange/archive/2011/08/16/retention-hold-and-litigation-hold-in-exchange-2010.aspx
November 9th, 2013 at 12:38 am
Subject to some constraints like recoverable quotas, it looks like a Litigation hold only ‘holds’ items that exist in the mailbox (hence the name of course). Does this include “sent” items IF the user does not have their client setup to keep a copy of all outbound/sent items (most users do of course have copies of outbound items in their sent items folder, but I need to know if jouraling will be required in the unusual situation where a user does not routinely populate ‘sent items’). If the answer dpends on the version or SP, please let me know.
Thank you
November 10th, 2013 at 2:06 am
@Atlanta
Litigation hold will hold sent items as well. Basically any email will be visible in discovery search.
No Journaling required to cover any litigation hold.
April 26th, 2014 at 9:12 pm
Is there a way to export ALL contents of a mailbox on litigation hold, perhaps to a pst?
April 26th, 2014 at 9:16 pm
@Ryan
You should have completed reading the blog to get the answer. Anyways, here is the command.
New-MailboxExportRequest -Mailbox “Discovery Search Mailbox” –FilePath “\\servername\sharefoldername\pstname.pst” -SourceRootFolder “SearchQueryname” –verborse
April 27th, 2014 at 2:47 pm
Ok, that isn’t exactly clear. Say I have two users, A, and B that have both been put on litigation hold. I need to export all the mail (both mail currently in his mailbox, and mail in the discovery mailbox that has been saved) for user A (but not include anything for user B). Is that possible?
April 27th, 2014 at 11:35 pm
@Ryan
Yes, Search is saved by search name so it can be exported with the search name so use the search name used for user A while exporting user A’s data.
Go through the full command, it is asking for the sourcerootfolder which is the search name.
April 28th, 2014 at 4:56 pm
Thank you!
August 20th, 2014 at 11:56 am
When doing a discovery search in Exchange 2010 I am getting many results outside of the specified date range. I have tried using both the ECP and PowerShell to create my searches. Any insight on this?
August 20th, 2014 at 11:58 am
Go for latest service pack and roll up update then see if anything changes.
August 20th, 2014 at 12:01 pm
Thanks for the quick response. The server is already on Service Pack 3 Rollup 6 as of a couple of weeks ago.
August 20th, 2014 at 12:10 pm
If you will give a correct date as per step 7 then we should get the result for the mentioned dates.
February 21st, 2016 at 3:38 am
Hi when i am running New-MailboxExportRequest -Mailbox “DiscoverySearchMailbox” –FilePath “\\mbx\user PST\user.pst” -SourceRootFolder “alen” –verborse its showing below error
The operation couldn’t be performed because object ‘DiscoverySearchMailbox’ couldn’t be found on ‘domain.com’
February 21st, 2016 at 4:10 am
You might be giving wrong mailbox name