Exchange 2003: Role Transfer and Removal from Exchange 2010 mixed mode
Exchange 2003 already passed the date of support cycle on April 08 2014 but removal has not been so easy for many organizations. The reason is the multiple components needs to be transferred to Exchange 2010 because of new design model of Exchange.
Just sharing well explained migration steps cycle from technet link here.
So here I am sharing the role required to be transferred to 2010 with the steps. Make sure all mailboxes have been moved to Exchange 2010 servers
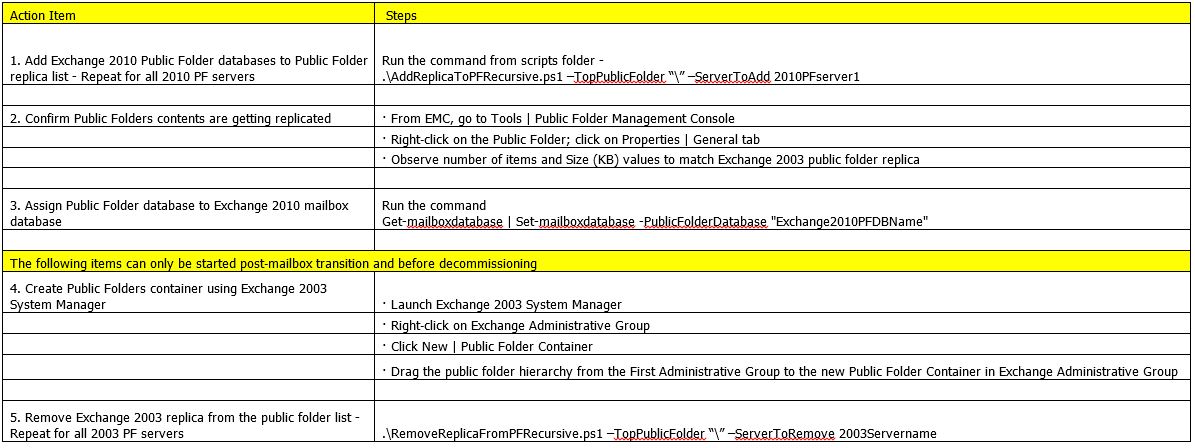
- Replica – Add the replica to 2010 PF server and compare the size
- Root Directory and Hierarchy – Do the following steps as described in the below table.
-
For domain Recipient Update Service: Repeat the steps for all domains
- In Exchange 2003 System Manager, expand Recipients, and then select Recipient Update Service.
- Right-click each domain Recipient Update Service, and then select Delete.
- Click Yes.
-
For Enterprise Recipient Update Service
- Open ADSI Edit, navigate to Configuration > CN=Configuration,CN=<domain> > CN=Services > CN=Microsoft Exchange >CN=<Exchange organization name> > CN=Address Lists Container > CN=Recipient Update Services.
- In the result pane, right-click Recipient Update Service (Enterprise Configuration), click Delete, and then click Yes to confirm the deletion.
-
If you have Exchange 2003 recipient policies that are only Mailbox Manager policies and don’t define e-mail addresses (they don’t have an E-mail Addresses (Policy) tab), perform the following steps to delete the policies:
- In Exchange System Manager, expand Recipients, and then select Recipient Policies.
- To verify that a policy is only a Mailbox Manager policy, right-click the policy, and then select Properties. The Properties page must not have an E-Mail Addresses (Policy) tab.
- To delete the policy, right-click the policy, and then select Delete. Click OK, and then click Yes.
-
If you have Exchange 2003 policies that are both E-mail Addresses and Mailbox Manager policies (they have both the Mailbox Manager Settings (Policy) tab and the E-mail Addresses (Policy) tab), perform the following steps to remove the mailbox manager portion of the policy:
- In Exchange System Manager, expand Recipients, and then select Recipient Policies.
- Right-click the policy, and then select Change property pages.
- Clear the Mailbox Manager Settings check box, and then click OK.
Run the below commands:
Set-AddressList “All Users” -IncludedRecipients MailboxUsers
Set-AddressList "All Groups" -IncludedRecipients MailGroups
Set-AddressList "All Contacts" -IncludedRecipients MailContacts
Set-AddressList "Public Folders" -RecipientFilter { RecipientType -eq 'PublicFolder' }
Set-GlobalAddressList “Default Global Address List” -RecipientFilter {(Alias -ne $null -and (ObjectClass -eq ‘user’ -or ObjectClass -eq ‘contact’ -or ObjectClass -eq ‘msExchSystemMailbox’ -or ObjectClass -eq ‘msExchDynamicDistributionList’ -or ObjectClass -eq ‘group’ -or ObjectClass -eq ‘publicFolder’))}
Press Y to confirm
Get-GlobalAddressList | Update-GlobalAddressList
Fix all the warnings by removeing the space in alias
Run the below commands. – Reference is here
Move-OfflineAddressBook -Identity "My OAB" -Server 2010MailboxSERVER
Get-Offlineaddressbook | Update-OfflineAddressBook
Create new send connector for every SMTP connector.
Test the new send connector
Remove the related SMTP connector
- Create a receive connector on every exchange 2010 server to accept the emails from ant-spam device or server or Load balancer.
-
Change the incoming exchange server IP from 2003 to 2010 on the firewall NAT on the firewall or anti-spam device or on the Load Balancer
From SMTP virtual server, get the relay IP and create a receive connector on every Exchange 2010 server then add these relay IPs.
Test after the restart of transport service,
9. Remove Routing Group connectors – Remove from Exchange system manager or use the command Remove-RoutingGroupConnector
10. Remove Public Folder Replica of 2003 server from Exchange 2010 Public Folder Management MMC.
11. Remove Public Folder Databases. Check the steps here.
12. Remove Mailbox Databases. Right Click on the mailbox store in the Exchange system manager and select delete.
13. Uninstall Exchange 2003 servers from Add / remove programs in the control panel.
Make sure you remove all the mailboxes and HomeServer value from any leftover disabled mailbox else uninstallation will not work.
To check home server follow the step 2 here Make sure you Exchange 2003 CD dump. 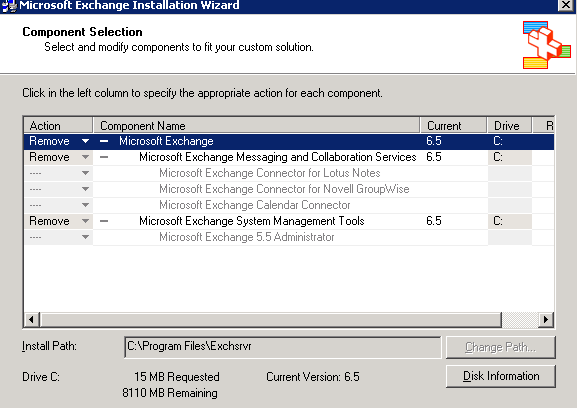
If you don’t have CD then follow this link to do manual uninstallation. http://support.microsoft.com/kb/833396
14. Remove the First Administrative Group and Active directory Connector from ADSIEDIT.
Reference: http://technet.microsoft.com/en-us/library/gg576862(v=exchg.141).aspx
Prabhat Nigam
Microsoft Solution Architect | Exchange Server
Team@MSExchangeGuru
")


June 12th, 2014 at 5:19 am
Nice article, step by step 🙂
Safe removal(2003) also help to get ready for Exchange 2013 on-premise deployment.
June 12th, 2014 at 9:40 am
Thank you Charles.
Yes, many org are migrating to 2013 so this blog should help them in removing 2003 before adding 2013.