Working with Exchange Control panel and RBAC in Exchange 2010
With enhanced remote management methods, Microsoft has taken its products to another level. Power Shell capabilities were introduced by Exchange Server 2010 and with it the remarkable ability to use web interface to manage several components using ECP (Exchange Control Panel). Various functions like managing mailboxes, Distribution groups, contacts, Journaling, Transport Rules, and Delivery Reports etc are performed easily with the aid of ECP.
This article deals with all the options available through the ECP.
Mailboxes, Contacts and Distribution Group Management
Even though Outlook Web App is configured by default in ECP we can access that separately on the Client Access Server, Exchange Control Panel tab as shown in Figure 01.

Figure 01
Once we have properly configured the outlook web app we can go to https://yourdomain.com/ECP to get access using the same authentication process that we would use to access Outlook Web App. The main page is shown in Figure 02, there are four categories: Users & Groups, Roles & Auditing, Mail Control, Phone & Voice and each one of them have sub categories.
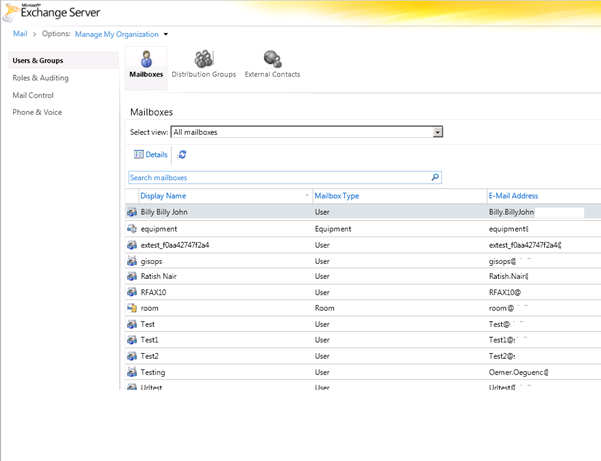
Figure 02
If you are already logged on in Outlook Web App, you can click Options and then See all Options, and then click on the option Manage Myself and change to My Organization. All areas that the current user has access will be available to be managed through the web interface.
Managing Mailboxes
With release of the ECP, feature facilitating creation of new mailboxes, were sadly removed from the Exchange Control Panel.
All the mailboxes created and being used in the server will be listed in the first page and their email ids are displayed. The Select View drop down menu can be used to sort the mailboxes that are being listed based on those attributes. We can also search a specific mailbox typing in the field right below Details and Refresh buttons. In the same field we can use a wildcard, for example, if you want to list all users that contains “test”, just type in *test and here you have the results (figure 03).
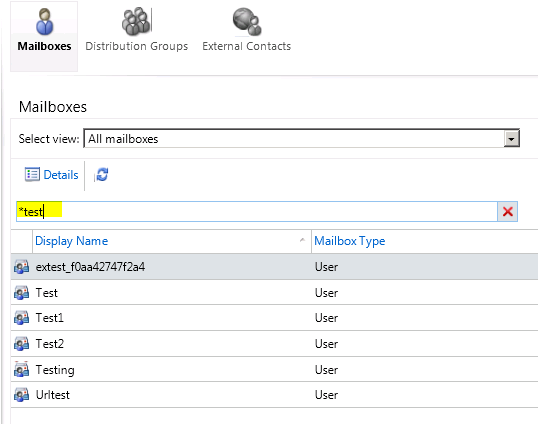
Figure 03
If we double click on a user or select the user and click on Details, then we will have access to configure some more attributes related to the user (not all of them), add additional e-mail addresses, mail tip, mailbox features and etc., as shown in Figure 04.
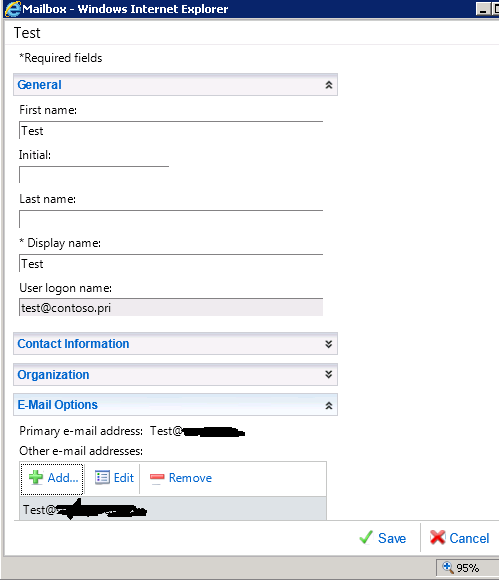
Figure 04
Managing Distribution Groups
In ECP Distribution Groups are slightly different. Next we look into creating and deleting distribution groups using ECP Interface. First, we click on the Distribution Groups tab. It displays the list of available groups. There are also a few more buttons on the main page. We can also view and edit the Group Naming Policy for new groups. This is illustrated in the Figure 05. Group naming policy help us decide how new groups are named. 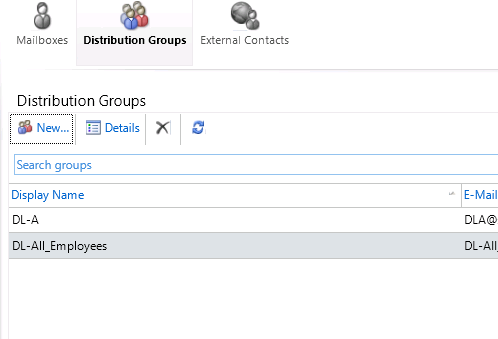
Figure 05
One of the functions in distribution group is to create new distributions group. To create a new group, click on New Group on Distribution Groups page. In the next page, i.e. the New Group page there are a few fields that requires to be completed to finish creating new group. These fields include Group Name and Alias. We can also define the security of the new group (In a secured group the membership is exclusive). The ownership of the group is defined in this page and initial members can be selected for the group. If the group is secured group, we can also define the membership approval process (Three membership choices are available for joining process of the group: Open, Closed or Owner approval; Further there are two choices on how to leave the group: Open or closed).
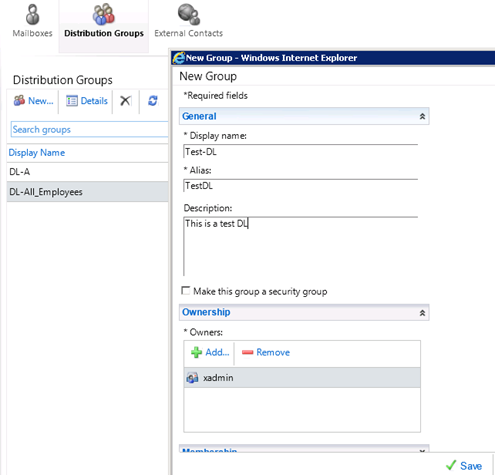
Figure 06: New Group Page
The newly create Distribution Groups in ECP are saved to the the Users container. We can also delete an existent group. To do that, select the group and click the Delete button. It will be followed by a confirmation dialog box.
Options like hiding the newly created group from the shared address book, delivery management, message moderation to the group (Message Approval section) can be managed by double clicking the newly created group.
Managing Contacts
ECP also provides options to manage External Contacts. This can be done by clicking on External Contacts. Now a list of all the available contacts will be populated. You can also create new contacts through the New… button. When you click the New button a new page opens up containing certain fields. This can be filled out as the information about the new contact. This is illustrated in figure 07
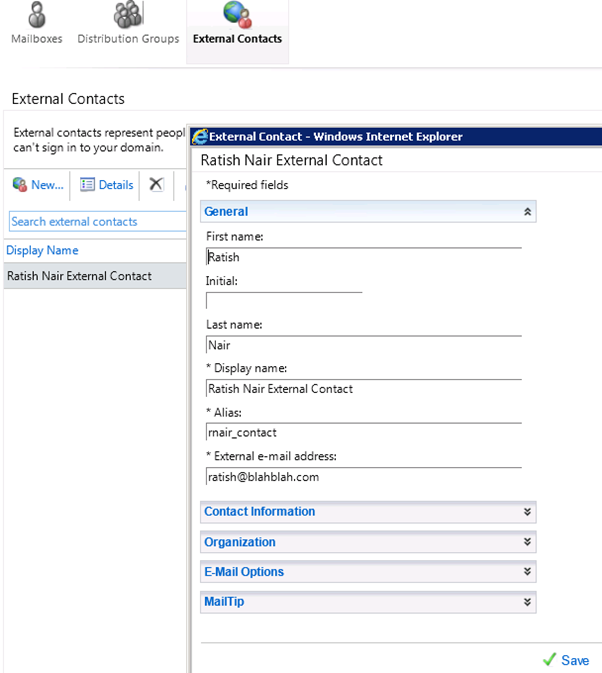
Figure 07
The Users container in the domain stores the information about the newly created user. It can also be viewed from the Exchange Management Console (Figure 08). Double clicking on the newly created user will load more options, like General information, Contact Information, Organization, MailTip and e-mail options.

Figure 08
Managing Transport Rules…
Another important and fascinating option available in the Exchange Server 2010 Service Pack 1 is the capacity to supervise Transport Rules. That option can be selected from the Mail Control tab on the left pane of the ECP window and then Rules sub option. We can see the available and in use Transport Rules in the organization in the main page. Existing rules can be edited from there (Figure 09).
In the interface, under the rules option we can see two columns. The ON column decides if the rule is enabled or disabled. In case of multiple rules, the order in which they appear on the table is the order of their priority. This priority can be changed using the up and down arrow buttons in the interface.
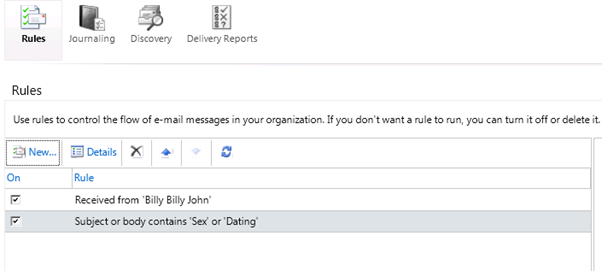
Figure 09
The New button is clicked when we are to create a new transport rule. The New Rule page which is then displayed contains various conditions set and corresponding action sets using which the rule can be formulated. This is illustrated in the figure 10.
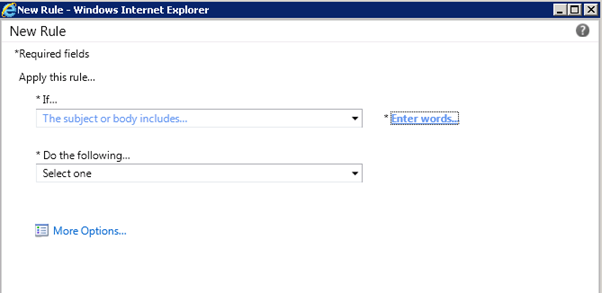
Figure 10
The process is very user friendly and every time that we select an option that requires us to choose from a list, a link will be displayed on the right side. From that link the Global Address List will be shown where we will be creating a Moderation Transport Rule for a specific user in this section. These are the few steps required to get it done:
In the If… field select The sender is…, then click on Select people and pick a name up from the GAL, we can add one or more conditions for the same rule if we want to. After that select Forward the message for approval to… and the wizard will automatically give you the Global Address List to find a name. Then click on Save and the Transport Rule will be operational. Bear in mind that in some environments with multiple sites, replication must take place before testing the new Transport Rule. Also, a Transport Rule is done at Organization Level so be cautious about the rules being created.
We can also use the advanced mode which allows us to define an exception for the rule by clicking on More Options button. This action also allows us to change the Transport Rule name by changing the Name of rule field (Figure 11).
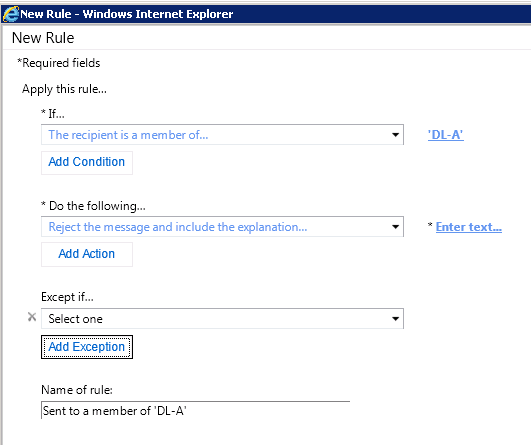
Figure 11
Managing Journaling…
In an Exchange Server 2010 Organization, using ECP we can also manage Journaling. There are two versions of journaling: Standard and Premium. While the standard version can be configured by configuring a mailbox database to journal all the mailboxes in the database to a different mailbox specified, it is not done in ECP level. To configure the premium version, we require the Enterprise CAL license. The premium version is more adaptable compared to the standard counterpart. In the premium version, a mailbox or a distribution group can be defined in which report can be enabled. The journal mailbox will t en store the messages sent and received by the defined distribution group or mailboxes.
Journal Rules are displayed in the homepage of Journaling (Figure 12).This page is similar to the Transport Rules page. The ON column represents the currently active journal rules. A selected rule can be edited by double clicking Details. It will also display all the details of the rule including the mailboxes and recipients involved in the rule. However the scope of the rule (Global, Internal or External) is not displayed in this main page. 
Figure 12
Now we shall see how to create a new Journal Rule. To do that first, click New. In the new page to which we are redirected, we can see a wizard. In the wizard, we have options to define the mailboxes and/or groups to be governed by the journal rule. We can also define the scope of the journal, the name of the journal rule and also the destination address to which the journal reports are to be saved (figure 13).
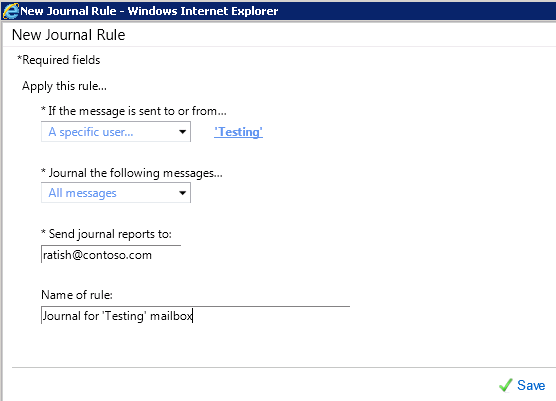
Figure 13
The newly created journal rule can be seen by opening Exchange Management Console, then Organization Configuration, next by clicking Hub Transport and finally Journal Rules tab (Figure 14).
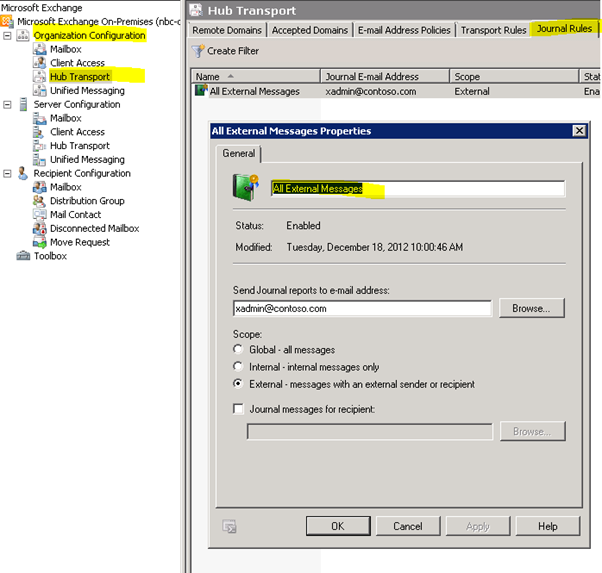
Figure 14
Managing Delivery Reports…
With the Delivery Report feature one can track the messages sent in the Exchange Server. Tracking can be done to such an extent that we can find the complete message route and also the status of messages can be defined in spite of the message having an inbox rule.
In the latest release of Exchange Server 2010, there are changes introduced to the message tracking component. Opening an entry using Exchange Management Console (Figure 15) will result in redirection to the ECP location.
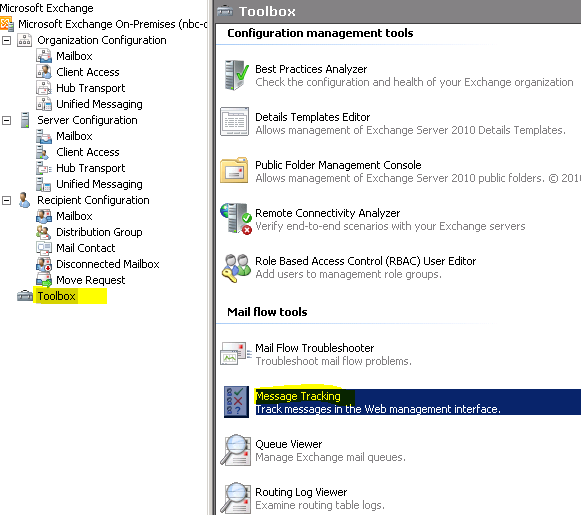
Figure 15
Delivery Reports are not just exclusive to Administrators but are also accessible by the end-users. They can do this by choosing See All Options and Organize E-Mail option. In the organization scope we can also choose the mailbox to search for using this feature. We can further narrow down the result by choosing the recipient (Search for messages sent to: option), or the sender (Search for messages received from: option), or the subject line (Figure 16).
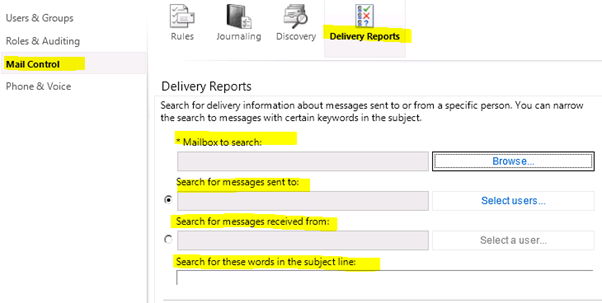
Figure 16
Managing administrative roles…
Another feature newly introduced in the Exchange Server 2010 was the RBAC (Role Based Access Control). This allowed us to access the resources without the need to manage Access Control Lists. With the RBAC, rules can be created based on the role of the user, that is, administrators and end-users.
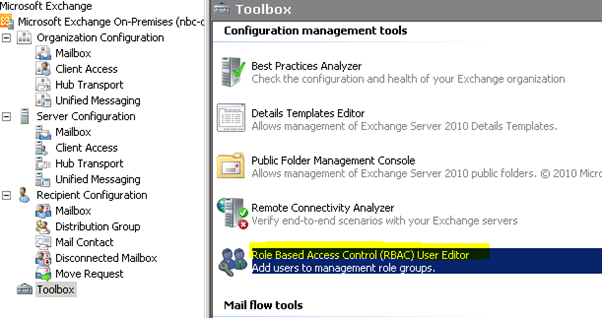
Figure 19
Let’s begin by clicking on Roles & Auditing. Three options are displayed which says: Administrator Roles, User Roles and Auditing. Administrator Roles option, displays the Role Groups in the homepage (Figure 19). Here we can create New roles, delete or organize the existing ones. There are built-in role available which can be used as a template for a new role to be created. Information about different role groups like, assigned roles, Members and write scope, can be viewed from the Role Groups pane.
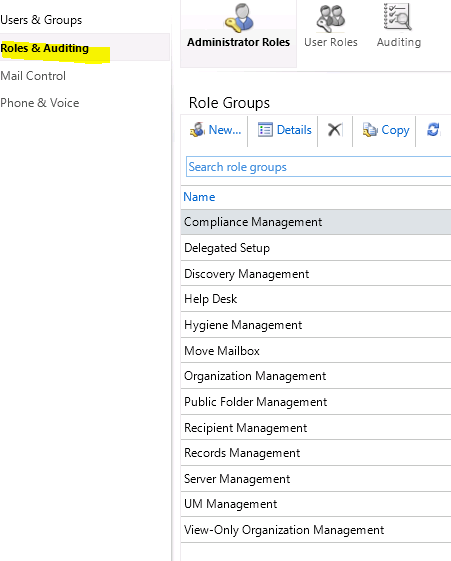
Figure 19
Managing User Roles…
Another feature of RBAC is the option to define end-user configuration. We can, using this feature and Exchange Control Panel or Exchange Management Shell, administer different roles and dispense them to different end-users. Important thing here is that the newly created and assigned features that are allotted to the end user can be accessed by the end-users on their Outlook Web App session. The assigned permissions of the end user also forms the basis of how the user can run their own mailbox objects
User Role Management option can be taken from the Role & Auditing menu item, and from there, to User Roles (Figure 22). The default value in this section will be Default Role Assignment Policy, which can be edited by double clicking on it or by choosing Details. We can also delete the existing Role Assignment Policies from here. While doing this one thing to be kept in mind is that the policy to be deleted is not currently assigned to other users. Under such circumstances the removal may not be completed.
Information about the selected role will be displayed on the right side of the pane. 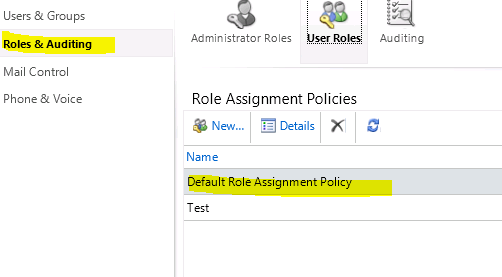
Figure 22
We shall now look into creating a new User Policy. We start by clicking on New… We can then define the name and description and choose the features that are enabled for the end users availing this policy. To finish, click on Save (Figure 23).
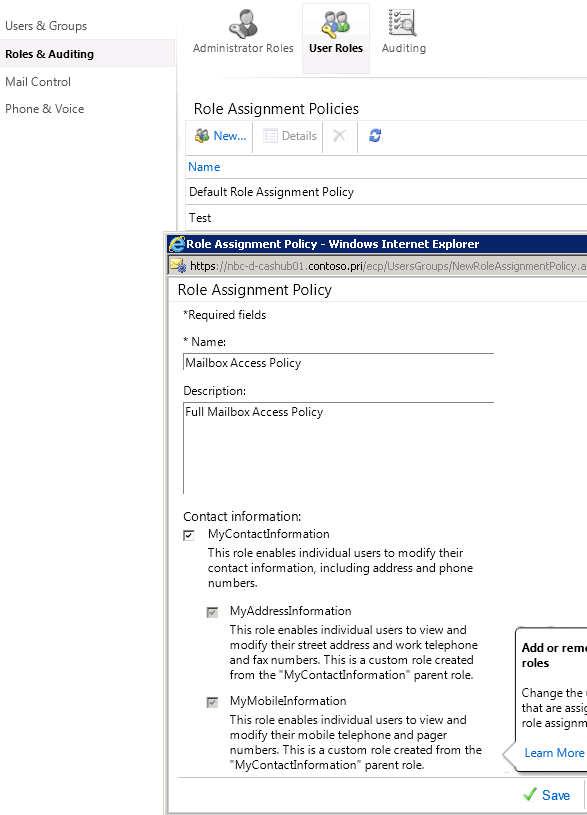
Figure 23
Now, we will be able to see the new Role Assignment Policy listed on the main page. In order to test it, go to Users & Groups, then Mailboxes and double click on the desired mailbox, expand the Mailbox Settings section, and select the Role assignment policy that we have just created (AndersonPatricio.org – user full features policy) and click Save (Figure 24).
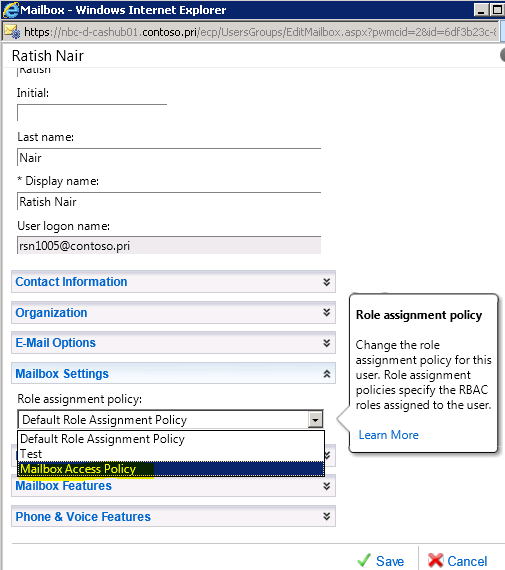
Figure 24
Auditing Reports…
The next feature we look into is the Reporting feature of the Exchange Server 2010 Using Exchange Control Panel we can access this feature with ease. When we go to the Auditing tab we can see (Figure 25) different options:
- Non-owner mailbox access report
- Litigation Hold Report
- Administrator role group report
- Export mailbox audit logs
- Export the administrator audit log
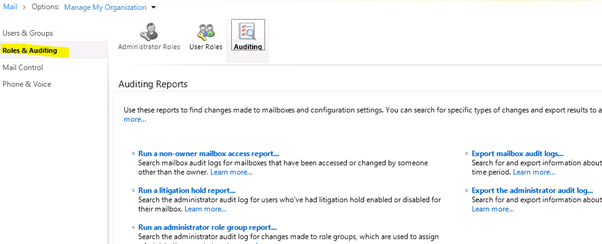
Figure 25
We’ll now see the Litigation hold report. Litigation Hold allows the administrator, privileges to open a mailbox to which messages that modified or deleted by the user shall be saved. The architectural changes of the Recoverable Item Folder introduced in Exchange Server 2010 enabled this feature. With the new architecture tracking of information can be done. It has also introduced certain folders that will be used by the feature: Deletions, Versions, Purges and Audit.
We can enable Litigation hold or check its status by taking the Users & Groups option, then Mailboxes, and double click on the desired user, and from there Mailbox Features section. By default Litigation Hold will be disabled. Selecting and clicking Enable (Figure 26) will open up a dialog box that says that it may take up to 60 minutes to be active. From there we can click Close, and then save.
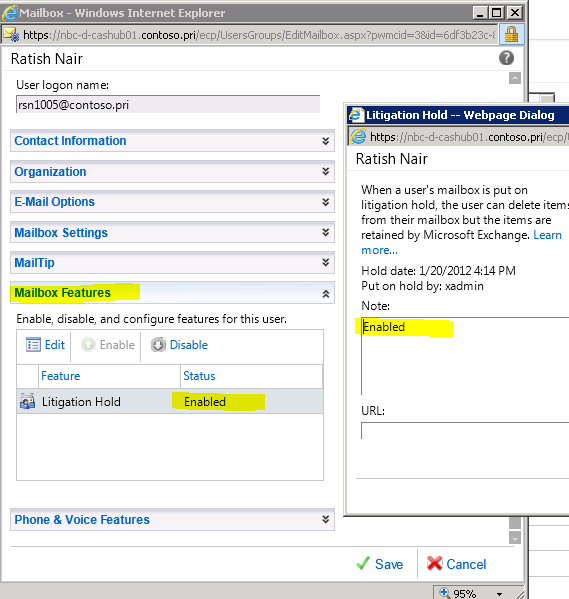
Figure 26
Next is Roles & Auditing. Frome there go to Run a litigation hold report. In the new page we can see query options such as: Start and End Date and specific mailbox,(Figure 28). The results will show if the litigation hold was enabled or disabled on the specified mailboxes.
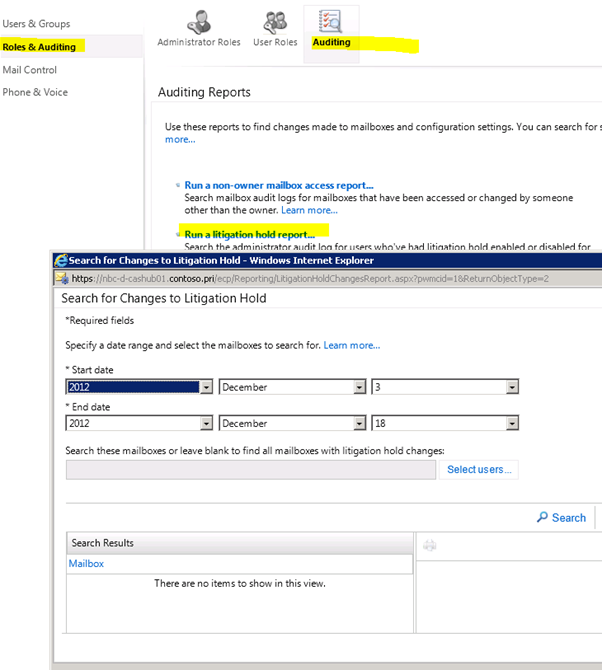
Figure 28
The next report in this class is Run an administrator role group report. This is by default enabled in the Exchange Server 2010 in which some specified mailbox is allotted to keep the information. Clicking on the report enables us to filter the results as in litigation hold report. In the results display (figure 29) we can see the changes and its details on the right hand side.
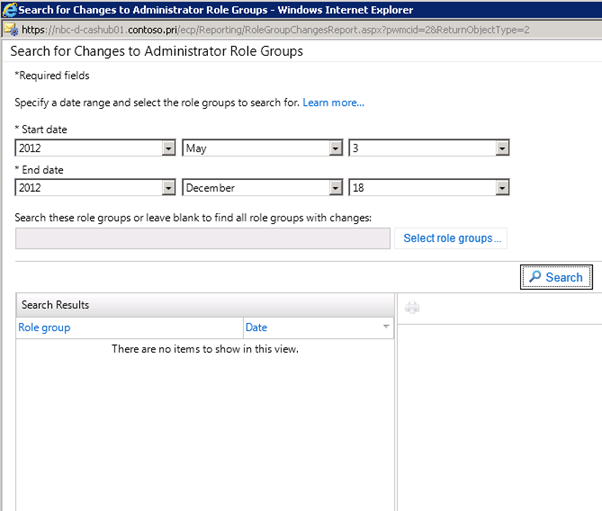
Figure 29
Previous search results can be exported by clicking Export the Administrator Audit Log on the main page of Auditing. A new pop up with the same query option will be displayed (figure 30). Here we will have to define the mailbox to which the report is to be sent. We then click on Export. The specified mailbox will then receive the report with an XML attachment which by default will be blocked by Outlook Web App. To enable the file in Outlook Web App you will have to allow that file extension in your current OWA Mailbox Policy.
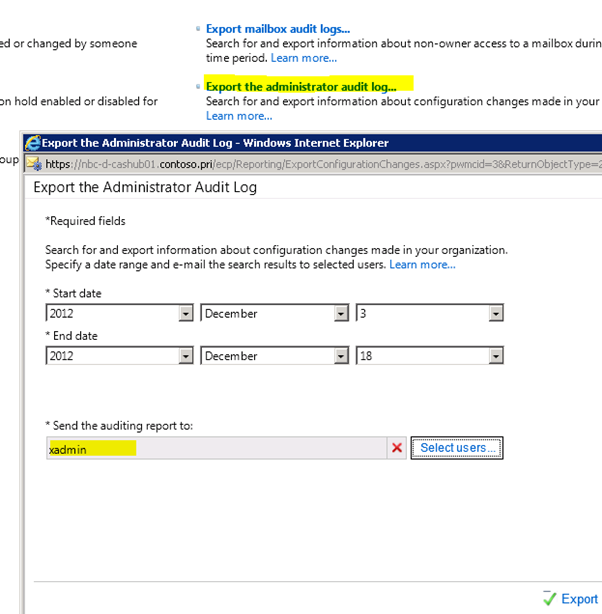
Figure 30
The third report is the Non-owner mailbox access report, for doing which, we will have to enable the Mailbox Audit on the mailboxes. After enabling the mailbox audit log will be stored to the Audit subfolder of the Recoverable Item Folder structure.
Mailbox audit can be enabled using the syntax:
Set-Mailbox <Mailbox> -AuditEnabled $true
Next click on Run a non-owner mailbox access report on the home page of Auditing. The pop up allows us to specify date range, the mailbox and if the access was made by a couple of entities (All non-owner, Administrator etc). This is illustrated in Figure 31.
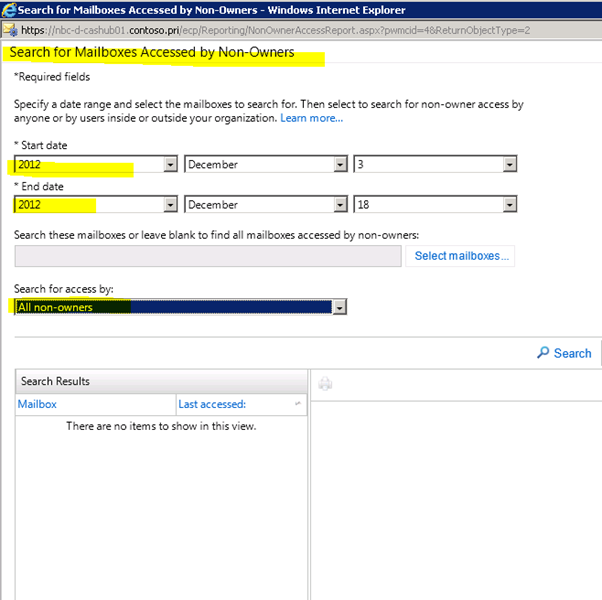
Figure 31
Here again, the results can be exported using Export Mailbox Audit Logs on the Auditing page (Figure 32). But in this case the results are only sent to the mailbox specified on the Send the auditing report to field and not displayed.
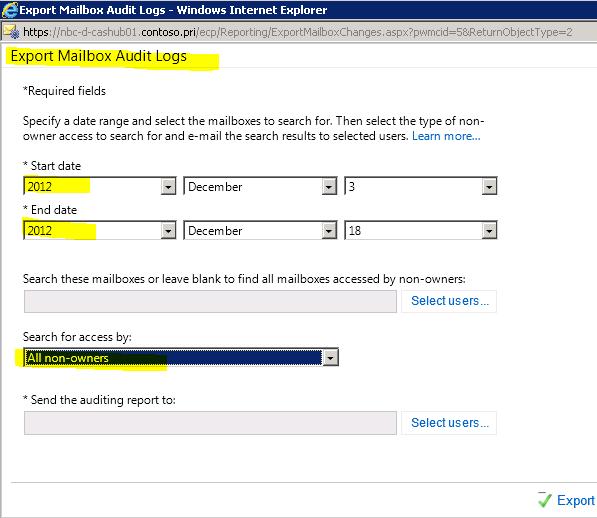
Figure 32
Managing ActiveSync Device Policy…
Next up is the management of ActiveSync Device Policy. With ECP we can perform various operations on the ActiveSync Device Policy like forming new policies, assigning them to a mailbox.
The ActiveSync Device Policy page (Figure 33) shows all currently active policies. To make changes we just double click on the particular policy or click the Details button after selecting the policy. We can also delete policies using the delete button.
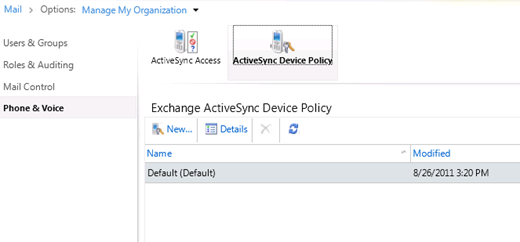
Figure 33
Creating New policy is similar to the previous topics. Click New… and on the New Exchange ActiveSync Policy pop up, we can define the name of the new policy. Next we specify security, sync and device settings (Figure 34).
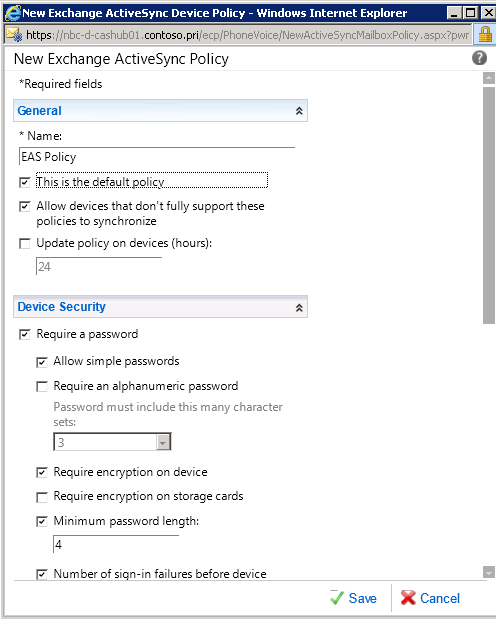
Figure 34
After creating the policy using ECP, we relate the new policy to mailboxes. For this go to Users & Groups, then Mailboxes and double click the required user; expand the Phone & Voice Features. Here we can specify if Exchange ActiveSync is enabled or not for the user (Figure 35). To edit this click Edit…
In the new page, when we click Browse a list of the Exchange ActiveSync Policies will be populated.
Managing ActiveSync Access
ActiveSync Access was introduced in Exchange Server 2010 Service Pack 1. This feature permits the administrator to choose how new devices can join the current ActiveSync infrastructure.
We can configure the basic settings for this by clicking Phone & Voice. Next we click on the Edit button located in the Exchange ActiveSync Access Settings area, as shown in Figure 37.
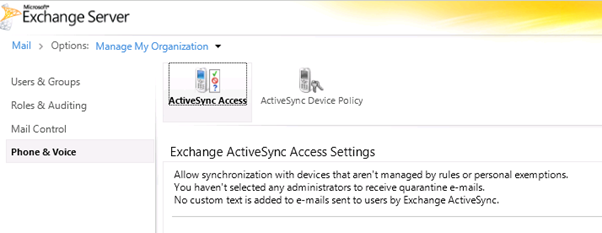
Figure 37
The Exchange ActiveSync Settings page is basic. Default settings using which a newly connected device, which is not managed by a rule, joins and synchronizes with the Exchange through ActiveSync can be defined here. The available choice are: Allow, Block or Quarantine (ABQ).
We select Quarantine as the default method in this article. Now we will have to choose the mailbox to which notification goes when a new device is quarantined. The second option specifies this and here we click Add and selects a mailbox from the Global Address List.
The last option in this section defines the message that the user trying to connect will receive in his/her Inbox.
Finally we click Save. (Figure 38)
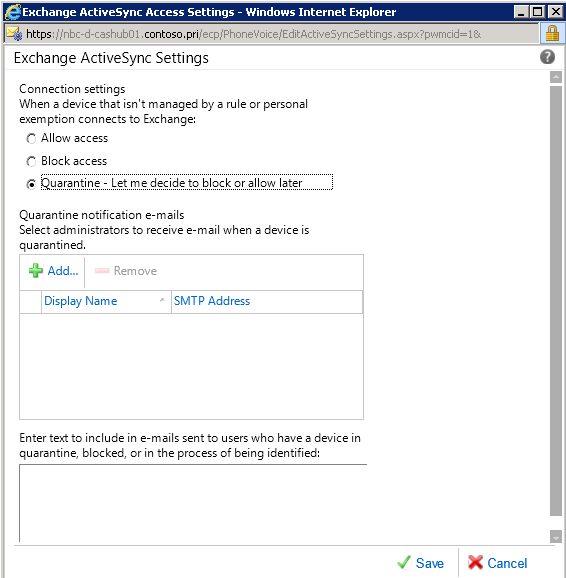
Figure 38
With this we can define, certain devices which were tested, with Allow Access/Block some devices/Quarantine unknown devices.
Ratish Nair
MVP Exchange Server
Team@ MSExchangeGuru



December 24th, 2012 at 5:10 am
[…] Working with Exchange Control panel and RBAC in Exchange 2010 […]
December 28th, 2012 at 2:37 pm
Exchange has many features that typically go unused. Proper training is essential to get the most out of the program.
May 16th, 2014 at 6:59 am
hi
i would like to edit the organization portion of our users, using the console. which option would i choose when creating the role group?
please advise.
thanks