Exchange 2013: Creating and testing Database Availability Groups (DAG)
Exchange can be used to reduce the cost and complexity of messaging systems that provide high availability levels and mailbox capacity.The new Exchange allows users to deploy an economical messaging continuity service in their organization.
In this article, we shall deal with the use of the new Exchange Administration Center (EAC) in creating a mailbox database and a new DAG.
Database Availability Group feature of the Exchange can be viably used to increase reliability and availability in organizations.
Note: We can check which mailbox is already running on your system by opening
Task Manager->Processes.
There, locate Microsoft Exchange Store Worker Process. Each instance of this process is associated with a mailbox database.

Here only one Store Worker process is running indicating that only one mailbox database is being used by the exchange.
We begin by signing in to the Exchange Administration Center (EAC).
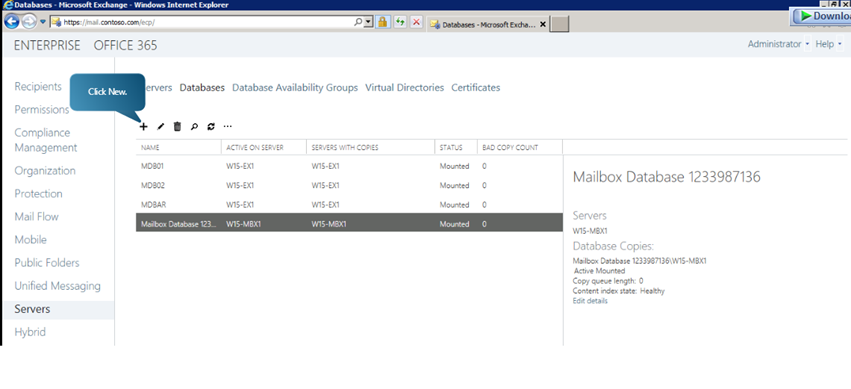
Now locate Servers page on the left pane of our homepage and go to Databases Tab.
We can now see a list of available mailboxes. Clicking on a particular mailbox will allow us to review the mailbox.
We shall now see how to configure Exchange for high availability.
We begin by clicking on + (New).
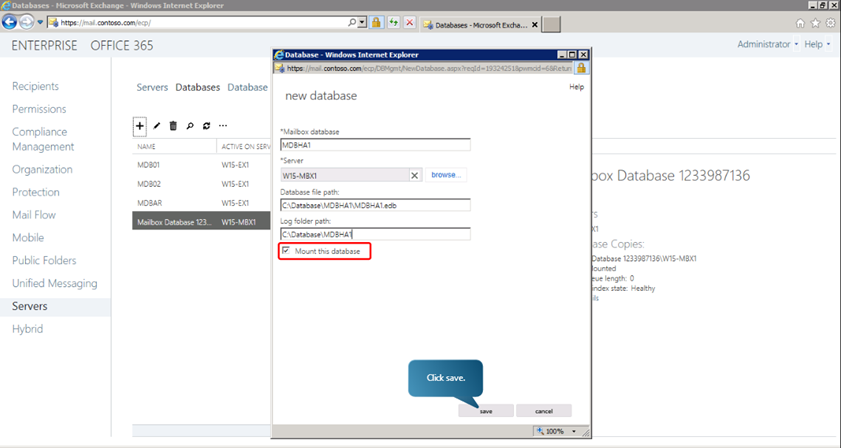
We can now see a pop up window where we can define the properties of the new mailbox. Fill in the name and select the server on which the mailbox is to be hosted.
After choosing the server, we can now specify the paths for database and log folder.
Please note that we have to select Mount this database option.
Now click on Save.
This will create a new mailbox database
We can verify that the new mailbox has been created by going to task manager-> Processes and locating Microsoft Exchange Worker Processes instances just as we did before.
In Exchange, it is database availability group (or DAG), that enables high availability and site resilience. A DAG is a collection of Mailbox servers that can manage a set of databases providing automated, database-level failure recovery that may affect individual databases, networks, or servers. The number of mailboxes can be up to 16 in a DAG.
Any mailbox database from a server in a DAG can be accessed from any other server in the DAG. Other servers within the DAG can provide automatic recovery from failures that affect mailbox databases, such as a disk failure or server failure, to any new or existing server added to the DAG.
Steps to Create a New DAG in Exchange 2013
In the EAC home page, go to Servers from the left pane.
Click on Database Availability Groups tab.
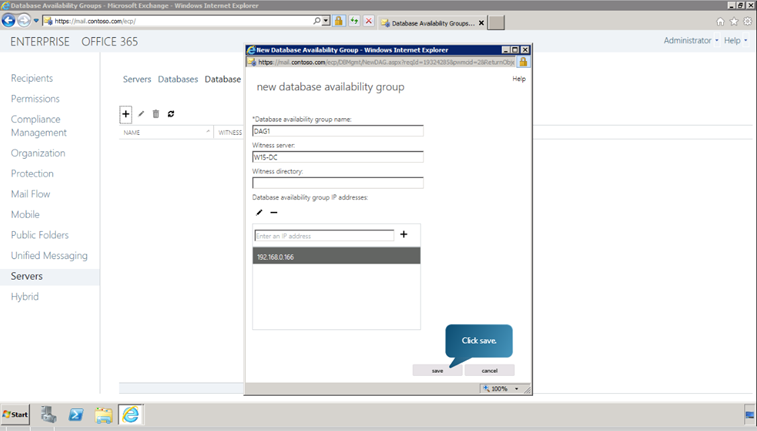
Click on the + (NEW) button.
In the new pop up window, we can define the parameters of the DAG like name, ip address, witness server etc. A witness resource is used in DAGs to make sure that only one collection of the members in the DAG is considered official.
Click on Save.
A warning message will be displayed. Click OK.
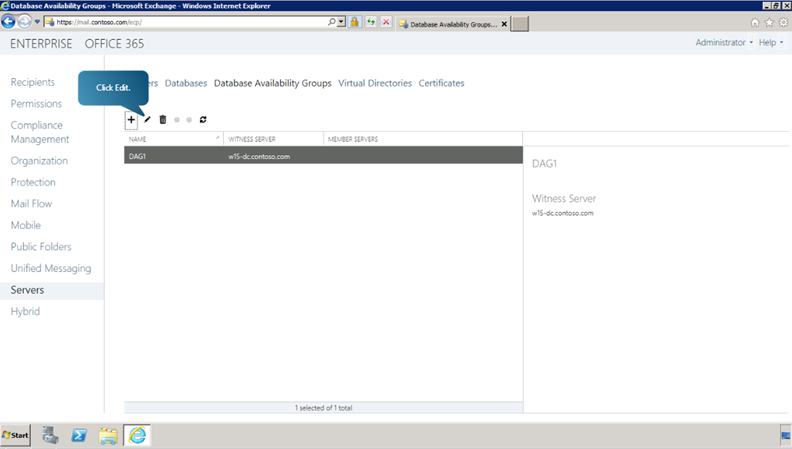
Now we can see the newly created DAG listed. We can review and edit the information about the DAG by clicking edit button. This is illustrated in the following figure.
Next, we need to add a server to the DAG. It can be done by clicking on Manage Membership button on the DAG page in the EAC. The following figure illustrates this.
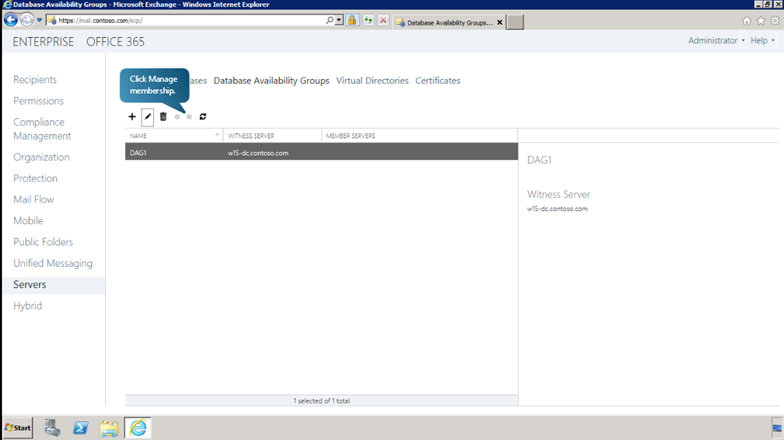
Once you click the Manage Membership button, a new pop up window opens listing the current servers in the DAG. To add a new server click on the + (Add) button, select the desired server from the newly populated list, click OK, and finally Save. Now a message will be displayed notifying that the saving has been completed successfully. Click Close.
We can add as many servers to the DAG as we desire by repeating the procedure.
Once servers are added to the DAG, we can see in the DAG window that the added servers have been listed as Member Servers.
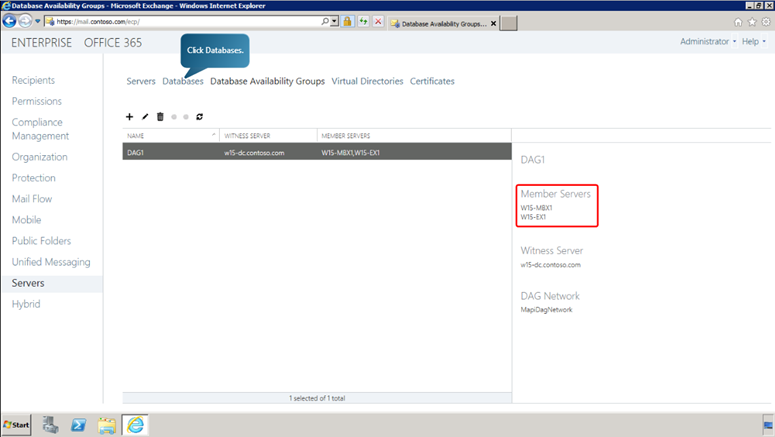
If we navigate back to the database pane, we can see that the newly added database has been listed as a part of the newly created DAG.
Now, we can add a copy of the database to another server. To do this, follow the following steps.
Click on Add database copy button.
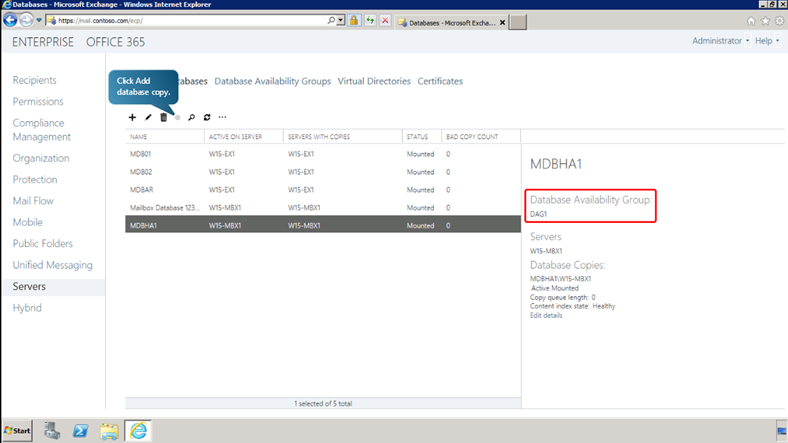
In the pop up window, specify the Mailbox Server for the copy database. Here, we can also define the activation preference number of the server.
Click Save
After the database copy has been successfully created, click Close.
We can view and edit the information about the mailbox database from the details pane by clicking on Edit Details button. We can also manage aspects of the database copy, like suspending the copy, activating the copy or removing the copy, from the details pane.
Checking the Status of the DAG in Exchange 2013
After deploying and assigning mailbox servers to a DAG, we can check the status of the DAG through Exchange Management Shell.
The following cmdlet returns the status of the DAG named DAG1.
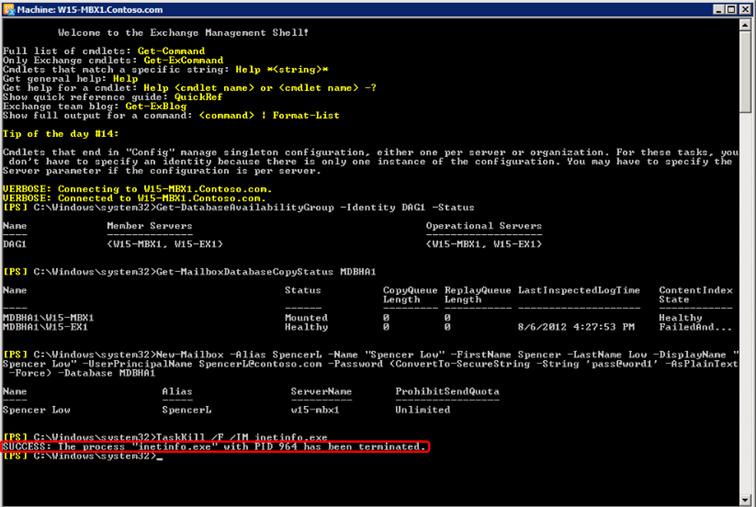
Get-DatabaseAvailabilityGroup -Identity DAG1 –Status
The following cmdlet returns the status of the database copy called MDBHA1
Get-MailboxDatabaseCopyStatus MDBHA1
We can create a new mailbox for a user in the mailbox using the following cmdlet.
New-Mailbox-Alias SpencerL -Name “Spencer Low” -Firstname Spencer -LastName Low -DisplayName “Spencer Low” -UserPrincipalName SpencerL@contoso.com -Password <ConvertTo-SercureString -String ‘password’ -AsPlainText -Force> -Database MDBHA1
Here, we have created a mailbox for user Spencer Low in the mailbox MDBHA1.
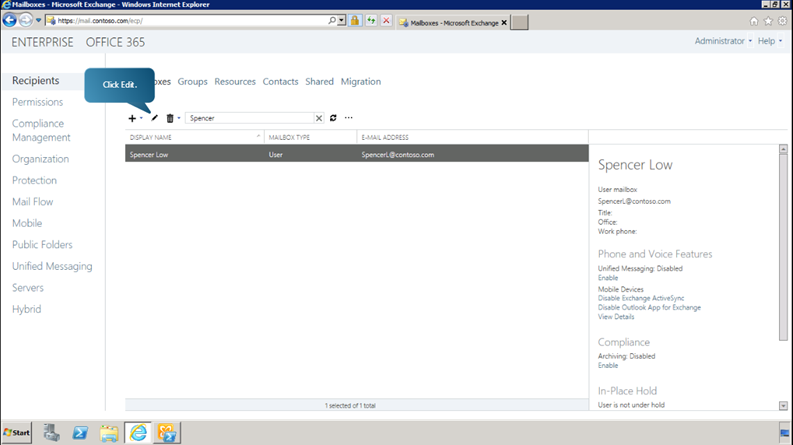
We can verify that the mailbox for Spencer Low has been created, by going back to the EAC. In the EAC navigate to Recipients and in the populated list, search for the name Spencer. We can view and edit the details of the mailbox by clicking on the edit button as shown here.
Testing Database Availability Group (DAG) Switchover and Failover in Exchange 2013
Switch Over
Now we can examine how we can test a DAG for reliability by performing Switchover and Failover tests.
Let us begin by sending a text message between two Exchange users using the Outlook WebApp.
Log in to the outlook web app as the first user (Henceforth known as Spencer Low)
Send a text message to a second user whose mailbox is located in a different mailbox database. (The second user shall henceforth be known as Alex Darrow)
Now just to verify that the message has been received, sign out of the web app and sign in as Alex Darrow.
Now return to the EAC, go to Servers and open Database tab.
Now select the required mailbox database.
Click on Activate in the details pane as shown to switch over to the database.
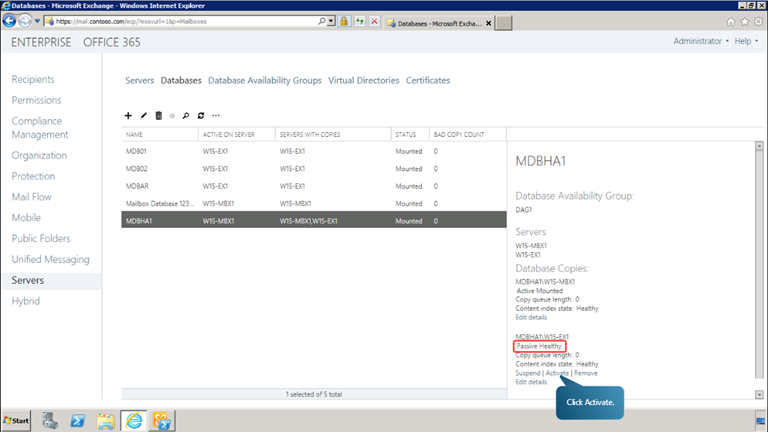
Click Yes on the warning message.
When it shows that operation is successful, click Close.
Now we have successfully completed a switch over.
Now we can return to the outlook web app to reply to the message sent to Alex as Spencer.
To verify that the replying was successful, in the outlook web app log out and log in as Spencer.
Automatic Service Recovery
Now let us find out more about automatic service recovery. Let us terminate a process and see if it is reinstated automatically by the exchange.
Open the exchange management shell
Terminate the inetinfo process using the following command
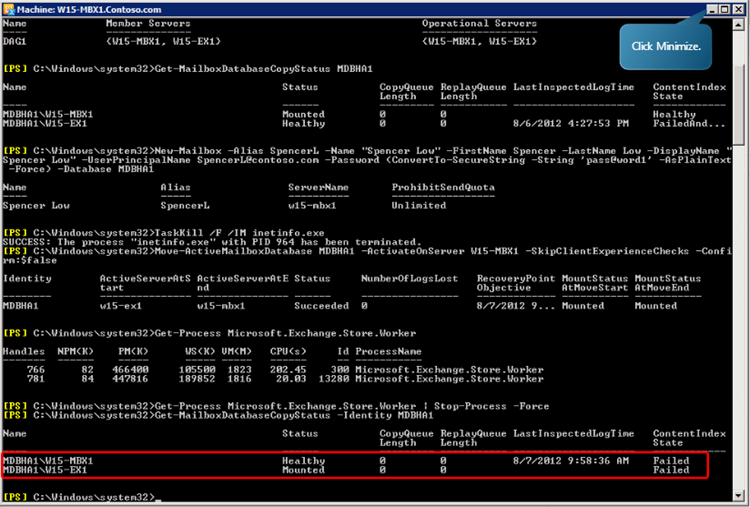
TaskKill /F /IM inetinfo.exe
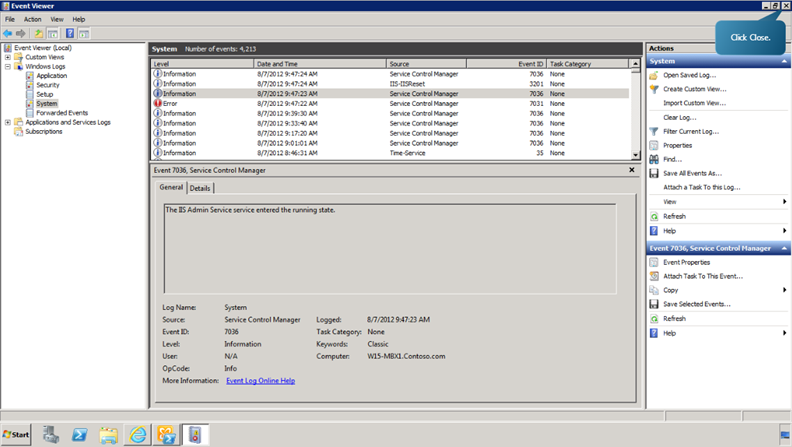
Now open event viewer from Start Menu->Administrative Tools->Event Viewer to find out how the event was handled.
Select the event logged as an Error to see more details.
Now just above the Error Log, an information log has been registered which shows that the service was reinstated into running state. This happened because the inetinfo process was being monitored by the managed availability feature in Exchange.
With managed availability, internal monitoring and recovery-oriented features are tightly integrated to help prevent failures, proactively restore services, and initiate server failovers automatically or alert administrators to take action. The focus is on monitoring and managing the end-user experience, rather than just server and component uptime, to help keep the service continuously available.
Now, we can test the DAG for a failover. The automatic activation of one or more mailboxes after a failure event is known as failover.
We begin by triggering a failover by stopping an Exchange Store Worker process.
This can be done by the following command.
Get-Process Microsoft.Exchange.Store.Worker | Stop-Process –Force
After entering the command we can check the status of the database copy of the mailbox database. This is done using the command:
Get-MailboxDatabaseCopyStatus -Identity MDBHA1
Now we can see that the failover has been successful
This can be further verified by going to the outlook web app and sending a message to Spencer as Alex. The failover will be successful if Spencer receives the message.
Ratish Nair
MVP Exchange
Team @MSexchangeGuru
Keywords: Exchange 2013 DAG, understanding DAG in exchange 2013, Exchange 2013 database availability group
")


January 23rd, 2013 at 11:44 pm
How much nics are preferred for DAG in 2013 .
April 2nd, 2013 at 2:56 pm
It is recommended that multiple nics are used in a DAG configuration. NIC 1 is then set for the MAPI session from the user to the server. Other than the NIC can be configured for replication (heartbeat). In this way, users do not suffer from a slower network by the replication process. The replication process can in many mailboxes (read: mail traffic) a lot of bandwidth.
May 17th, 2013 at 4:21 am
Thanks a lot for this useful instruction.
After I took part in a Workshop due to Microsoft Exchange Server 2013, I learned all the new features and the fact that it makes your everyday work much simpler.
And your blog is a very good source to get new information about that. So thanks again!
May 22nd, 2013 at 10:41 pm
Hi I am trying to research on exchange2013 high availability and Site Resilience.
We have 3 site .(Primary , Branch and DR site) from the link below it looks like we should be able to achieve automatic failover if I put the witness server on the third site.
my goal is put 2 Mailbox\CAS server on the primary site and 1 Mailbox\CAS at the DR site
is this configuration be possible if not what is the minimum server requirement to achieve this. We are small company I cannot justify the cost of 4 exchange server
blogs.technet.com/b/scottschnoll/archive/2012/11/01/storage-high-availability-and-site-resilience-in-exchange-server-2013-part-3.aspx
July 17th, 2013 at 5:09 pm
Why do you keep referring to the database as a mailbox? e.g. “Here, we have created a mailbox for user Spencer Low in the mailbox MDBHA1”. I think you should change “mailbox” to “database” where appropriate. It’s very confusing as it is now.
September 17th, 2013 at 2:26 pm
Hi Ratish,
have you also performed Exchange 2013 DAG Complete Site Fail-over? I Have DAG with 3 Mailbox server. 2 at primary site and 1 (lagged copy with 12 hrs delay) in DR Site. i want to perform primary site failover to DR site..and again want to activate my main Datacenter after couple of days (probably after 1 or 2 weeks)..in this situation what are the steps i have to take for Site failover..and what are the steps i have to take on both sites after i fail back my primary site as active site.
steps required for complete failover.fail back would greatly appreciated..
October 17th, 2013 at 8:09 am
Hi Ratish,
Thank you for the guide.I just have a question:
We created 2 exchange servers member of the DAG and One Witness server and everything looks OK but when the Active server is down and the Passive server Takes Over BUT the Office Outlook shows Disconnected. The Failover is not successful in the Office outlook 2010.
Hope you can help me.
October 17th, 2013 at 11:47 am
Exchange 2013/2010 ?
October 17th, 2013 at 5:23 pm
hi Ratish,
it is exchange 2013..
thanks
February 4th, 2014 at 8:20 am
[…] https://msexchangeguru.com/2013/01/17/e2013-dag/ […]
April 7th, 2014 at 2:27 am
[…] https://msexchangeguru.com/2013/01/17/e2013-dag/ […]
March 25th, 2015 at 6:20 am
Hi,
I have one customer requirement which has 3 mailbox servers and 3 hub/cas servers in 3 hyper-v host. And one archiving mailbox server for 10,000 users.
Now i want to create a new setup exchange 2013 for DC site for 20,000 users which i have prepared with 6 mailbox server and 6 hub/cas server and two archiving mail box servers with 6 hyper-v host.
Now for the created exchange 2013 new setup i want this DC new setup should be avaliable in DR site when failure happens on Dc site. Pls suggest how to do. How i should replicate all the data which is avalialbe in DC site to DR site. And pls suggest how to provide backup solution for this senerio to provide best cost effective way
March 29th, 2015 at 11:17 pm
Hi Vinod,
This is just not so easy to tell you here. We need to get inside of the configuration and what are the expectation. This means everything has to be aligned as per SLA, bandwidth, possible DR situations.
So we always recommend to contact professionals here architects@goldenfive.net