CodeTwo Exchange migration for Exchange 2003 to 2010/2013: Operational review
I’ve been using CodeTwo migration product for a while now and thought a review would be useful to the community.Scenario goes like this – Primary forest has Exchange 2007 and Target forest running Exchange 2013
First step was to ensure Impersonation rights are in place for the target forest:
http://www.codetwo.com/kb/how-to-set-impersonation-rights-manually
Download Codetwo for free: http://www.codetwo.com/exchange-migration/?sts=3160
Wizard is a next next install on the Source forest side.
Ensure you DO NOT have Outlook installed on the machine on which you are installing the tool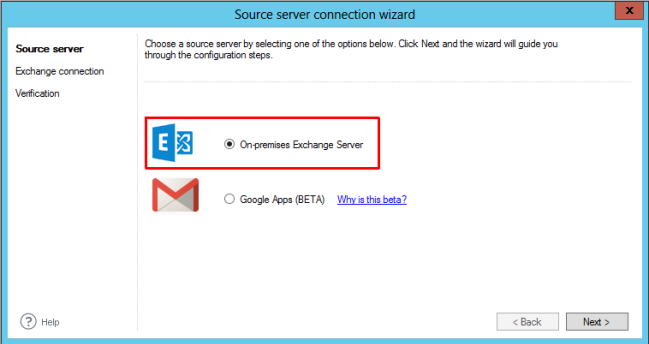
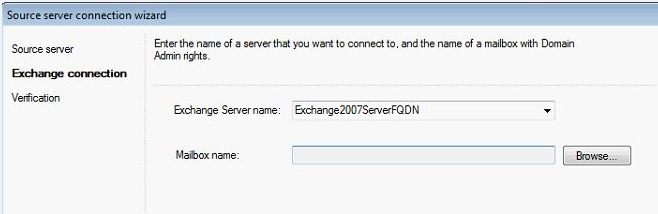
The On-premises Exchange server configuration window will display. Choose the appropriate Exchange Server name and the mailbox (source server administrator’s MAPI profile) the program will work under and hit Next.

The only thing left to do to start migrating your mailboxes is setting up the target on-premises server of your choice.
Please note that you may change the source at any time by entering the Source server settings from the program’s ribbon.
CodeTwo Exchange Migration needs a source server’s MAPI profile to work under which you create while configuring the source server’s connection. Therefore, if the profile is not configured, the program won’t work. Please note that the administrator, whose profile is used in the MAPI profile configuration, must belong to the Domain Admins group. Otherwise the program won’t work correctly.
There are three types of target On-premises Exchange servers that can be used in migration: the ones from the same domain, those from a different trusted domain and servers from a different untrusted domain. No matter which type of target server you choose you will have to define the administrator’s credentials including the UPN and corresponding password.
UPN (User Principal Name) is an Internal account name of a user in an e-mail address format.
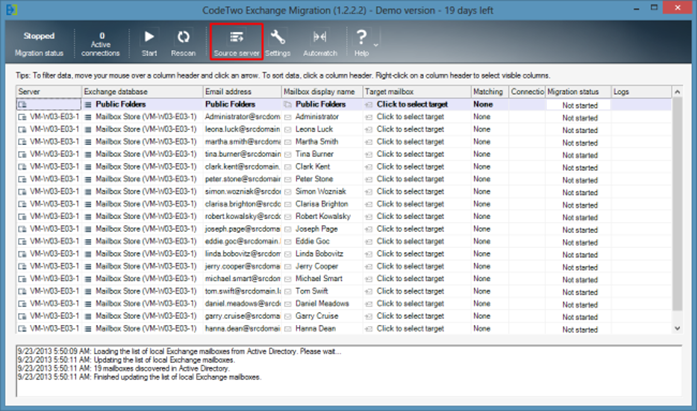
To set up a connection with the target On-premises Exchange Server, choose Click to select target under the Target mailbox section in the administration panel of the program (Fig. 1.).
 |
| Fig. 1. Opening the target server’s configuration window. |
This opens the target server connection wizard (Fig.2.).
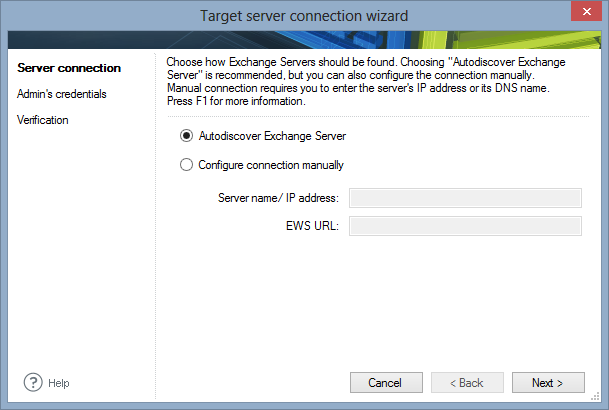 |
| Fig. 2. Target server connection wizard. |
If you want to connect to a target server from the same domain there is not much to do: the Autodiscover function will locate the server automatically.
On the other hand, if you want to set up a target server from a different domain the Autodiscover function won’t work. You need to enter the server’s location manually instead of using Autodiscover. To do that, tick Configure connection manually and enter either the full Server name or its IP address (Fig. 3.). You need not enter the EWS URL field as it will be created automatically with the given server name.
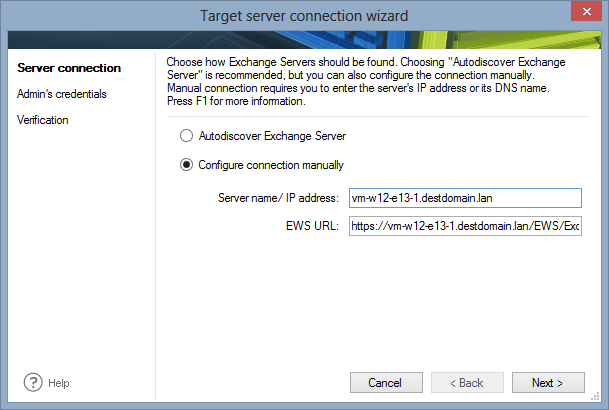 |
| Fig. 3. Manually configuring Exchange Server’s location. |
In the next window you will find the automatically added UPN, which is the administrator’s UPN of your source server. It will let you migrate mailboxes and public folders within your own domain. To enter the target server administrator’s UPN e-mail address from outside your domain, enter it manually or automatically via the Browse button (Fig. 4.).
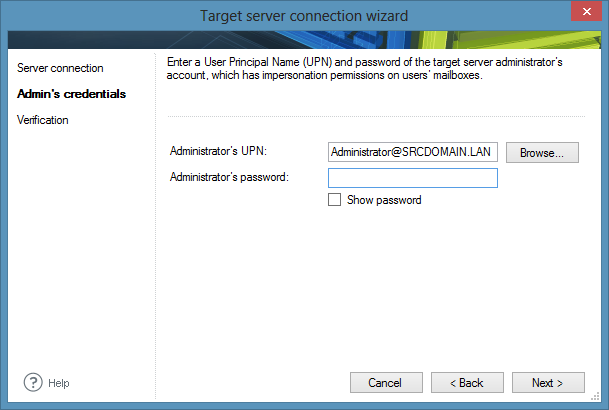 |
| Fig. 4. Choosing the administrator’s UPN. |
Once you choose the Browse button, you will be able to pull out the appropriate UPN from Active Directory. Furthermore, by clickingLocations … you can determine the domain from which the target on-premises server administrators’ UPN will be taken (Fig. 5.).
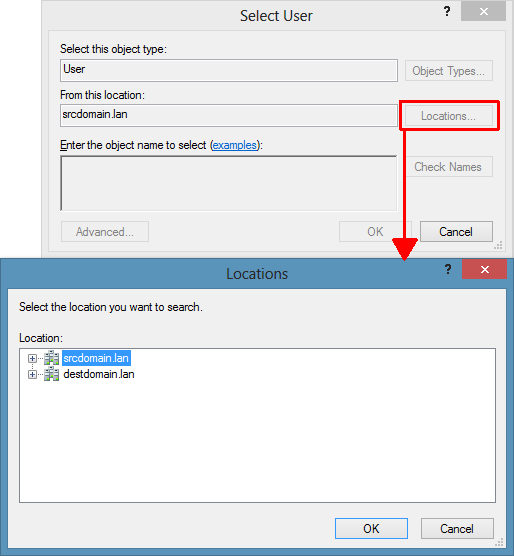 |
| Fig. 5. Selecting the administrator’s UPN from Active Directory. |
Please note that the Browse button can ONLY be used to list the UPN’s of administrators from the same domain or different TRUSTED domains. This option is UNAVAILABLE with the untrusted domains. Therefore if you want to select UPN from an untrusted domain you will have to type it manually.
After choosing the desirable domain enter your administrator’s name and click Check name – your user will be listed automatically. Click OKand the administrator UPN will be listed in the field provided (Fig. 6.).
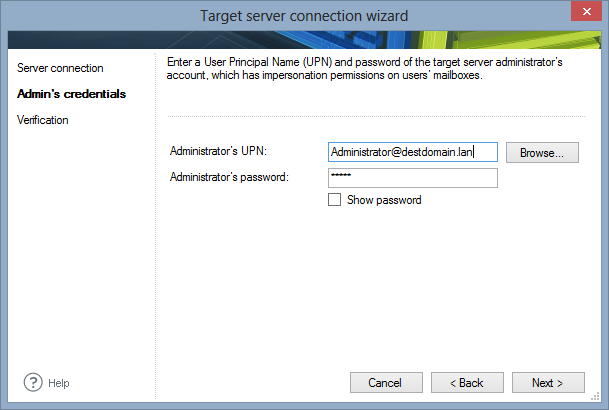 |
| Fig. 6. The administrator’s UPN entered in the target server’s access configuration window. |
Then, enter the password and click the Next button.
The window that shows up is the verification stage of the target server connection wizard. When the Verify button is clicked, it checks the server connectivity, the impersonation rights assignment status and the connection to the target Powershell console (Fig.7.).
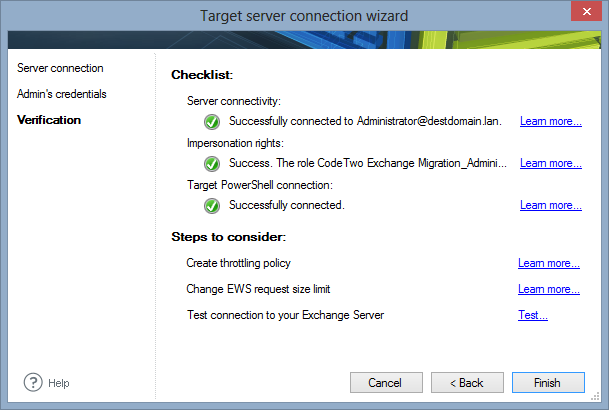 |
| Fig. 7. Verification stage of the target server connection wizard. |
Additionally this step offers a couple of other configuration hints, e.g. about creating new throttling policy with higher throughput or changing the EWS request size limit. Lastly you can check administrator’s impersonation rights against the selected user mailbox on the target server – simply click blue Test link to open the mailbox selection window (Fig.8.). Then just select target mailbox by clicking Browse button and clickTest to perform the check.
 |
| Fig. 8. Impersonation rights test window. |
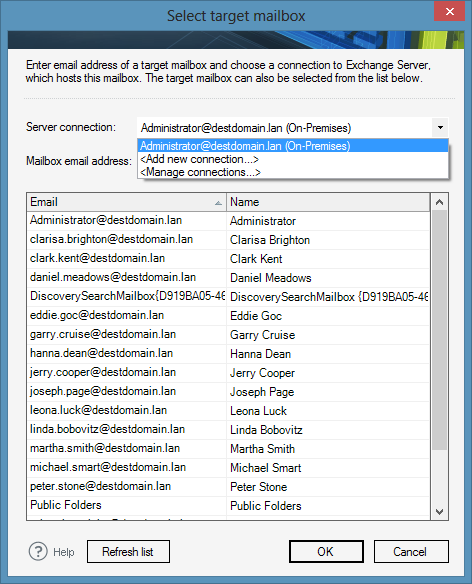
Finally, after confirming your target server’s settings by clicking Finish in the verification step of the connecton wizard you will be able to select the target mailbox to which the source mailbox will be migrated. In the Select target mailbox window choose the newly created server connection (it is shown as the target server administrator’s e-mail address) and pick one of the target mailboxes automatically listed in the field provided (Fig. 9.). Then confirm your choice by clicking OK.
 |
| Fig. 9. Choosing the target mailbox. |
If the desirable mailbox seems to be not listed, use the Refresh list button at the bottom to refresh the list of available target mailboxes.
Lastly start the migration by using the Start button located in the Administration Panel’s menu (Fig. 10.).
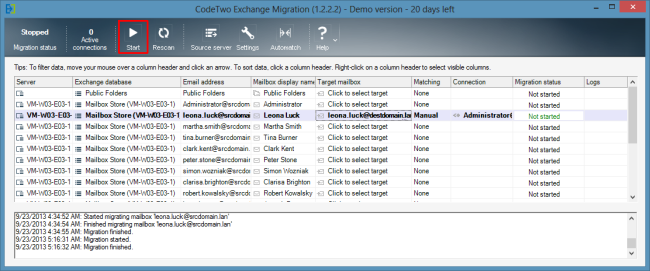 |
| Fig. 10. Starting the migration process. |
You may restart the migration process at any point by clicking the Rescan button located in the menu of the Administration Panel (Fig. 11.).
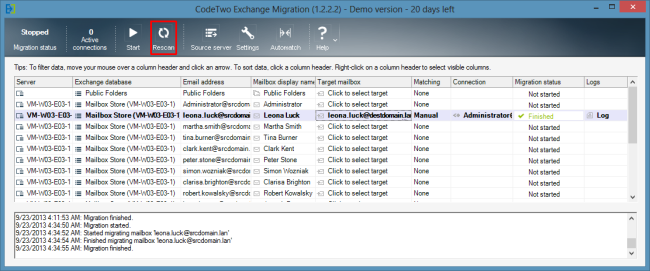 |
| Fig. 11. Restarting the migration process. |
And that’s all – the selected mailbox has been migrated. Managing the already existing target connections and mailboxes
It may happen that you want to manage the already configured target server connection (remove, change settings or establish new). In such case click on the configured target mailbox in the Administration Panel and the following dropdown menu will display (Fig. 12.):
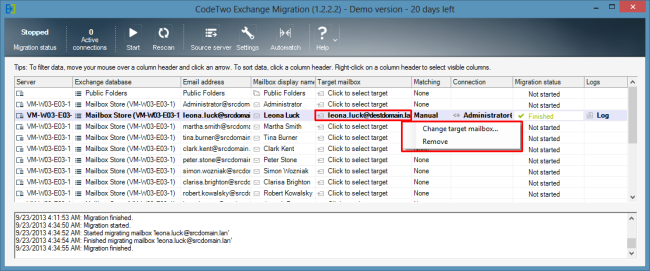 |
| Fig. 12. Managing the already existing target mailbox. |
There are two available options to choose from:
- If you click Change target mailbox… and expand the dropdown menu (Fig. 13.), you will be able to manage the already existing target server connection (Fig. 14.) and add new target server connection (Fig. 15.)
 |
| Fig. 13. Change target mailbox… options. |
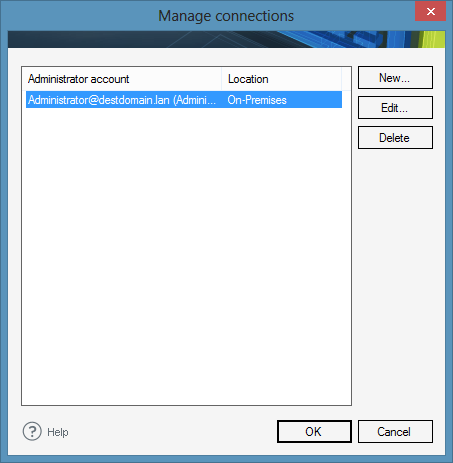 |
| Fig. 14. Manage connections window. |
 |
| Fig. 15. Adding new connection. |
If you select Change target mailbox… after it was migrated the following window will open (Fig. 16.):
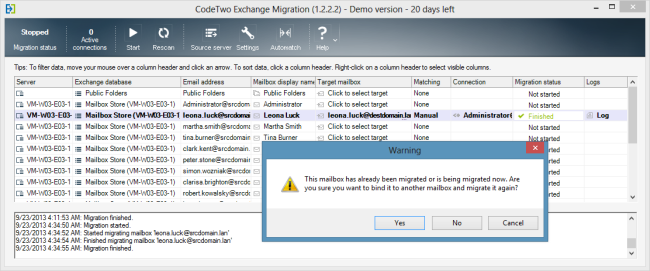 |
| Fig. 16. Notification after choosing Change target mailbox… |
Remove – this option will remove /unbind the source mailbox from the target mailbox (Fig. 17.)
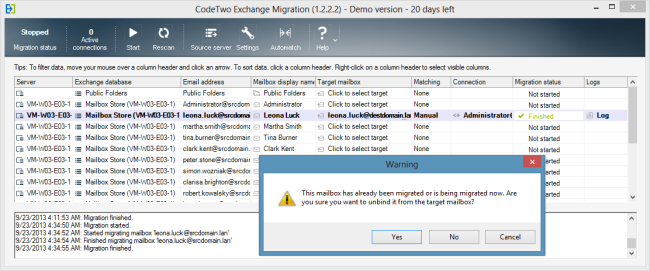 .
.
Fig. 17. Unbinding the source mailbox from the target mailbox.
The migration status may be checked not only in the Migration status area located next to the chosen pair of mailboxes but also in the field below the list of all mailboxes (Fig. 18.). Furthermore, if any errors or warnings appear in the Migration status areas you may check their details in the Log files.
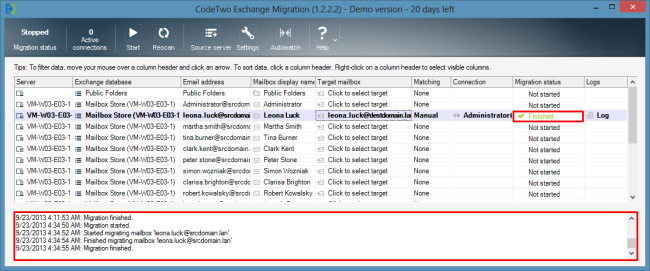
Fig. 18. Checking the migration status.
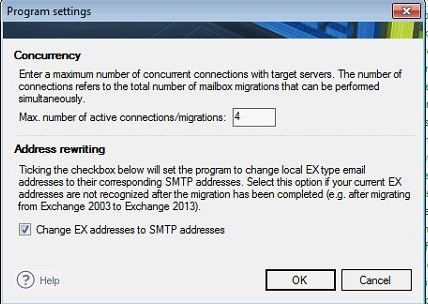
Change the number of mailboxes to be migrated at once.
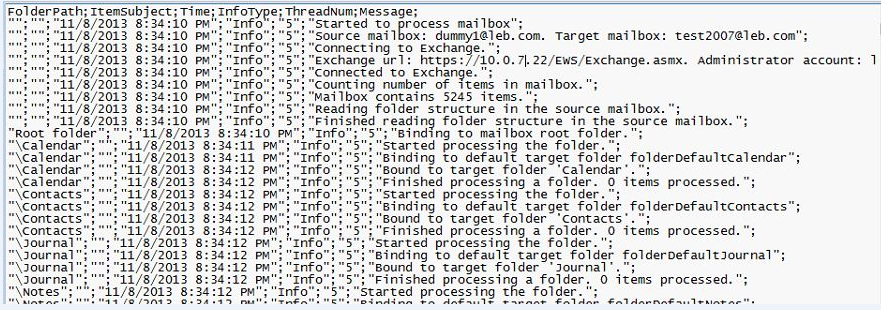
A very comprehensive log is available to review in the event you want to troubleshoot.
Download Codetwo for free: http://www.codetwo.com/exchange-migration/?sts=3160
Ratish Nair
Microsoft MVP | Exchange Server
Team @MSExchangeGuru
")


December 2nd, 2013 at 7:01 am
[…] CodeTwo Exchange migration for Exchange 2003 to 2010/2013: Operational review […]
December 3rd, 2013 at 1:53 pm
[…] Migration for Exchange 2003 to 2010/2013: Operational review“ kann man in voller Länge auf MSExchangeGuru.com […]
December 9th, 2013 at 3:15 am
[…] Gegensatz zu dem Artikel auf MSExchangeGuru beginnt Bruzzeses Review mit einem ausführlichen Kommentar zu dem auslaufenden Support für […]
December 9th, 2013 at 8:54 am
[…] CodeTwo Exchange migration for Exchange 2003 to 2010/2013: Operational review: https://msexchangeguru.com/2013/11/24/codetwo-exchange-migration/ […]
December 9th, 2013 at 8:57 am
[…] Read the full review on MSExchangeGuru.com […]
September 8th, 2014 at 3:41 am
[…] MSExchangeGuru.com: CodeTwo Exchange migration for Exchange 2003 to 2010/2013 operational review Learn more about migrating from Exchange 2003 to Exchange 2013 with CodeTwo Exchange Migration […]