Address Book Policies in Exchange Server
Address book policy is a feature which is first introduced in Exchange Server 2010 Service Pack 2.
Address Book Policy feature allows an Exchange administrator to segment their global address list for their users as per the requirement. Precious versions of Exchange servers had a feature called ‘Global address list segregation’ which is implemented by setting up custom permissions on Active Directory and permits administrators to segment their global address list to provide different groups of users with specified views of other users in the organization. Even though well-documented, configuration of GAL segregation was not an easy task.
Address book policies (ABPs) are comparatively easy to implement, but they are not suitable for all organizations. Below are the few examples where the Address book policies (ABPs) can be considered:
Companies with multiple Units:
If an organization has multiple Units which operate individually, one unit may have no purpose to contract with another on a day-to-day basis, in such cases having one huge global address list (GAL) may confuse the end users. Here Administrators can create Address book policies (ABPs) for each division, with the corporate group preserving full visibility over the entire company
Colleges, universities and school regions:
Though educational institutions often have thousands of mailboxes, it’s common that they have multiple units that operate individually.
Multi-tenant environments:
Address book policies also make a lot of sense for multi-tenant environments.
Let us see how to implement the Address book policies (ABPs):
Define the Requirement:
Firstly we need to define our requirement to implement the Address book policies (ABPs). In our example I have taken MSExchangeGuru as a parent group and IT and Non-IT are two departments under this.
Employees from MSExchangeGuru should be able to see all employees including the employees from different departments in a GAL. But IT and Non-IT department Employees can see only the employees from their respective departments.
Here we are using Exchange CustomAttribute2 as a filter to determine who should be listed in each GAL. CustomAttribute2 will be used to store the department name, and then create two address book policies for each department. This allows MSExchangeGuru (Parent Group) employees to remain with the visibility over the existing default global address policy.
Implementing Exchange address book policies:
Implementing ABPs is a straightforward process and it includes the below steps:
-
Set the custom attribute for the users within the different department.
-
Create two new GALs for both Departments.
-
Create new address lists for both Departments.
-
Create new offline address books (OABs) for both Departments.
-
Create two new address book policies referencing the above GALs, address lists and OABs.
-
Assign the address book policies to users in each Departments
NOTE: Process of Implementing Exchange address book policies is accomplished through PowerShell.
Set Custom Attribute on users to the key attribute to filter:
In our case the accounts for IT and Non-IT employees are created under their own organizational units within Active Directory, this makes simple to find the users within each department.
Use the below command to set the custom attribute:
Get-Mailbox -OrganizationalUnit <OU Name> | Set-Mailbox –CustomAttribute2 <Name of the department>

Use the below command to set custom attribute For MailUsers and distribution groups if any (in my case no DLs and contacts):
Get-MailUser -OrganizationalUnit <OU Name> | Set-MailUser –CustomAttribute2 <Name of the department>
Get-DistributionGroup -OrganizationalUnit <OU Name> | Set-DistributionGroup –CustomAttribute2 <Name of the department>
Create new GALs for each Department, referencing the CustomAttribute and its value:
Use the below command to create new GAL:
New-GlobalAddressList “<Name of Global Address List>” -RecipientFilter {(CustomAttribute2 -eq “<Name of the department>”)} | Update-GlobalAddressList

Create the base address lists. These are the standard “Folders” within the GAL that end users use to view lists of mailboxes, distribution groups, contacts and room mailboxes:
Use the below command to create new Address list:
New-AddressList “<AddressList Name>” -RecipientFilter {((CustomAttribute2 -eq “<Name of the department>”) -and (RecipientType -eq ‘UserMailbox’))} | Update-AddressList
New-AddressList “<AddressList Name for DLs>” -RecipientFilter {((CustomAttribute2 -eq “<Name of the department>”) -and (RecipientType -eq ‘MailUniversalDistributionGroup’ -or RecipientType -eq ‘MailUniversalSecurityGroup’ -or RecipientType -eq ‘MailNonUniversalGroup’ -or RecipientType -eq ‘DynamicDistributionGroup’))} | Update-AddressList
New-AddressList “<AddressList Name for contacts>” -RecipientFilter {((CustomAttribute2 -eq “<Name of the department>”) -and (RecipientType -eq ‘MailContact’))} | Update-AddressList
New-AddressList “<AddressList Name for Room list>” -RecipientFilter {((CustomAttribute2 -eq “<Name of the department>”) -and (Alias -ne $null) -and ((RecipientDisplayType -eq ‘ConferenceRoomMailbox’) -or (RecipientDisplayType -eq ‘SyncedConferenceRoomMailbox’)))} | Update-AddressList


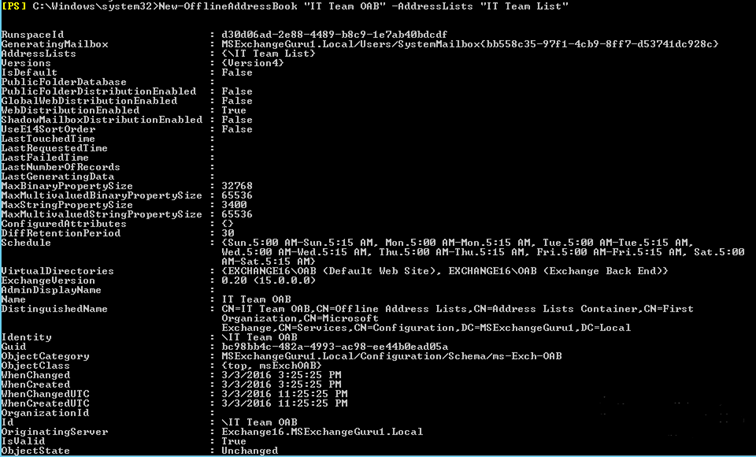
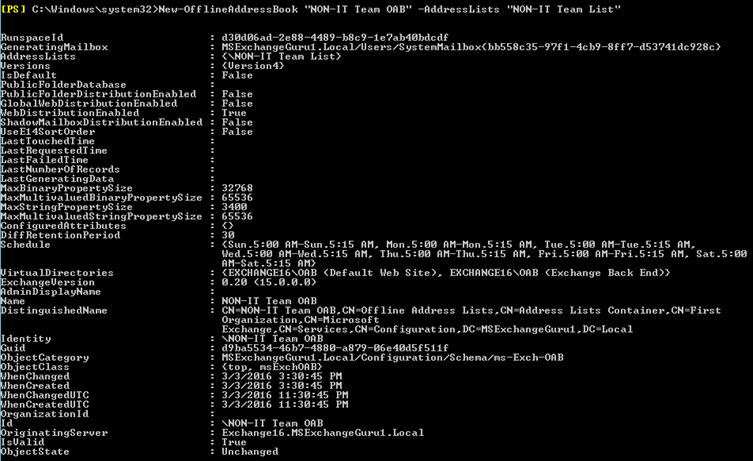
Create new offline address books (OABs) for both Departments:
Use the below command to create new OAB:
New-OfflineAddressBook “<Offline Address Book Name>” -AddressLists “<Name of Global Address List>”
Create new address book policies:
Now that we have
our GALs, address lists and OABs ready, we can create new address book policy, use the below command to create Address Book Policy:
New-AddressBookPolicy -Name “<Address Book Policy Name” -AddressLists (Get-AddressList <name>*) -OfflineAddressBook “< Offline Address Book Name>” -GlobalAddressList “<Global Address List Name” -RoomList “<Room list name>”
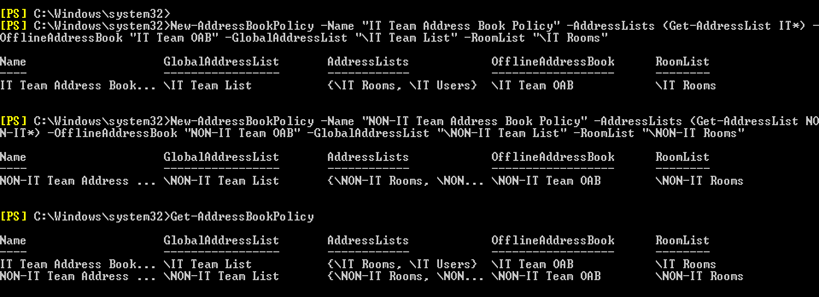
Assign the address book policies to users in each Department:
Now we have completed the creation of Address Book policies and we can find them as below:

Though users are listed on the GAL which contained within an ABP, still users cannot able to access/see it. In order to enable the correct GAL for the users, we need to assign each user to the correct ABP.
We can use the CustomAttribute filter we used earlier to search for mailboxes using the Get-Mailbox cmdlet and pipe the results to the Set-Mailbox cmdlet:
Get-Mailbox -Filter {(CustomAttribute2 -eq “<Attribute name>”)} | Set-Mailbox -AddressBookPolicy “<Address Book Policy name>”

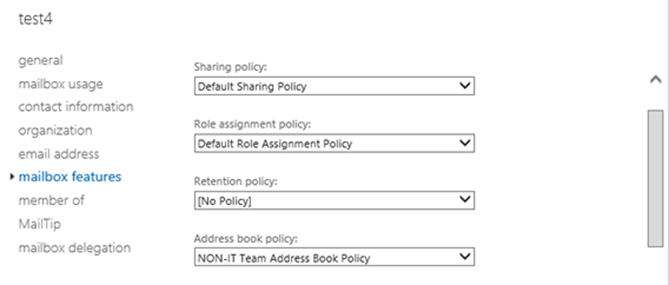
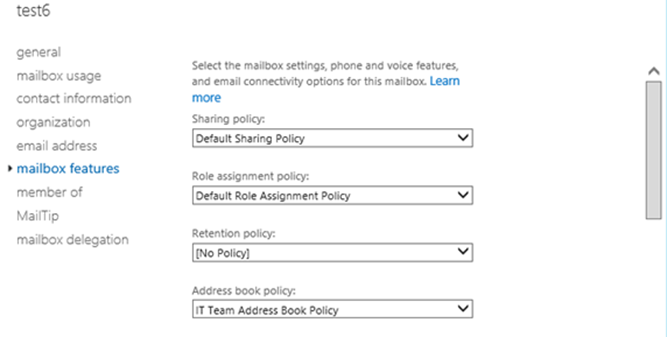
Once the policy is assigned, we can find the same under user properties as below:
User from NON-IT Department:
User from IT Department:
NOTE: If any new users created within a department, we must complete the below steps:
-
Assign the address book policy to the new user.
-
Add the correct division name to CustomAttribute2 on the new user.
Ratish Nair
Microsoft MVP | Exchange Server
Team @MSExchangeGuru
")


November 7th, 2016 at 7:49 am
Hi,
Thanks for the article. I manage to get hosted exchange working but stuck with distribution groups. I am creating the distribution group and placing it in right Tenant’s OU but its not shwoing to end users when they login to outlook….
Any help would be highly appreciated .
Regards,
Vikram
November 16th, 2016 at 2:24 pm
check the query.