Exchange 2013/2016: Ease of Database Portability
Database Portability was introduced in Exchange 2010. It was a great innovation from Microsoft for Disasters or for the situation where your back up take much time and you decide to reduce the load on one server which will reduce the backup time of that server.
We wrote about the use of Database portability in a Disaster Recovery scenario here. https://msexchangeguru.com/2013/04/15/e2010-database-portability/
Now we are going to talk about Database Portability in case of reducing the load from one server. We wanted to add a new server to reduce the load on server1 to finish his backup faster.
We should follow the below mentioned steps to do the database portability
Step 1. OS and Exchange:
Deploy same Exchange server version and Same CU.
Step 2. Planning:
-
Decide the Directory location in the new serv.
Database location E:\exchange\databases\DBName\DBNAme.edb
Log Files location L:\exchange\tlogs\DBName
-
Collect the LogFilePrefix which is msExchESEParamBaseName AD attribute
Important- If you just copy the database and mount it then previous backup can’t replay the log files. So if you want to continue the log sequence then we need to give same LogFilePrefix to the new database
- Take the database Backup
- Declare 1-hour outage.
Step 3. New Database creation:
Run the below mentioned cmdlet:
New-MailboxDatabase -Name DatabaseName -Server DestinationServerName -EDBFilePath E:\exchange\databases\DBNAMEFolder\DBNAme.edb -LogFolderPath L:\exchange\tlogs\DBNAMEfolder
Step 4: Restart Information store
Restart the Information Store service in the new server.
Step 5: Enable Database restore.
Set-MailboxDatabase Databasename -AllowFileRestore $true
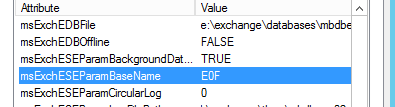
Step 6: Update msExchESEParamBaseName value

- Open Configuration partition in Adsiedit.msc
- Expand to CN=Configuration,DC=DOMAIN,DC=LOCAL > CN=Services > CN=Microsoft Exchange > CN=EXCHANGE_ORG > CN=Administrative Groups > CN=Exchange Administrative Group (FYDIBOHF23SPDLT) >CN=Databases
- Go to the properties of old database and look for msExchESEParamBaseName value. It must be 3 character starting with Exx. Copy this.
- Go to the properties of new database and look for msExchESEParamBaseName value. Change it to same value as Old Database. If you had coped earlier then paste here. Click ok and close Adsiedit.msc
Step 7. Dismount the OLD Database. This time user will be disconnected from the server.
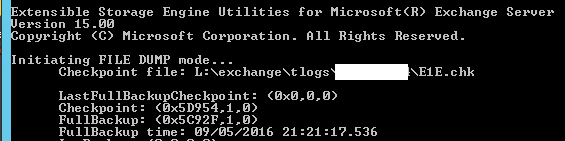
Step 8. Verification of Database, Log and Checkpoint file.
-
Run the following cmdlet on the dismounted database to check if it is a clean shut
eseutil.exe /mh “E:\exchange\databases\DBFolde\DBName.edb”

-
Run the following cmdlet on the dismounted database’s checkpoint file to check the last log
eseutil.exe /mk “L:\exchange\tlogs\CheckpointFilePath\Checkpointfilename.chk”
Check the Checkpoint – 0x5D954
-
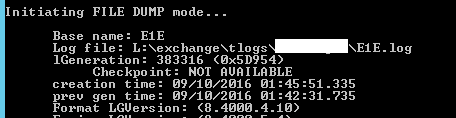
Run the following cmdlet against the dismounted database’s last log file (file will be only 3 letters and numbers starting with Exx, xx can be anything from 0-9 of A-F) to check the last log file name. This will tell us if it is the same which committed to the DB last Log which is in the Checkpoint file in the previous step.
eseutil.exe /ml “L:\exchange\tlogs\LogFilePath\LastLogFileName.log”
Check the LGeneration 0x5D954
Step 9. Copy the database to the new location
Step 10. Copy the last Exx.log and Exx.chk file to the new location
Step 11. While Database copy is going on, update the following database properties
- Set the limits tab same as the source database for mailbox size and retention.
- Set the Offline Address Book same as source database
- Set the Journaling mailbox same as Source Database.
Step 12. Rename the Copied Database to the name of the created database which we have configured earlier.
Step 13. Mount the Database on the new server:
Run the below mentioned cmdlet
Mount-Database Databasename
Step 14. Change the Mailbox’s Database property which is homeMDB and HomeServer by running the following cmdlet
Get-Mailbox -Database <SourceDatabase> |where {$_.ObjectClass -NotMatch ‘(SystemAttendantMailbox|ExOleDbSystemMailbox)’}| Set-Mailbox -Database <TargetDatabase> -Confirm:$False
Step 15. Recycle the following App Pools in the IIS Manager
- Open IIS Manager
- Expand it and select Application Pools
-
Then Recycle the following AppPools
MSExchangeAutodiscoverAppPool
MSEXChangeOWAAppPool
- Do the same in all frontend and backend servers.
Step 16. Now, do the AD replication to all domain controllers from AD sites and Services
Step 17. Delete the dismounted old database from EAC.
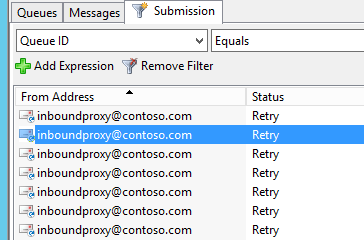
Step 18. Delete the health mailbox emails from the queue which will look like the screen.
Step 19. Run the following command to check the mail queue
Get-queue
Step 20. Run the following command to resubmit the emails for delivery
Get-Queue <QueueName> | Retry-Queue -Resubmit $true
Step 21. Delete health check monitoring mailboxes of those databases.
Step 22. Backup the old logs and database then delete them from the old server.
Here is the TechNet Reference: https://technet.microsoft.com/en-us/library/dd876926(v=exchg.150).aspx
Microsoft MVP | Office Servers and Services
Team@MSExchangeGuru
")

