Office 365 DirSync Filtering
How many of you knew that we never had an option to partially sync your AD infrastructure to the Microsoft cloud using DirSync tool? Until now, one of the problems of DirSync was that it would sync your entire AD to Office 365. This means that if you had 10,000 AD users and only wanted 500 in Office 365, you would have all 10,000 users listed in Office 365… There were a couple of methods of excluding certain objects, but none supported by Microsoft. With the latest release it is now possible to set a filter and sync your Active Directory using Microsoft Directory synchronization tool.
Introduction
If you subscribe to Microsoft Office 365 (with the exception of the Small Business Plan) and your company already has users in a local Active Directory [AD] environment, you can use the Microsoft Online Services Directory Synchronization [DirSync] tool to synchronize those users to your Office 365 directory.
By using DirSync, you can keep your local AD in constant synchronization with Office 365 so that any changes made to users such as contact updates for example, are propagated to Office 365.
This allows you not only to create synchronized versions of each user account and group, but also allows Global Address List [GAL] synchronization from your local Exchange environment to Exchange Online.
Synchronization
Until now, one of the problems of DirSync was that it would sync your entire AD to Office 365. This means that if you had 10,000 AD users and only wanted 500 in Office 365, you would have all 10,000 users listed in Office 365… There were a couple of methods of excluding certain objects, but none supported by Microsoft.
DirSync Filtering has been possible for early Office 365 for Education customers but now it is available to all customers, allowing you to easily exclude Organizational Units [OUs], for example, from being synchronized. Let’s have a look.
DirSync is simply a pre-configured Microsoft Identity Integration Server [MIIS] installation specific for Office 365 integration. What some administrators don’t know is that MIIS can be customized by using the MIIS Client located at:
-
32-bit: %SystemDrive%\Program Files\Microsoft Online Directory Sync\SYNCBUS\UIShell
-
64-bit: %SystemDrive%\Program Files\Microsoft Online Directory Sync\SYNCBUS\Synchronization Service\UIShell
WARNING: Before we proceed, please be very careful when using MIIS Client as it can cause harm to your office 365 environment if not used properly!
Filtering
At the time of writing of this post, there are 3 filtering options that can be applied to DirSync:
-
Organizational Units based, which allows you to select which OUs are to be synced to the cloud;
-
Domain based, allowing you to select which domains are synchronized to the cloud;
-
User attribute based, enabling you to control which objects shouldn’t be synchronized to the cloud based on their AD attributes.
NOTE: If you have already run DirSync and synced all your AD into Office 365, the objects that you now filter will no longer be synchronized and will be deleted from the cloud! If you excluded, and subsequently deleted objects because of a filtering error, you can easily re-create them in the cloud by removing the filter and then syncing the directories again.
Organizational Units Based Filtering
-
Log on to the computer that is running DirSync by using an account that is a member of the MIISAdmins local group;
-
Open MIIS by running miisclient.exe;
-
In Synchronization Service Manager, click Management Agents and then double-click SourceAD;

-
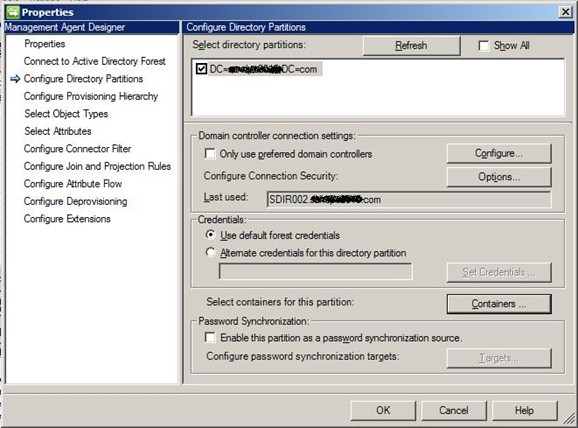
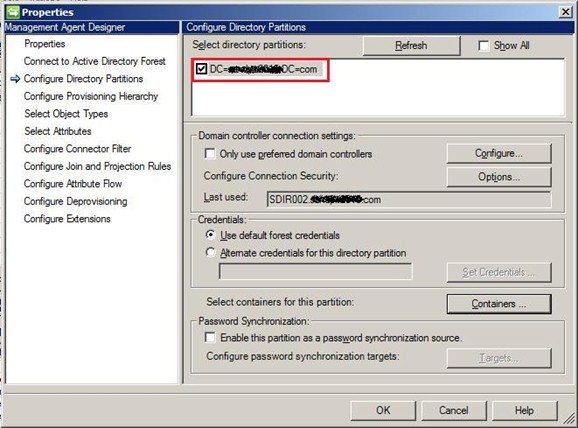
Click Configure Directory Partitions and then click Containers;
-
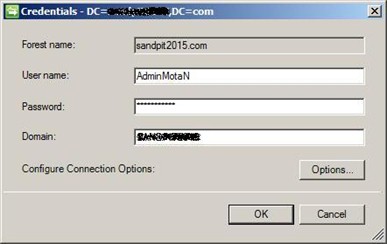
When prompted, enter domain credentials for your on-premises domain and then click OK;
-
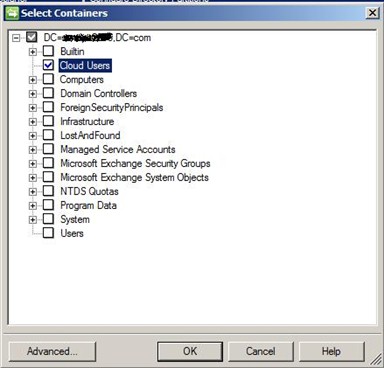
In the Select Containers dialog box, clear the OUs that you don’t want to sync;
-
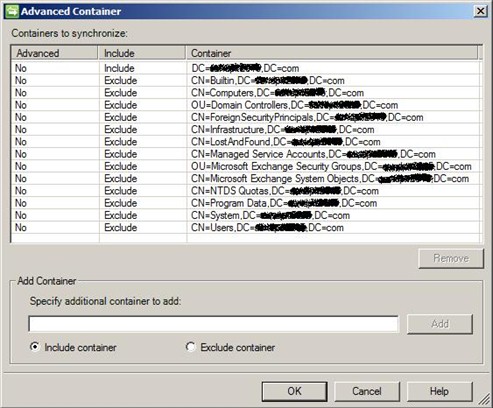
If you click in Advanced… you will be able to further control which OUs to include and exclude;
-
Click OK three times;
-
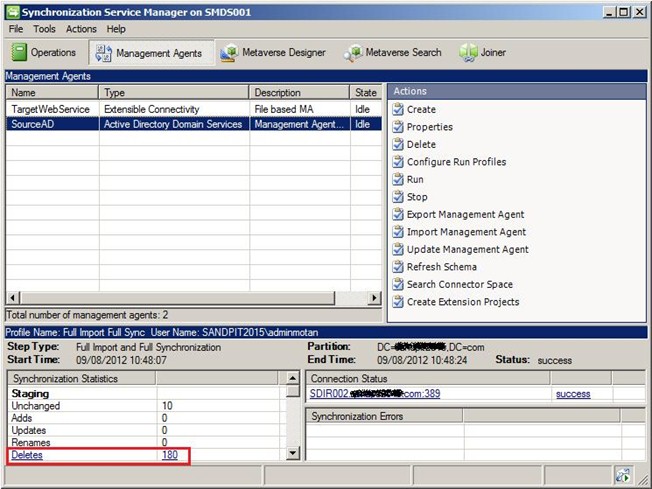
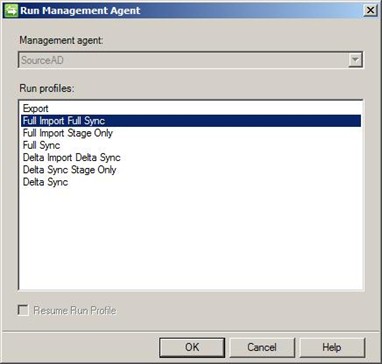
On the Management Agent tab, right-click SourceAD, click Run, click Full Import Full Sync and then click OK to perform a full sync;

-
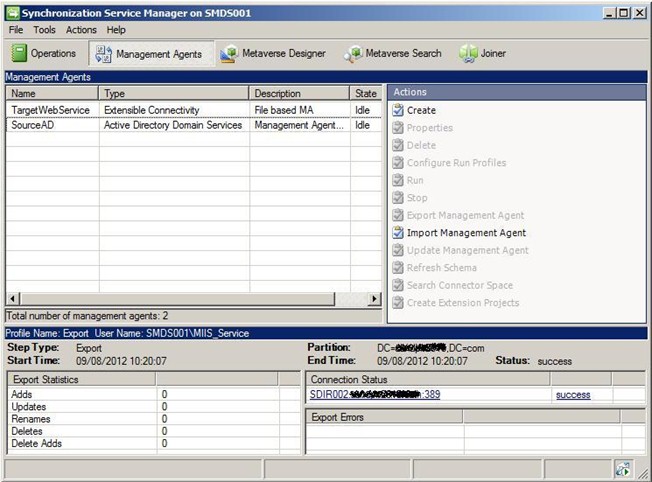
Once finished, you can check the results at the bottom left corner of the window.
Domain Based Filtering
-
Log on to the computer that is running DirSync by using an account that is a member of the MIISAdmins local group;
-
Open MIIS by running miisclient.exe;
-
In Synchronization Service Manager, click Management Agents and then double-click SourceAD;

-
Click Configure Directory Partitions and then select the domains that you want to synchronize. Because in my environment there is only one domain, I only get one domain listed. To exclude a domain simply clear its check box;
-
Click OK;
-
On the Management Agent tab, right-click SourceAD, click Run, click Full Import Full Sync and then click OK to perform a full sync;
-
Once finished, you can check the results at the bottom left corner of the window.
User Attribute Based Filtering
As the name suggests, this third option can only be applied to user objects. It is possible to filter contacts and groups, but these use other and more complex filtering rules.
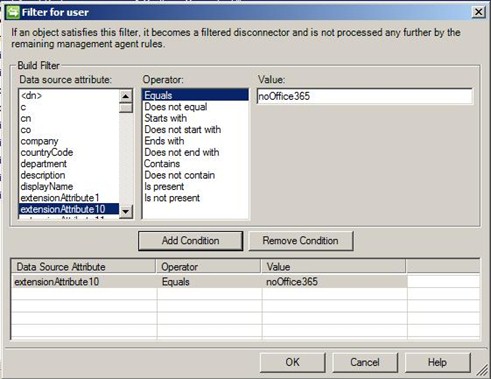
To exclude users from filtering, we can utilize around 114 AD attributes. For example, you can set extensionAttribute10 to “noOffice365” for all the users you don’t want to sync and then create a filter rule to exclude these from synchronization. After you configure in AD the attribute you want to look, here’s how you configure MIIS:
-
Log on to the computer that is running DirSync by using an account that is a member of the MIISAdmins local group;
-
Open MIIS by running miisclient.exe;
-
In Synchronization Service Manager, click Management Agents and then double-click SourceAD;
-
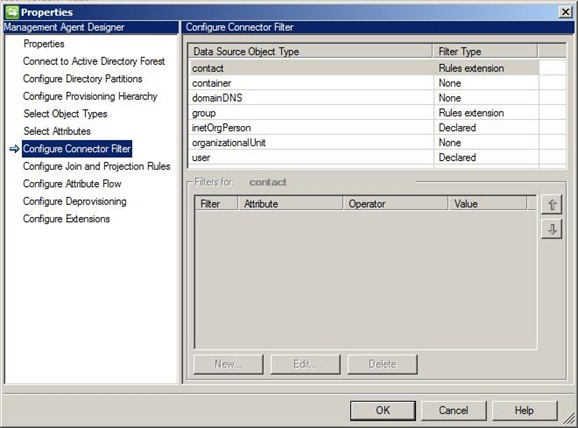
Click Configure Connector Filter;
-
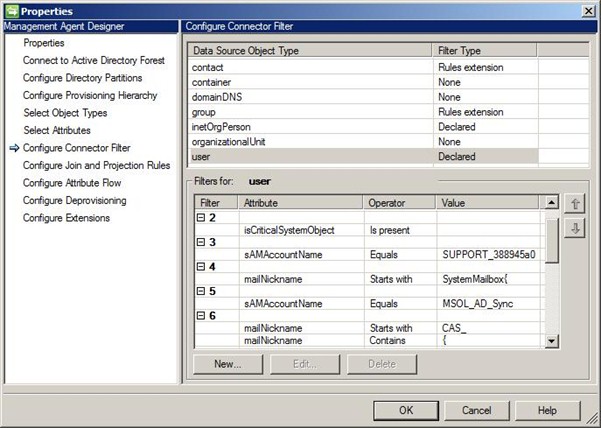
Select user in the Data Source Object Type column. In here you can see some examples of accounts being excluded already such as Exchange System mailboxes or the MSOL_AD_Sync account used by DirSync;
-
Click New;
-
In Filter for user, on the Data Source attribute, select extensionAttribute10. For Operator select Equals and then type noOffice365in the Value field. Click Add Condition and then click OK;
-
Click OK again;
-
On the Management Agent tab, right-click SourceAD, click Run, click Full Import Full Sync and then click OK to perform a full sync;

-
Once finished, you can check the results at the bottom left corner of the window.
Nuno Mota
Microsoft MVP – Exchange server
Team @MSExchangeGuru
keywords: using Office 365 dirsync tool, office 365 dirsync tool, dirsync tool
")


August 11th, 2012 at 10:54 pm
Excellent & Thanks you…
August 13th, 2012 at 2:25 pm
Thank you Shyam! Hope it is useful!
August 15th, 2012 at 4:25 pm
Good article…
August 22nd, 2012 at 4:28 pm
Thanks Chandra!
August 28th, 2012 at 9:44 am
Excellent article Nuno! Was searching for the OU based sync but didnt get anything good. This explains everything step by step!!
October 19th, 2012 at 5:22 am
Thank you. This helped
October 26th, 2012 at 4:01 am
“”any changes made to users such as passwords or contact updates for example, are propagated to Office 365″”…You mean the possibility to sync passwords exists in DirSync?..Bit confused..please clarify
October 29th, 2012 at 9:08 am
Hi Radhakanth,
My sincere apologies for this, that phrase is wrong… Passwords are NOT sync’ed to Office 365 through DirSync!
I will get this changed as soon as possible.
Regards, Nuno
November 6th, 2012 at 4:03 pm
We’ve had our dirsync server set up before Microsoft officially supported choosing which directory partitions you want synced. Does the decision to support it come with a dirsync tool update or can we simply configure the management agent as shown above with our current version?
March 15th, 2013 at 7:32 pm
Hello, Thank you for the pos.
Can you help Me?
Currently licensed users have accounts in Office 365 Exchange, these users were created manually and not synchronized with Dirsync, we need to activate the synchronization service but I am looking for information on whether you can make a Merge or unification between the object created locally in AD and the user of the cloud?
Thanks for your time.
Regards.
March 19th, 2013 at 9:31 am
good article.. just running a full sync with the steps suggested here
April 17th, 2013 at 5:15 am
Domain filtering doesn’t work that way. All you get is failed sync with “missing-partition-for-run-step” error in log.
Tried on several tenants/forests…
Only suggestion is create empty OUs in domains you don’t want to sync and select only those in container-based filter.
April 24th, 2013 at 3:11 pm
Very useful. Thank you for taking the time to publish this and do screen shots. The original “unsupported” solution was to use permissions to exclude the dirsync (FIM) service account from specific OUs, but this is a big step forward.
I hope you will also address password management (reset) and DL management in FIM. Looking forward to your next post.
Matt
May 1st, 2013 at 6:17 am
[…] colleague Mark Blok pointed me to an interesting blog post from MSExchangeGuru.com how to configure select Active Directory synchronization for Office 365. Until now, one of the […]
June 27th, 2013 at 5:50 am
Now that Miisclient has moved to C:\Program Files\Windows Azure Active Directory Sync\SYNCBUS\Synchronization Service\UIShell it no longer seems to work. It says ‘unable to connect to the synchronisation service’. I used to use this with ILM for Live@Edu sync but have replaced it with the latest version for Office 365. However, I would like to setup the filtering again.
July 29th, 2013 at 5:26 am
The password SYNC feature as part of O365 DirSync tool is available now. check this out for further details http://technet.microsoft.com/en-us/library/dn246918.aspx
July 29th, 2013 at 2:13 pm
The official guidance is posted here:
http://technet.microsoft.com/en-us/library/jj710171.aspx
September 15th, 2013 at 4:43 pm
Thank you Pavel Garmashov.
We have a Domain forest with a number of child domains. I wanted to sync users in only one child domain.
I was seeing the same “missing-partition-for-run-step” error in log.
I created an empty OU in each domain and selected to sync it, as you suggested. The result was successful syncing. Each domain syncs and the empty OU’s get the other domains to pass a sync too.
Thanks again.
October 8th, 2013 at 6:56 am
I’m just curious about filtering.
From what I can tell from being in the DirSync config at the moment, the connector filter is to EXclude, which would be something along the lines of – do not sync is extensionAttribute11 DOES NOT = ‘YES’.
What I am aiming for is an INclude into my DirSync filter – essentially – sync only if extensionAttribute11 = ‘YES’.
I recognise these are more-or-less the, same, which is why I said I’m ‘curious’.
Also – can anyone say, with the above being set as an EXclude – if I remove the attribute value for a user – will DirSync remove it?
Thanks in advance!
December 11th, 2013 at 10:40 am
Excellent article and very useful for me.
December 12th, 2013 at 4:25 am
[…] […]
January 29th, 2014 at 10:42 pm
Don’t create junk/empty OUs. “If you have removed some domains from the sync by unticking some partitions per these instructions you will then need to remove the corresponding steps from each Run Profile for the MA. Click ‘Configure Run Profiles’ on the SourceAD MA, then go through each looking for Steps where the Partition is shown as a GUID rather than an LDAP path – remove those. You should be left with one step for each domain you are connecting to.” from http://community.office365.com/en-us/forums/613/t/103091.aspx similar comment is made on the official guidance for dirsync filtering technet page: http://technet.microsoft.com/en-us/library/jj710171.aspx
May 23rd, 2014 at 7:52 am
really useful for me. nice article
December 8th, 2014 at 1:45 am
[…] Office 365 DirSync Filteringhttps://msexchangeguru.com/2012/08/10/office-365-2/ […]
December 18th, 2014 at 12:02 am
very good
January 6th, 2015 at 10:36 pm
[…] Office 365 DirSync Filtering « MSExchangeGuru.com – DirSync Filtering has been possible for early Office 365 for Education customers but now it is available to all customers, allowing you to easily exclude …… […]
April 8th, 2015 at 1:00 pm
Great article.. However is it normal that after activating dirsync that a lot of attributes can only be managed via local AD?? for example alias addresses can only be added via EMC or EMS in the local environment! For Hybrid no problem but decommissioning the OnPremise Exchange would be not possible! Any suggestions? Thank you
May 7th, 2015 at 4:05 am
Hi Frank.
That is indeed the case. When you activate DirSync/AADSync, the source of authority becomes your local AD, meaning any change needs to be made on-premises. This is why it is recommended to always leave at least one Hybrid server behind after decommissioning your on-prem Exchange environment so you can manage Exchange attributes.
Best regards, Nuno
June 25th, 2015 at 12:00 pm
[…] – Filtering OUs to Synchronize to Office 365 | Office 365 Technical Support Blog Office 365 DirSync Filtering « MSExchangeGuru.com […]
July 7th, 2015 at 10:03 pm
HI Nuno,
Questions:
a) can we have 2 filtering (OU & user attributes) for an AD running in a forest with one domain name?
b) what is the best way to design the OU structure for an org?
July 9th, 2015 at 2:31 pm
Hi Dematri,
a) yes, absolutely! I have worked with several organizations that wanted to do that, especially during the migration phase.
b) it will depend from organization to organization to be honest… If you have offices in different cities/countries, you can create top OUs per city/country and then OUs for users/servers/etc for each city/country. Have a look at https://technet.microsoft.com/en-gb/magazine/2008.05.oudesign.aspx it will definitely help you!
Regards,
Nuno
July 30th, 2015 at 7:25 am
Once i have made the changes and synced Active Directory Connector, do i just wait for the users to delete from Office 365 or can i run a full sync on azure directory too?
Thanks
February 15th, 2016 at 7:53 pm
Very informative and useful for various scenarios. Keep up the good work!!!