Exchange 2013: Creating and Testing Data Loss Prevention (DLP) Policies
Data loss prevention is gaining popularity and has grown to become a mandatory entity in today’s email security. Financial and legal firms cannot live without it and now slowly almost all businesses have started to adopt DLP as a security measure and to gain trust with their partners and vendors. Prior to Exchange 2013, organizations had to invest thousands of dollars in third party DLP products to monitor incoming and outgoing traffic to the companies email servers. These products are usually installed in a server in DMZ which monitor all SMTP traffic from HUB, EDGE etc and report any malicious activities to the compliance officer.
With Exchange 2013, Data Loss prevention or DLP ships for free and this makes a good case for your organization to migrate to Exchange 2013. There are several DLP policies available in EAC under “Compliance Management Tab” as shown in:
Working with EAC or Exchange administration center in Exchange 2013 – Part1: https://msexchangeguru.com/2013/01/16/eac-exchange-2013/
In this article, we will deal with creation of new data loss prevention policy (DLP) and test the newly created DLP rule in Exchange 2013.
The Data Loss Prevention Policy in exchange allows users to define policies and policy rules for the organization to improve protection of information usually sent through email, including financial and personal data.
The importance of Data loss prevention (or DLP) lies in the fact that enterprise systems make extensive use of email for business critical communication that may include sensitive and confidential data. To ensure that such data are not lost in communication, and to manage its use in email without affecting the productivity of workers, the new Exchange includes DLP features that help achieve protection of sensitive data easily.
DLP policies are a set of rules, actions and exceptions, defined by the administrator using EAC and activated to filter email.
Creating a New Policy Using Exchange Management Shell in Exchange 2013
Let us create a new DLP policy that monitors the transmission of credit card details by users through e mail. The following command creates a DLP policy and defines its name as “PCI-CreditCard”
New-DlpPolicy _Name “PCI-CreditCard”
Now that we have defined the DLP policy, we have to define a transport rule associated with it.
The following command defines a transport rule associated with the DLP. It scans each email message to see if it contains a credit card number. If a credit card number is found, the policy notifies the sender as a warning.
New-TransportRule _Name “Notify in Outlook:External Recipient Credit Cards” -NotifySender NotifyOnly -RuleSubType DLP -DlpPolicy “PCI-CreditCard” -Mode Enforcement _SentToScope NotInOrganization -MessageContainsDataClassification @<Name=”Credit Card Number”>
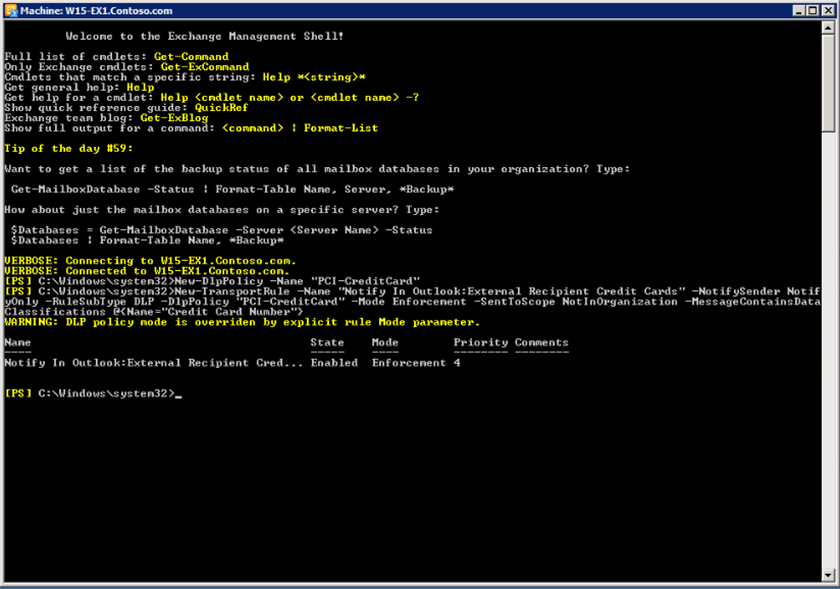
We can use the following command to view the details about the newly created policy
Get -DlpPolicy | FL
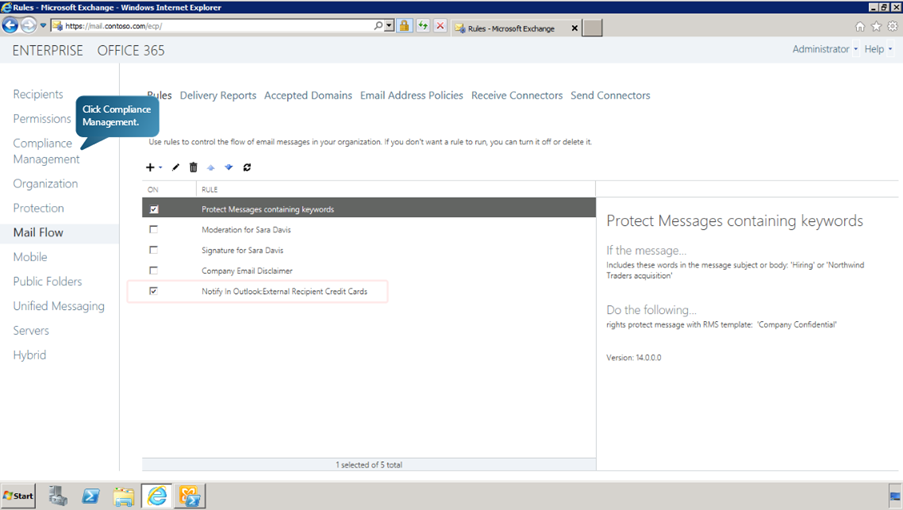
We can review the policy by signing in to the EAC as administrator. This can be done by following the following steps:
- In the EAC go to Compliance Management page.
- Open Data Loss Prevention tab.
- We can see the newly created policy in the list given.
- Go to Mail Flow in the left pane to verify that the rule for the DLP is listed.
Creating a New Policy from an existing template
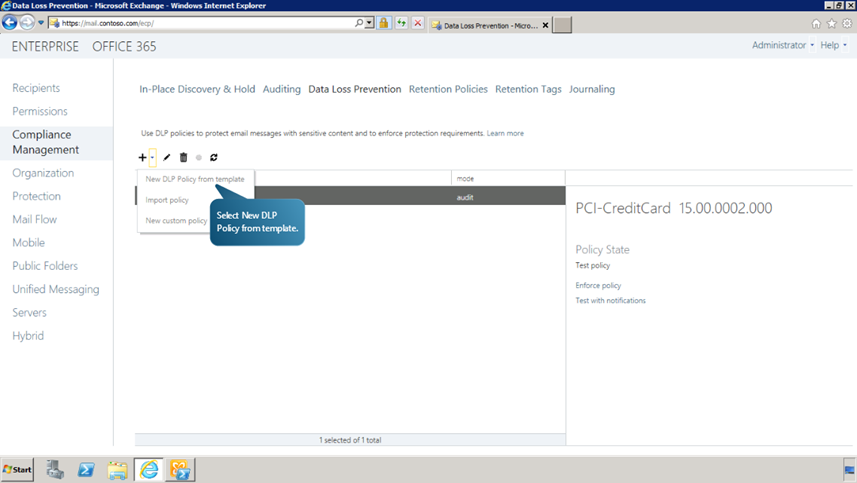
We can also create a DLP policy from an existing template. The steps to be followed to do this are,
- Navigate to Compliance Management.
- Click on “+” Add drop down button.
-
Select New DLP Policy from template option.
-
In the pop up window, we can define the properties of the DLP policy like Name etc. Select the required template from the list. Here we choose PII policy. This personally identifiable information (or PII) policy detects the presence of information commonly considered to be personally identifiable information, such as Social Security numbers or driver’s license numbers.
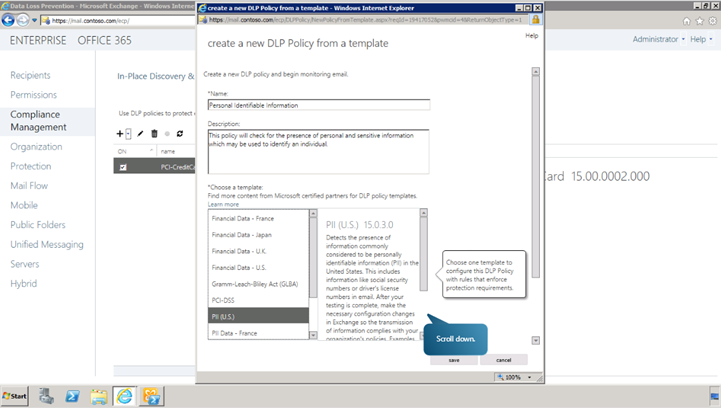
- Select the mailbox to which Incident Reports are to be sent.
- Click Save.
-
We can review the policy by clicking on Edit button in the compliance management page.
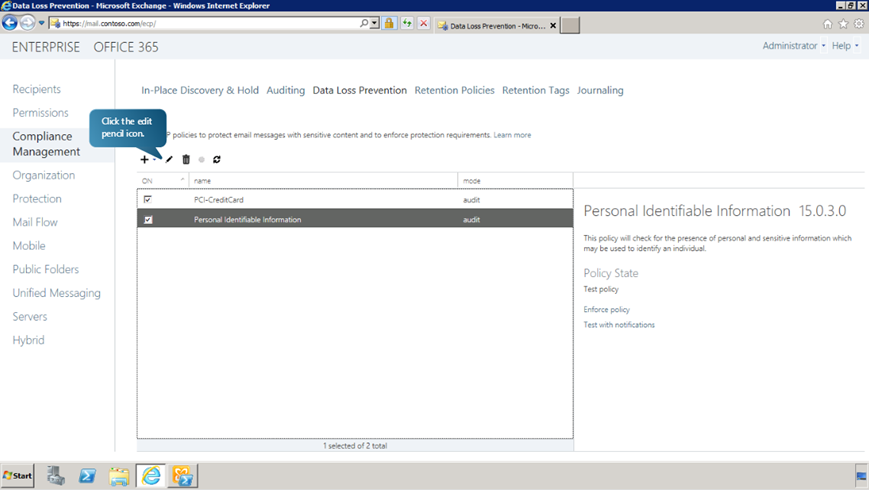
- Let us now review the template rule for the DLP policy. Begin by clicking on the edit pencil button.
- In the new window, click on Rules. Select the rule to edit and click on Edit Pencil button.
- Review the conditions and click Save or Cancel. You can edit a custom DLP in the same procedure.
-
Select the newly created DLP and click on Edit button. Select Rules from the new window. Click on Edit. Click Notify Only link to change the notification setting for the rule.
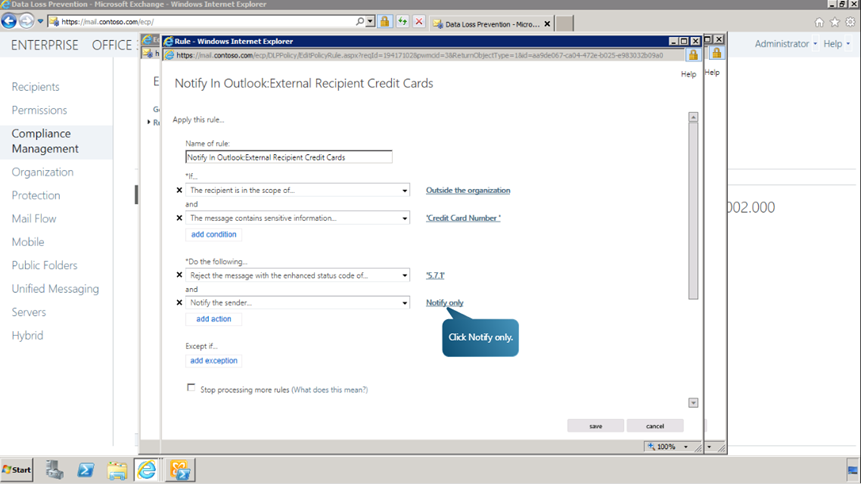
- In the drop down list change the option from Notify Only to Reject Message so that the message with a credit card number is automatically rejected and the sender notified.
- Click OK and Save.
- We can create more rules by clicking on + drop down button and selecting Create a new empty rule.
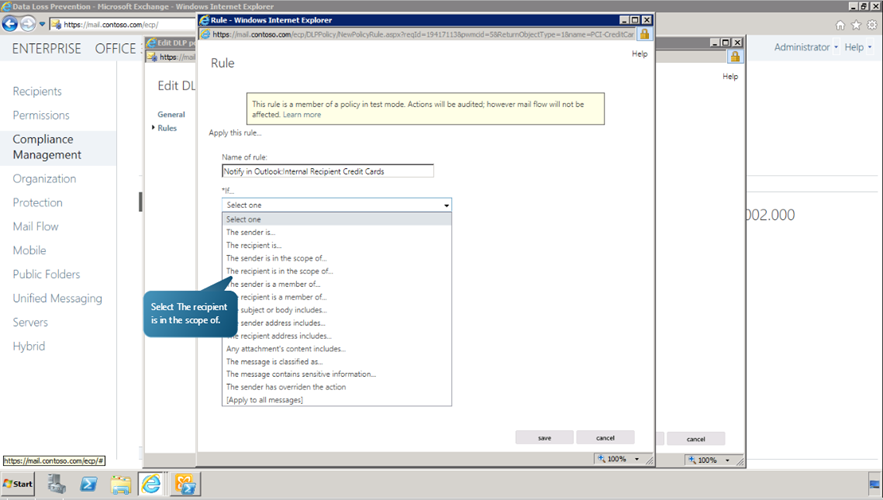
- Specify the Name the rule in the new window and Select a Condition by choosing from the drop down list of IF option.
-
Here we execute the rule for recipients within the organization. So we set the ‘The recipient is in the scope of’ option to ‘Inside the Organization’. Click OK.
-
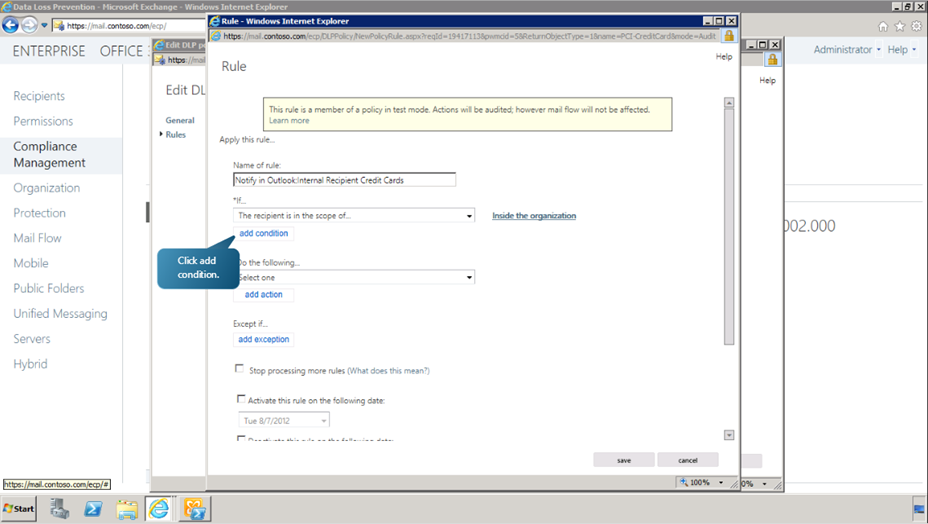
Now click More Options. We can now add a condition to the rule to check for sensitive information. Click on add condition button. From the drop down list, choose The Message->Contains sensitive information option.
-
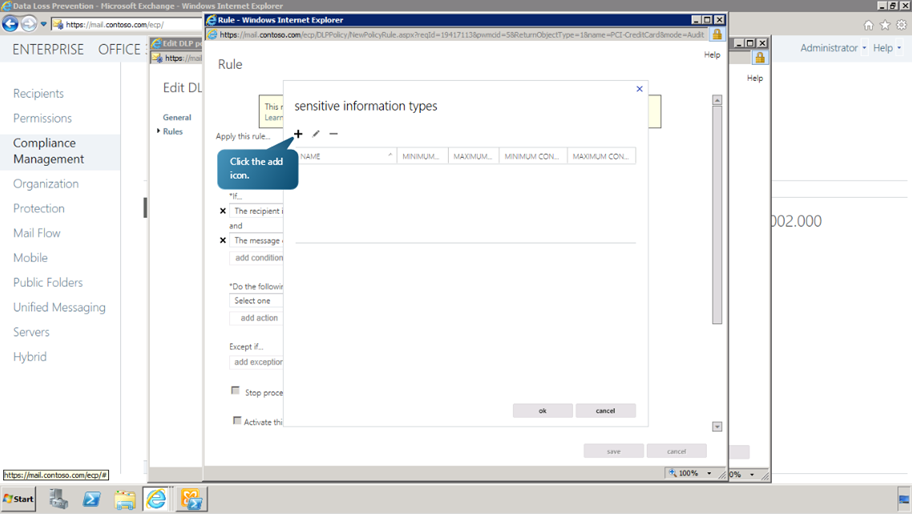
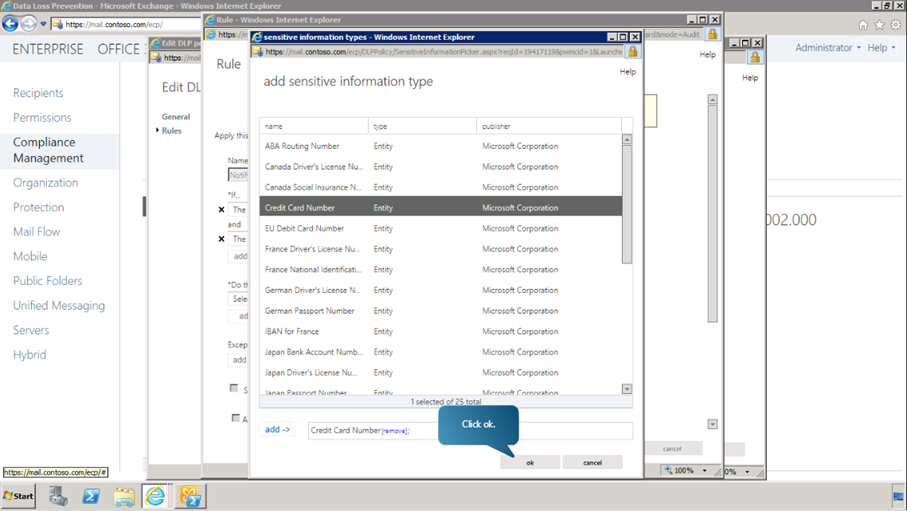
Now in the new window, we can choose the sensitive information from a variety of options. Here, we will choose the credit card number as the condition.
-
Click on + Add button and choose Credit Card Number option from the list. Then click add-> button. Click OK.
-
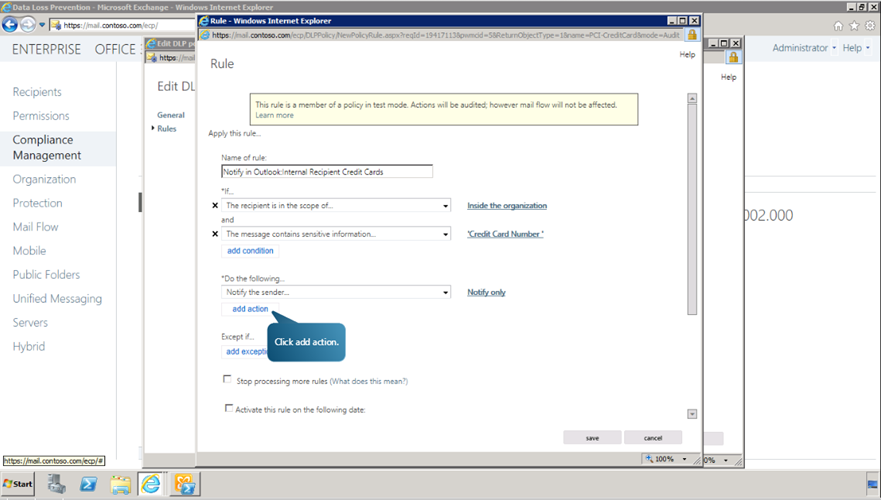
Now, we can define the action to be performed for this rule. Open the drop down list ‘Do the following’. Select Notify the sender. Click OK. We can also create an incident report option. To do this, Click add action button.
- Select Generate Incident Report option.
-
Next, we need to specify the recipient for the incident report. Begin by clicking on Select one option as shown.
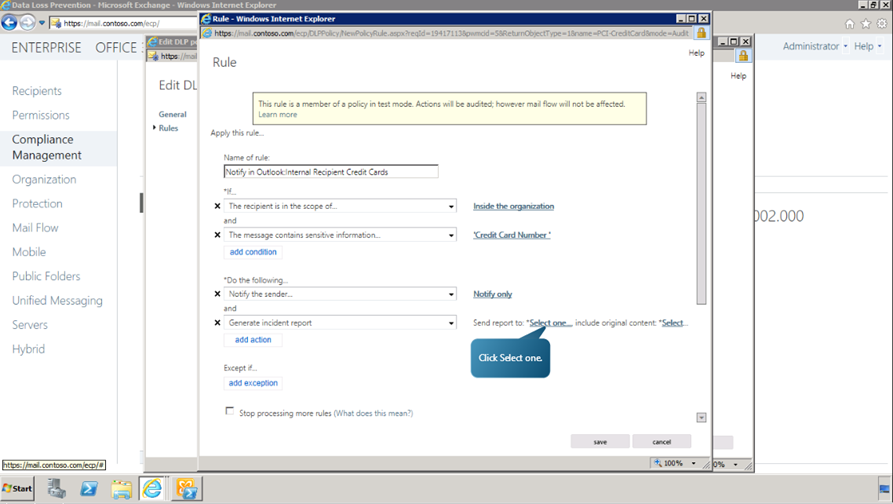
- From the list, choose the desired mailbox and click OK. We can also choose whether the Original Content of the detected mail is to be included in the incident report. To do that, click on Select option after the Include original content. Choose the desired option and click ok. After finishing defining the rule, click Save.
- Click Save in the DLP Policy page to finalize defining the DLP policy.
Now let us test the incident report rule. Sign in to outlook web app as any user. Create a new email message. In the body of the message type a credit card number and send the message. Sign out of the outlook web app and sign in as the user designated to receive the incident report. We can see a message called Testing credit card policy with an incident report and attached message.
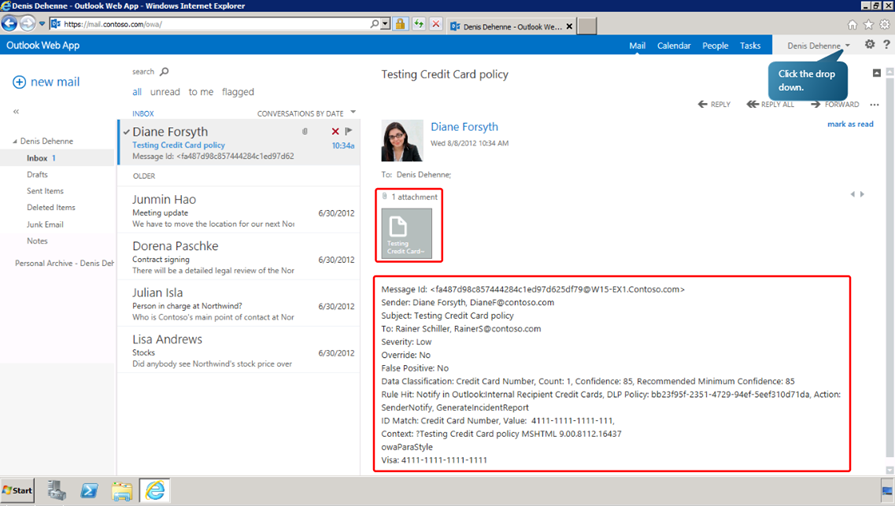
Now that the rule is working fine, we can modify the rule to enable enforcement.
Navigate to Compliance Management in EAC. Go to Data Loss Prevention and select PCI CreditCard rule from the list. Click Edit button and select Rules option. Now select the Notify in outlook:Internal Recipient Credit Cards option and click Edit. Change the Notify Only option to Reject Unless Explicit Override and click OK.
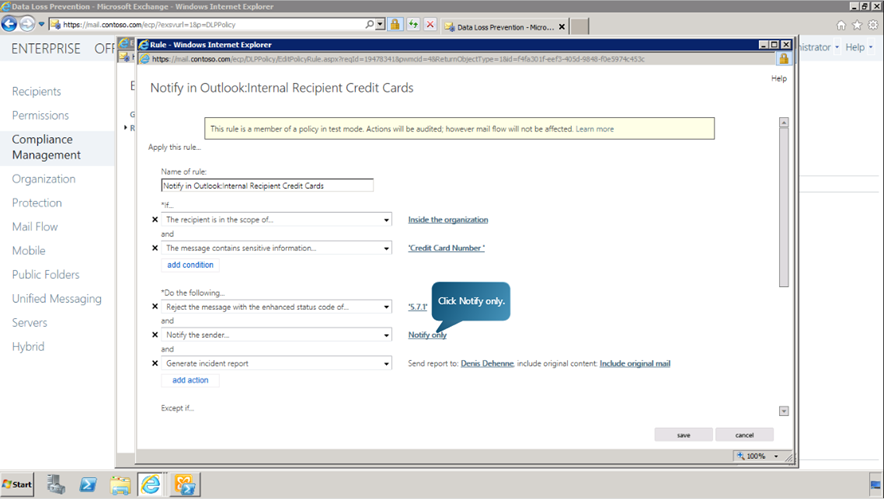
Now, scroll down and choose the Enforce this Rule option. Click Save.
Now the rule has been enabled. Now we have to enable the policy. To do that, select General and click Enforce Policy option. And finally, click Save.
Configuring Outlook to enable DLP Policy
Next, we will configure the outlook settings to enable DLP Policy tips. Click Configure Outlook Settings button to begin.
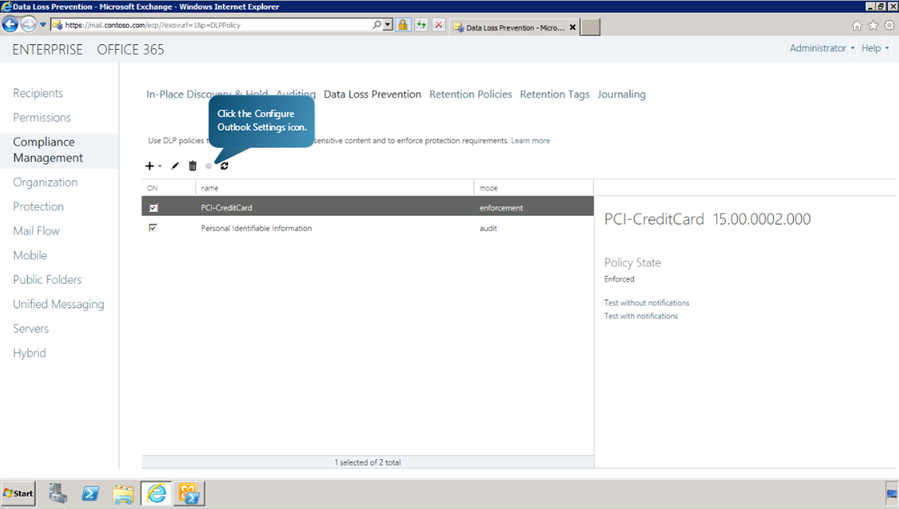
In the outlook configurations window, click Add. Using the action dropdown box, we can change different actions. We can review the locales available for the notification text. This can also be applied to the Override and Reject text actions. Now from the actions list, choose Compliance Url. The compliance URL can be set to any external or internal address and would normally include compliance reference information. Type in a URL and click Save. 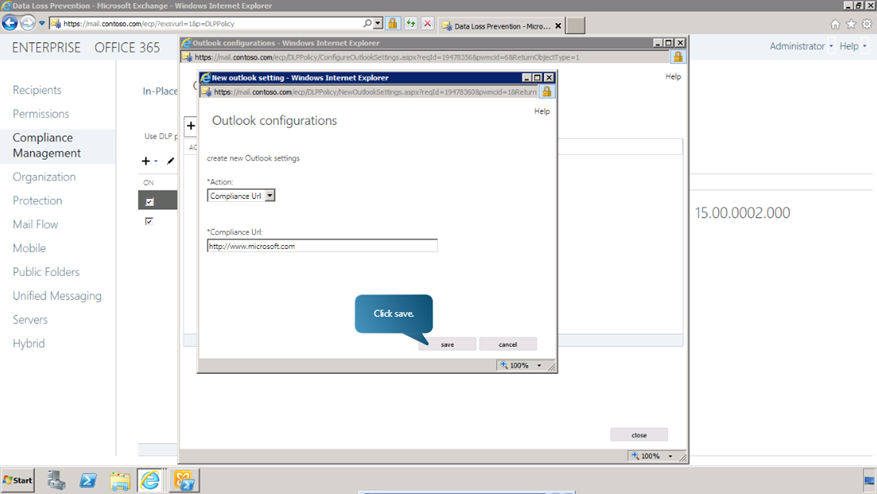
Finish by clicking Close.
Importing Custom Policy Template
Next, let us find out how to import a custom policy template. In the Exchange management shell enter the following command.
Get-DlpPolicyTemplate
This will display the available policies.
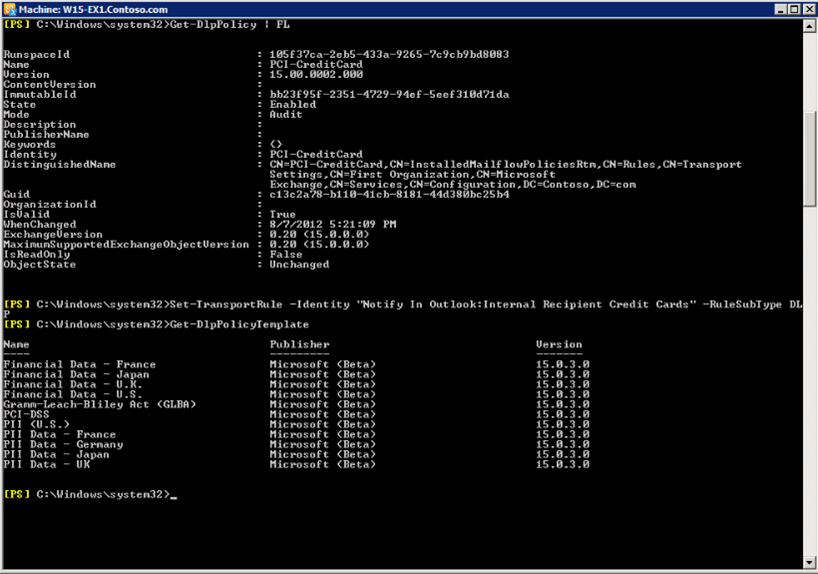
Now we define a new variable called “policytemplate” which points to an XML file that defines a custom policy template.
Enter the following command:
[Byte[]]$policytemplate = Get-Content C:\Labfiles\Contoso-Ip-Policy.xml -Encoding Byte
To import the custom policy template, enter the following command:
Import-DLppolicyTemplate -FileData $policytemplate
To verify that the new template is available now, we review the available policy templates like we did earlier.
To review the imported policy template, go to EAC, and navigate to Compliance Management->Data Loss Prevention->New. There, we can see the newly imported policy template listed as Contoso IP.
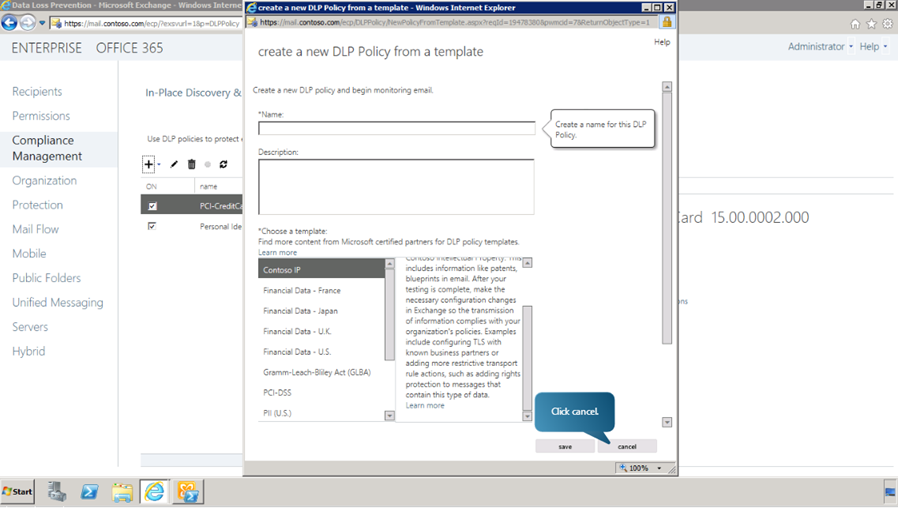
Importing Custom Data Classification
Finally, we can learn how to import a custom data classification. Go to EMS, and enter
Get-DataClassification.
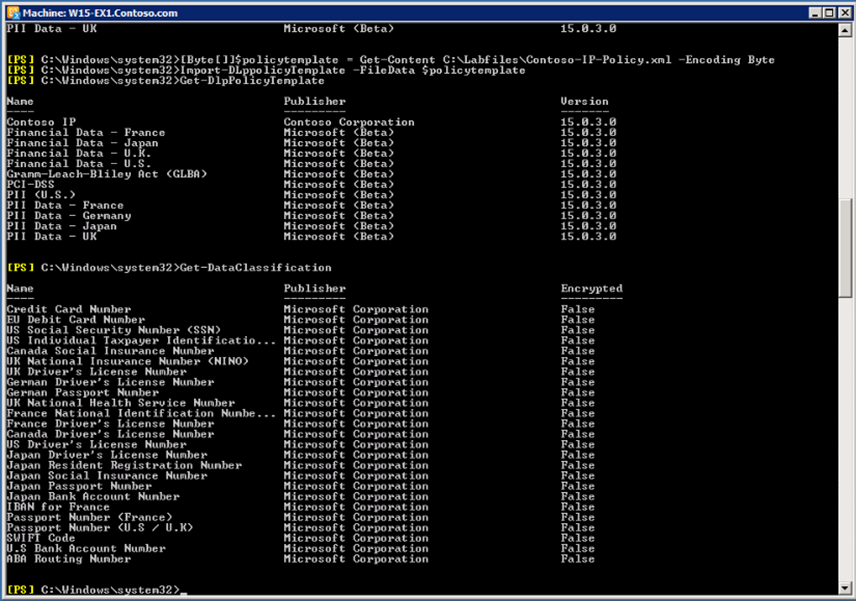
It displays the available data classifications.
Now we will define a new variable, called “data”, that points to an XML file that defines a custom data classification rule package.
Enter the following command.
[Byte[]]$data = Get-Content C:\Labfiles\CustomClassificationRulePackage.xml -Encoding Byte
Now, we import the custom data classification using the command
New-ClassificationRuleCollection -FileData $data
Press Enter to confirm.
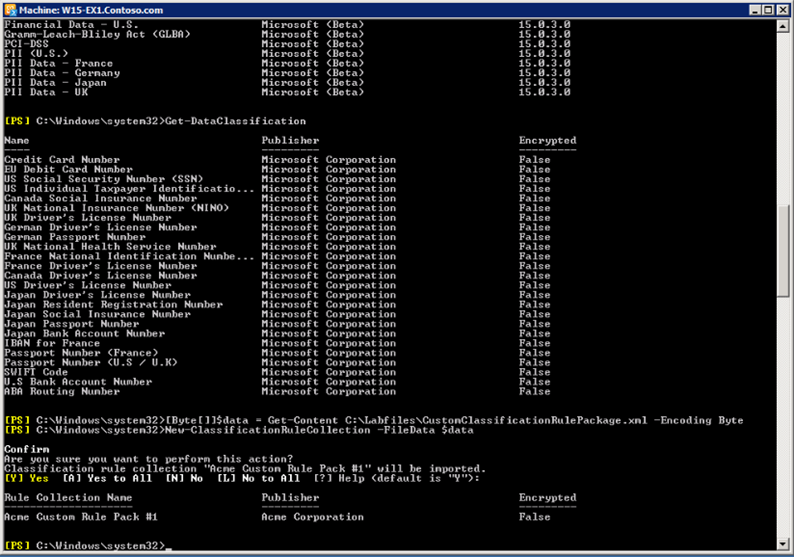
We can verify that the new custom data collection is available by the same method as we did above.
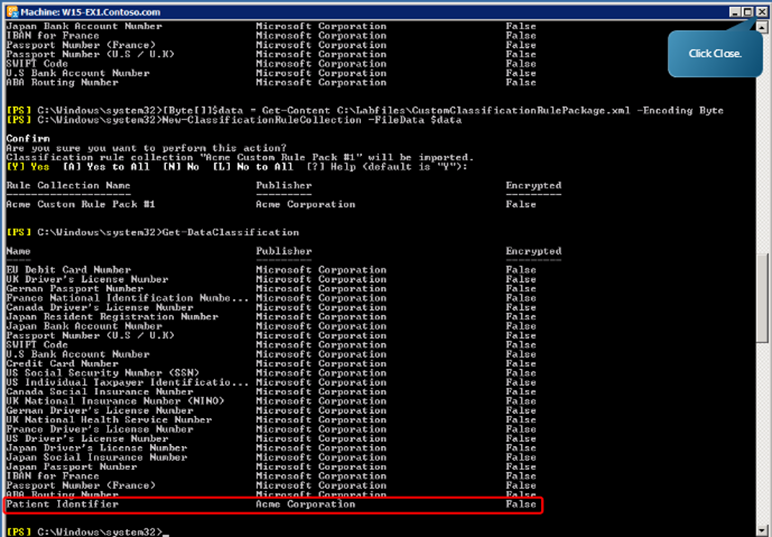
With this we have familiarized ourselves with creating new data loss prevention (DLP) policies, importing a provided policy template, and adding a custom classification for DLP policy rules. Now we shall test the data loss prevention (or DLP) policy rules that we just created.
Testing Data Loss Prevention Policies
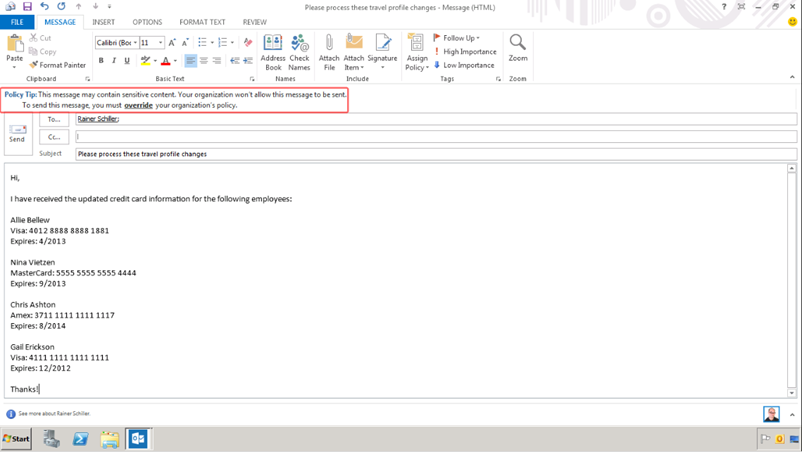
We begin by trying to send a message containing sensitive data using outlook. Log in to outlook and create a new message containing sensitive data. Observe that a policy tip will be displayed as a result of the sensitive content in the message.
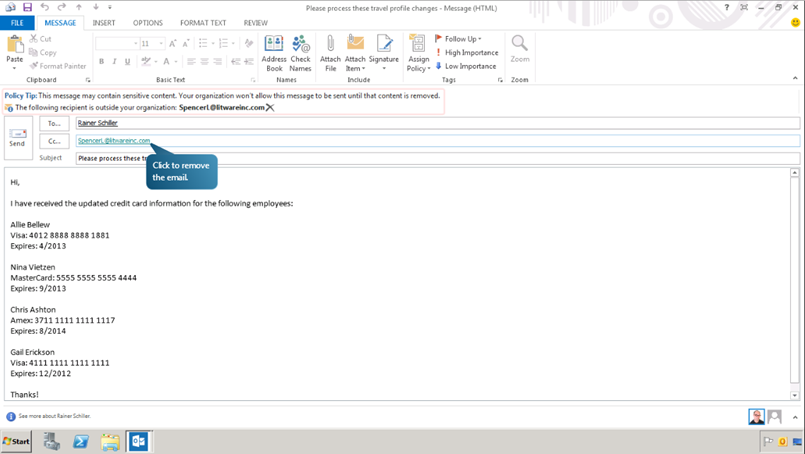
Now let us add a recipient who is outside the organization. We can observe a change in the Policy Tip indicating that the message won’t be sent until content is removed.
Notice that the Policy Tip has changed back once we remove the recipient. In the tip, click override. Now, we have the option to override the regulation by filing a business justification.
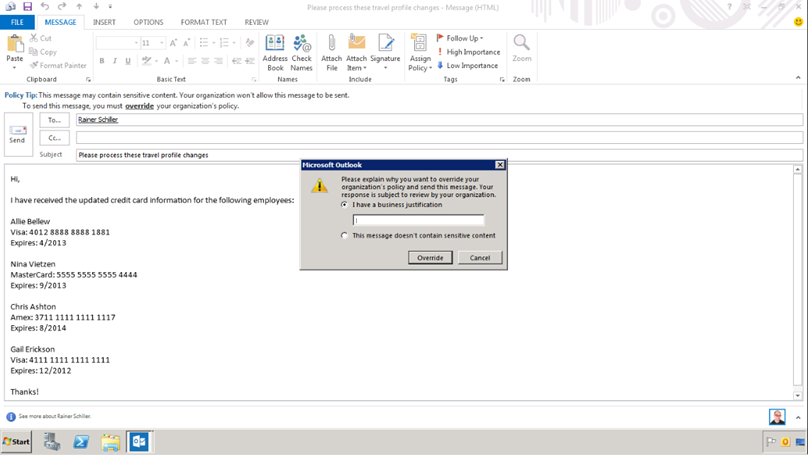
Once you fill in a justification and click override, we can see that the policy tip has been changed. Now send the mail. We will now log in to the outlook web app as the recipient of the message. We can see an incident report being received by the recipient.
Now let us return to outlook to try sending a message which contains an attachment with sensitive data. Create a message and add some attachments with sensitive data. Observe that the Policy Tip now displays as a result of sensitive content being discovered within one of the attached files, and the highlighted file that has been identified as containing sensitive content.
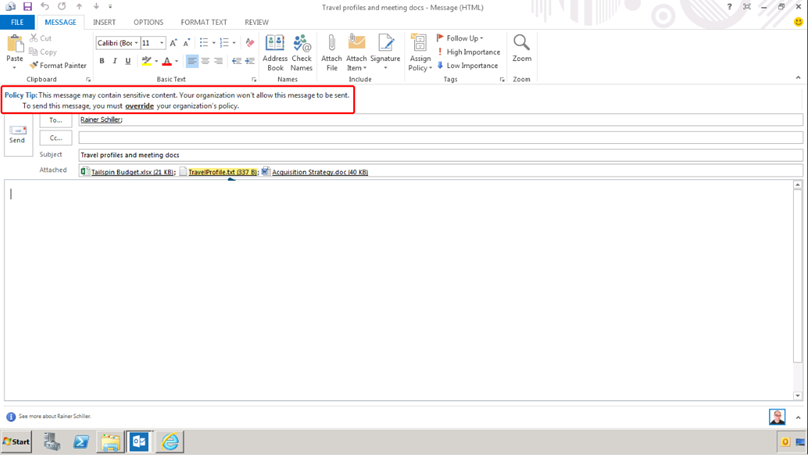
Now for the final test, we create a message containing some numerical data resembling sensitive data. In this case, the numbers entered are actually a travel confirmation number, but they have the same data pattern as a credit card number. This causes the message to be flagged as sensitive content.
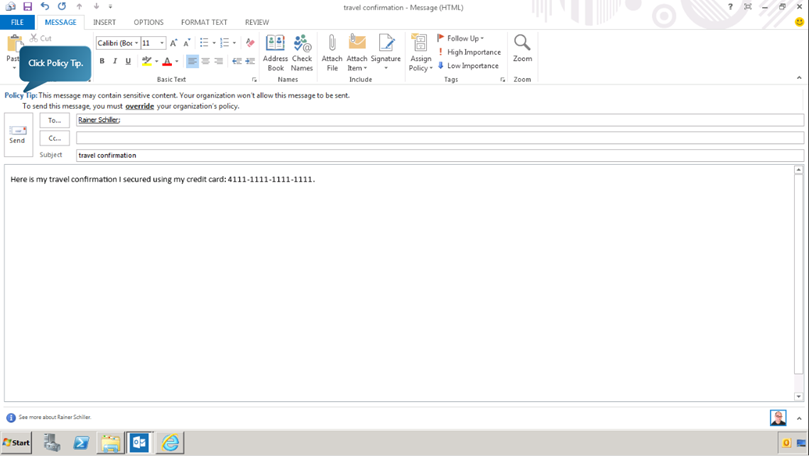
When we click on the policy tip, we can observe that a link appears to help us learn more about the DLP policy. Click the Learn more link. The destination of this link can be customized, as shown in the previous exercise.
In our case, we are redirected to the website of Microsoft.
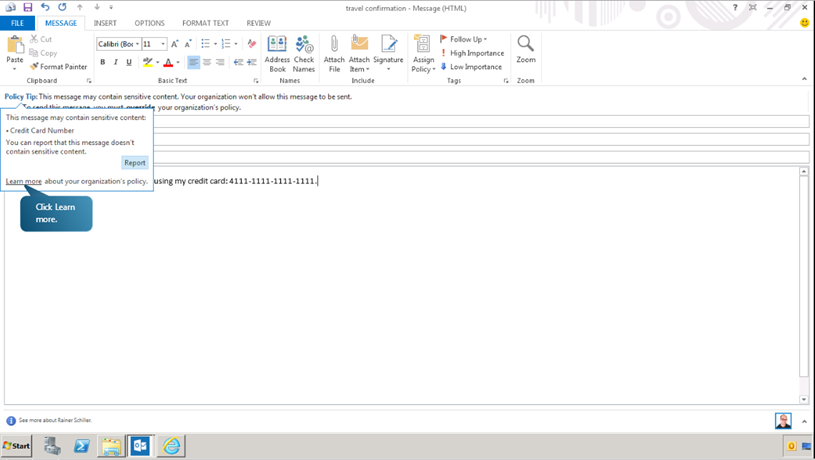
If the message was incorrectly flagged, we have an option to report the issue so an administrator can review it. Click on the policy tip and click Report. Now the policy tip changes automatically, indicating that the feedback will be submitted to the administrator when the message is sent. Now, switch back to the administrator mailbox. Here you can see the issue report that was just submitted.
With that we complete Creating and Testing of Data Loss Prevention Policies.
Ratish Nair
MVP Exchange
Team @MSExchangeGuru.com
Keywords: Exchange 2013 DLP policy, How to create a DLP policy in Exchange 2013, Exchange 2013 data loss prevention


January 28th, 2013 at 5:31 am
[…] Exchange 2013: Creating and Testing Data Loss Prevention (DLP) Policies […]
February 14th, 2013 at 1:04 pm
Great article!
The built-in Data Leakage Protection (DLP) feature is what attracted us to Exchange 2013. On the surface it looks great, but as we found in practice, the “DLP sensitive information types” (aka “Classification Definitions” when using the Exchange cmdlets) are highly deficient. These are the “rules” or “definitions” that are responsible for detecting sensitive data in the e-mail (ex. credit card number, social security number, etc).
Nearly every one that we experimented with seemed to work on the surface, but failed in practice with high False Positives (ie. falsely detected things that are not actually there) and False Negatives (ie. failed to detect actual things).
Once deployed in small-scale production, the poor accuracy of these types caused frustration and required significant time from the admin to investigate each one (especially since DLP reporting is not available in the on-prem version of Exchange 2013).
If the DLP solution is not finding the right things, or if it’s finding the wrong thing, what’s the point!?
We’re currently evaluating a solution from Nucleuz (http://www.nucleuz.com/) which so far (knock on wood) is performing much better and makes Microsoft’s built-in DLP solution worthwhile.
July 3rd, 2013 at 11:05 am
I have a question about the actual editing of the XML file to include more robust search options. In the TechNet article “Matching Methods and Techniques for Rule Packages”, it mentions that terms can be matched by using the Term sub-element or in an external dictionary file by specifying the Dictionary sub-element. This is configured by Term and Dictionary sub-elements. However I cannot find any documentation on how to include a Dictionary sub-element, what properties it takes, and where the external dictionary must be located. I have searched the web extensively for the documentation of the elements in the DLP XML schema but can find nothing….not even samples. The sample info on TechNet is incomplete. If you have a URL to the DLP XML schema documentation it would be a big help or if you can discuss in a future article (beyond what is in TechNet)…that would be really useful.