Exchange CAS high availability with Windows NLB
Application availability is getting super critical these days. Most of them can be clustered but there are still few applications which can’t be clustered. So we have Network load balance hardware devices but not every organization is happy to invest in NLB device just for Exchange CAS. For these organizations the solution is windows NLB and Microsoft fully support it. Let us see how we configure Windows NLB for 2 nodes.
Infrastructure Configuration for this article:
Yes, prepare the below values for your NLB.
- Server Names: CAS1 and CAS1
- CAS1 NLB NIC IP Address: 10.10.10.10
- CAS2 NLB NIC IP Address: 10.10.10.20
- NLB IP Address: 10.10.10.40
- Subnet mask: 255.255.255.0
- CAS URL/NLB NAME: mail.msexchangeguru.com
Configure NLB Cluster – Follow the below steps on both the Servers.
- This should be the Secondary NIC for NLB but in the same production network.
- Configure the IP address and subnet mask only. No DNS and WINS.
- In Advanced’s DNS tab, confirm checkbox for Register this connection’s addresses in DNS is unchecked
- In Advanced’s WINS tab, ensure Disable NetBIOS over TCP/IP is checked
- NLB Configuration Steps:
- Validate required NICbinding order onCAS1 andCAS2
- Otherwise, reorder the NICs so they occupy the first and second positions
- Save settings by clicking OK and close Network Connections Applet
Install Network Load – Follow the below steps on both the Servers
- Click on Start | Administrative Tools | Server Manager Balancing Service on Click on Features | Add Features In the Add Features wizard, check Network Load Balancing checkbox Click Install
- Close once installed.
Create a new NLB
- On CAS1, click on Start | Administrative Tools | Network Load Balancing Manager
- From the NLB console, right‐click Network Load Balancing Clusters
- Click New Cluster
- In Host field, enter CAS1 FQDN; cas1.msexchangeguru.com click Connect
- Choose the NLB NIC (Interface IP 10.10.10.10); click Next | Add
- In Add IP Address dialog box, enter 10.10.10.40 on IPv4 address
- For Subnet mask, enter 255.255.255.0; click OK | Next
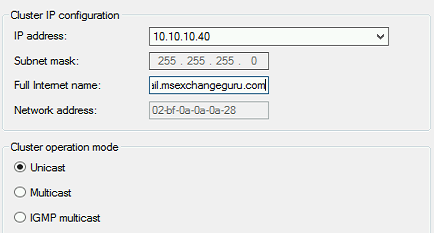
- In New cluster: Cluster Parameters dialog box, confirm cluster IP address
- On Full Internet name, enter OWA URL “mail.msexchangeguru.com”
- On Client operations mode, choose unicast; click Next

- In Add/Edit Port Rule dialog box, allow all port then Click Finish
- Allow the new NLB cluster to converge; after convergence, the cluster status should say Success and with a GREEN icon next to it.
- From CAS2, confirm OWA URL “mail.msexchangeguru.com” responds with the cluster IP 10.10.10.40; otherwise determine dns issue and resolve the issue.
- Add the second node On NLB Manager console.
- Right‐click OWA URL Cluster Name
- Click Add Host to Cluster
- Type in Server 2 FQDN cas2.msexchangeguru.com in the Host field then click Connect
- Choose the NLB NIC (interface IP 10.10.10.20) then click Next and Next
- Leave all settings at default; click Finish
- Allow CAS2 to converge with the cluster; after convergence, the cluster status should say Success and with a GREEN icon next to it
Verify NLB:
- Stop Windows NLB service on CAS1 then From CAS2, confirm OWA URL responds with the cluster IP 10.10.10.40 and owa page is opening; otherwise determine and resolve the issue.
- Restart Windows NLB service on CAS1 and allow the cluster nodes to converge successfully.
- Stop Windows NLB service on CAS2 then From CAS1, confirm OWA URL responds with the cluster IP 10.10.10.40 and owa page is opening; otherwise determine and resolve the issue.
- Restart Windows NLB service on CAS2 and allow the cluster nodes to converge successfully.
Configure the MAC address to the VM NLB NIC
If you have virtualized CAS then follow this step
- Go to NLB Manager à Cluster Properties à Clusters Parameters Tab and write down the Network address for the NLB cluster. Which is like 02-BF-0A-0A-0A-28
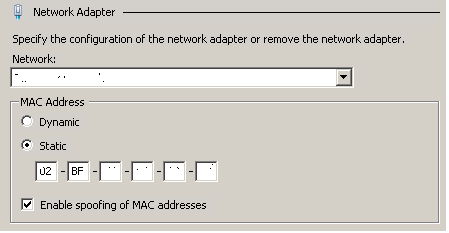
- Shut down the NLB cluster VMs one by one (make sure you don’t shutdown both CAS at a time) then in Hyper-V Manager, manually configure the network adapters that you added to the VMs for the NLB cluster to use a static MAC address that matches the NLB network address: 02-BF-0A-0A-0A-28.
- Check the checkbox “Enable Spoofing of MAC Addresses”

- Restart the CAS Server VMs in Hyper-V Manager.
- Confirm successful NLB cluster convergence status one more time.
NIC Forwarding
Run the below command on both the servers so that NLB can forward OWA request to Prod NIC
This is a very important step, if you have missed this then NLB will not be able to forward the CAS request to Production NIC and no app will open.
- Open the cmd prompt with Run as Administrator and run the below cmd.
netsh interface ipv4 set interface “NLB Interface” forwarding=enabled
NLB should be working fine at this moment.
Recently I was helping a customer who decided to stick to only 2 servers with all the roles in it. Then he end up asking high availability for CAS as well on the same setup. I decide to explain the unsupported configuration which I am mentioning here but Microsoft/MsExchangeGuru will not support any issue or loss caused by this. So use this configuration at your own risk.
For such setup we can change their CAS/Transport internal NAT IP to the DAG Cluster IP/Name (CNO).
Prabhat Nigam
Microsoft MVP | Exchange Server
team@msexchnageguru


August 11th, 2016 at 10:40 am
So just so I understand this correctly your only actually configuring the network load balancer on once of the two cas server?
1.On CAS1, click on Start | Administrative Tools | Network Load Balancing Manager
2.From the NLB console, right‐click Network Load Balancing Clusters
3.Click New Cluster
4.In Host field, enter CAS1 FQDN; cas1.msexchangeguru.com click Connect
5.Choose the NLB NIC (Interface IP 10.10.10.10); click Next | Add
6.In Add IP Address dialog box, enter 10.10.10.40 on IPv4 address
7.For Subnet mask, enter 255.255.255.0; click OK | Next
8.In New cluster: Cluster Parameters dialog box, confirm cluster IP address
9.On Full Internet name, enter OWA URL “mail.msexchangeguru.com”
This part
August 12th, 2016 at 2:06 pm
Yes, any cluster will be configured on server1 then other nodes will be added.
August 12th, 2016 at 2:08 pm
So if server 1 was to go down that would break the cluster?
August 12th, 2016 at 2:45 pm
No, cluster config replicates to other servers.
September 19th, 2016 at 3:07 am
Hi Prabhat,
This is a great article. This WNLB setup is similar to old Exchange 2010 CAS Array on WNLB. However, can you please reply with a little more on ‘CAS load balancing with DAG on same server’? If someone don’t want to use a third party hardware load balancer, and not using DNS round robin (two entries to same namespace), then is there any other methods to achieve the CAS high availability in Exchange 2013 (all roles)?
September 19th, 2016 at 8:03 pm
I have mentioned that in the last part of it. It only works if your DAG is with IP but it is not recommended. You should go for load balancer.
April 6th, 2017 at 2:28 am
Hi,
Thanks a lot of the detailed information. THis is of great help.
1 Quick and imp question:
In Network connections and advanced settings. Which NIC should be binded first? NLB NIC with no gateway or the NIC with the Gateway?
April 6th, 2017 at 4:48 am
NiC with gateway and DNS.
July 8th, 2017 at 10:12 pm
How can we proceede to upgrade 2 CAS servers highly availabile with Windows NLB ?
I am asking specifically about CAS with WNLB (Note MBX with DAG Cluster).
Many thanks
July 15th, 2017 at 3:13 am
Buy 2 F5 load balancers which will be required for new servers. WNLB is not recommended for bigger setups.
December 10th, 2017 at 7:42 pm
[…] https://msexchangeguru.com/2013/08/14/windowsnlb/ […]