Exchange 2010/2007 to 2013 Migration and Co-existence Guide
We don’t have a lot of guides out there helping with a step by step guide for the migration and co-existence of Exchange 2010/2007 to Exchange 2013So, here you go !!!

Update:
If you are planning to employ a third party product for migration – look no further. CodeTwo is a mature and reliable product for full blown Exchange migraiton from
Exchange 2003/2007/2010 – cross forest or cross domain migration:
Take a look here:
CodeTwo Exchange migration for Exchange 2003 to 2010/2013: Operational review: https://msexchangeguru.com/2013/11/24/codetwo-exchange-migration/
Download here:
Download Codetwo for free: http://www.codetwo.com/exchange-migration/
Before you proceed with the actual migration steps, these articles may be of interest to you:
Exchange 2013 CAS Role Demystified: https://msexchangeguru.com/2013/05/22/exchange-2013-cas/
Exchange 2013 High Availability demystified: https://msexchangeguru.com/2013/05/23/e2013-ha-demystified/
Load Balancing Exchange Server 2013 – Good to know stuff: https://msexchangeguru.com/2013/06/05/load-balancing/
Public Folders Migration from Exchange 2007/2010 to Exchange 2013: https://msexchangeguru.com/2013/04/18/exchange2013-public-folders/
Upgrade from Exchange 2013 CU1 or RTM to CU2: https://msexchangeguru.com/2013/07/10/install-e2013-cu2/
Monitoring and troubleshooting Exchange using powershell: https://msexchangeguru.com/2013/07/23/monitoring-powershell/
For Complex Exchange 2007 migration check the common errors here – http://blogs.technet.com/b/exchange/archive/2007/09/10/3403885.aspx
Check our multisite url and authentication blog here – https://msexchangeguru.com/2015/08/22/e20132007-urlsauth-multiadsite/
Preparing Exchange 2010/2007
-
Install the hotfix 2550886 for DAG failover improvements on Exchange 2010/2007 DAG servers.
-
Login to the Exchange 2010/2007 server with Schema Admins, enterprise admins, domain admins and organization management group member id as SP 3 will extend the schema.
-
Install Exchange 2010/2007 SP3 on all the exchange 2010/2007 servers in CAS then HT then mailbox role order if they are not on the same server
SP3 can be downloaded from the below link:
http://www.microsoft.com/en-us/download/details.aspx?id=36768
-
Check the below link for SP3 installation steps
https://msexchangeguru.com/2013/04/03/exchange-2010/2007-sp3/
Installing Exchange 2013
-
I would suggest going for Windows 2012 for Exchange 2013 but you can use windows 2008 R2 SP1 as well.
-
Install the windows 2012 server or Windows 2008 R2 SP1 on a new server and join the domain. It can be virtual or physical. Now Microsoft support virtualized mailbox role.
-
Run the windows update and install all the recommended updates.
-
You might like to configure windows NLB if you don’t have NLB hardware. Check the below blog on it. (optional) https://msexchangeguru.com/
2013/08/14/windowsnlb/ - For Active Directory preparation check the “step 3 preparing active directory” at the blog mentioned below: https://msexchangeguru.com/2013/04/29/install-e2013/
- Install the following prerequisites for Exchange 2013
For Windows 2012:
-
Open Windows PowerShell.
-
Run the following command to install the required Windows components.
Install-WindowsFeature AS-HTTP-Activation, Desktop-Experience, NET-Framework-45-Features, RPC-over-HTTP-proxy, RSAT-Clustering, RSAT-Clustering-CmdInterface, RSAT-Clustering-Mgmt, RSAT-Clustering-PowerShell, Web-Mgmt-Console, WAS-Process-Model, Web-Asp-Net45, Web-Basic-Auth, Web-Client-Auth, Web-Digest-Auth, Web-Dir-Browsing, Web-Dyn-Compression, Web-Http-Errors, Web-Http-Logging, Web-Http-Redirect, Web-Http-Tracing, Web-ISAPI-Ext, Web-ISAPI-Filter, Web-Lgcy-Mgmt-Console, Web-Metabase, Web-Mgmt-Console, Web-Mgmt-Service, Web-Net-Ext45, Web-Request-Monitor, Web-Server, Web-Stat-Compression, Web-Static-Content, Web-Windows-Auth, Web-WMI, Windows-Identity-Foundation
-
Restart the server.
-
http://www.microsoft.com/en-us/download/details.aspx?id=34992
-
http://www.microsoft.com/en-us/download/details.aspx?id=17062
-
http://www.microsoft.com/en-us/download/details.aspx?id=26604
For Windows 2008:
-
Open Windows PowerShell.
-
Run the following command to load the Server Manager module.
Import-Module ServerManager
-
Run the following command to install the required Windows components.
Add-WindowsFeature Desktop-Experience, NET-Framework, NET-HTTP-Activation, RPC-over-HTTP-proxy, RSAT-Clustering, RSAT-Web-Server, WAS-Process-Model, Web-Asp-Net, Web-Basic-Auth, Web-Client-Auth, Web-Digest-Auth, Web-Dir-Browsing, Web-Dyn-Compression, Web-Http-Errors, Web-Http-Logging, Web-Http-Redirect, Web-Http-Tracing, Web-ISAPI-Ext, Web-ISAPI-Filter, Web-Lgcy-Mgmt-Console, Web-Metabase, Web-Mgmt-Console, Web-Mgmt-Service, Web-Net-Ext, Web-Request-Monitor, Web-Server, Web-Stat-Compression, Web-Static-Content, Web-Windows-Auth, Web-WMI
-
Restart the server
-
http://msdn.microsoft.com/en-us/library/5a4x27ek(VS.110).aspx
-
http://www.microsoft.com/en-us/download/details.aspx?id=34595
-
Microsoft Unified Communications Managed API 4.0, Core Runtime 64-bit
http://www.microsoft.com/en-us/download/details.aspx?id=34992
-
http://www.microsoft.com/en-us/download/details.aspx?id=17062
-
http://www.microsoft.com/en-us/download/details.aspx?id=26604
6. Restart the server
7. Exchange 2013 Installation – Please follow the below link for the Exchange 2013 installation: https://msexchangeguru.com/2013/04/29/install-e2013/or Exchange 2013 SP1installation: https://msexchangeguru.com/2014/03/02/e2013sp1-installationupgrade/
Imp: You can directly install Exchange 2013 CU1 as well. If you directly install CU1 then you can skip step 12 – Testing mailbox move without CU1. If you are installing CU2 make sure you are installing CU2 V2.
If you are doing new installation then you can directly install Exchange 2013 CU1 which itself is a full setup. You can follow same schema update and AD preparation steps.
After Exchange 2013 installation the biggest challenge will be how to login to the EAC, there is no mailbox on Exchange 2013 and redirection or proxy is not configured to use the existing Exchange admin user.
If you are trying to access EAC for the first time and your mailbox is on Exchange 2010, you need to use the URL in the format:
https://Exchange2013ServerName/ecp?ExchClientVer=15
This is because in a co-existence scenario, your mailbox is still housed on the Exchange 2010 mailbox server, the browser will default to the Exchange Server 2010 ECP. Now if you want to access the Exchange 2010 ECP and your mailbox resides on an Exchange 2013 mailbox server, use the following URL:
https://Exchange2010ServerName/ecp?ExchClientVer=14.
Take a look at:
Working with EAC or Exchange administration center in Exchange 2013 – Part1: https://msexchangeguru.com/2013/01/16/eac-exchange-2013/
So you need to create a mailbox to administer Exchange 2013. We will follow the below steps:
- Create a mailbox in Exchange 2013 mailbox database.
- “New-Mailbox –name 2013Admin –userPrincipalName 2013Admin@domain.com –Database “2013 DBName””
-
Run Get-mailboxdatabase to check the database name

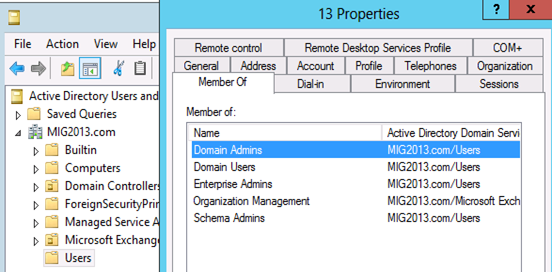
4. Give the permission to the mailbox to Administrate EAC.
Add the following group membership:
Domain Admins
Schema Admins
Enterprise Admins
Organization Management
Test mailbox migration without CU1 for Exchange 2013
-
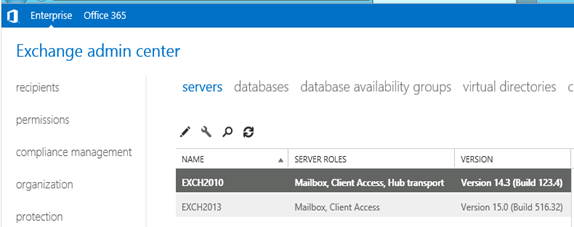
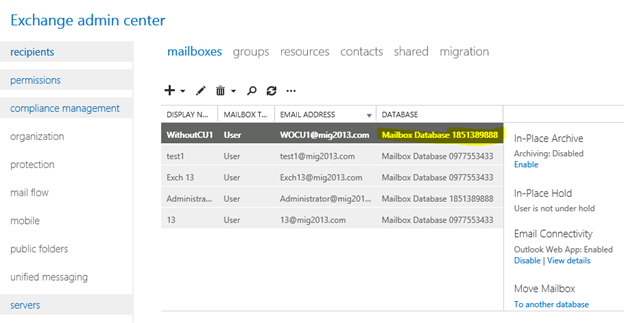
Now, you should be able to login to EAC by going to the url https://localhost/ECP. If you will test the mailbox migration from Exchange 2010/2007 to Exchange 2013 before CU1 for Exchange 2013, it will be working but full co-existence will not work so it is a necessity to install CU1. As an example my Servers are mentioned below:
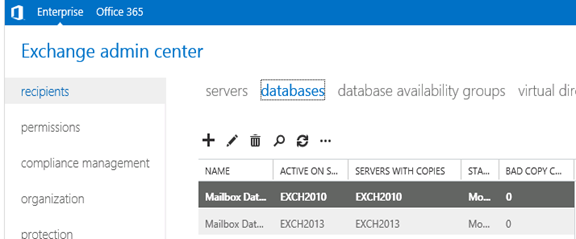
- EAC will show Databases from both the servers
- Now I am migrating the mailbox being Exchange 2010/2007 on SP3 and Exchange 2013 without CU1.
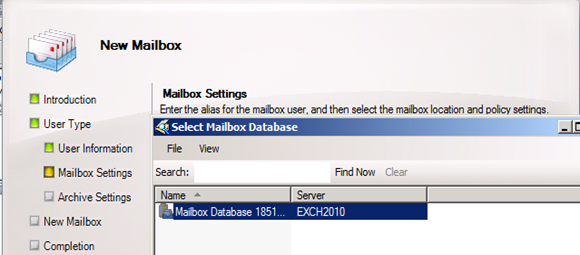
Created new mailbox in Exchange 2010/2007, you can see 2013 database is not showing here
- Database before move
- I have moved the mailbox from Exchange 2013 EAC to Exchange 2013 database. Now click on migration to check the status
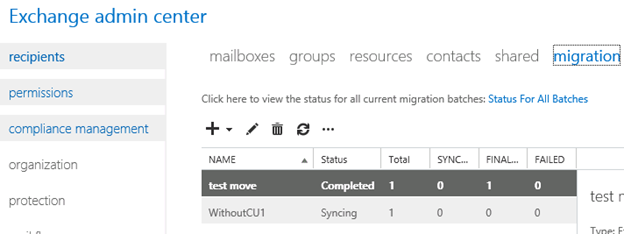
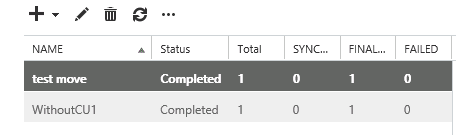
- Now Refresh and you will see completed depends on the size of mailbox.
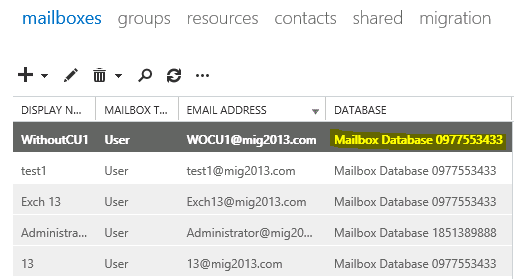
- Check the Database name has changed
Continue the Exchange 2013 CU1 installation
5. If you have not install CU1 version of exchange 2013 then this is the time to install Exchange 2013 Cumulative update 1 so that we avoid any co-existence issue. If you are doing new installation then you can directly install Exchange 2013 CU1 which itself is a full setup. You can follow same schema update and AD preparation steps mentioned in the Exchange 2013 installation article
Update 4/7/2014: Now – We can go for SP1 – https://msexchangeguru.com/2014/03/02/e2013sp1-installationupgrade/
6. Download the Exchange 2013 from the below link which is an Exchange 2013 setup with Cumulative update
http://www.microsoft.com/en-us/download/details.aspx?id=38176
7. Install the Exchange 2013 CU 1 with the help of below link:
https://msexchangeguru.com/2013/04/15/e2013-cu1-2/
Configuring Exchange 2013 and network
-
Transport Configuration
-
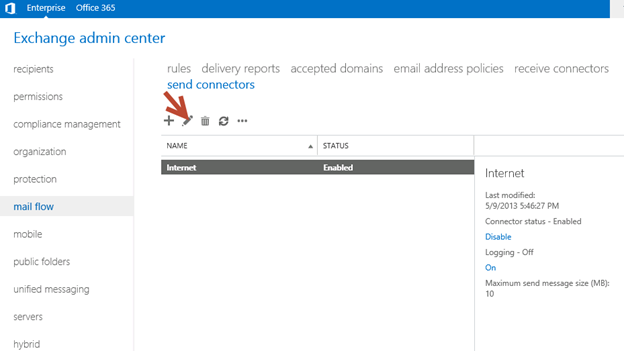
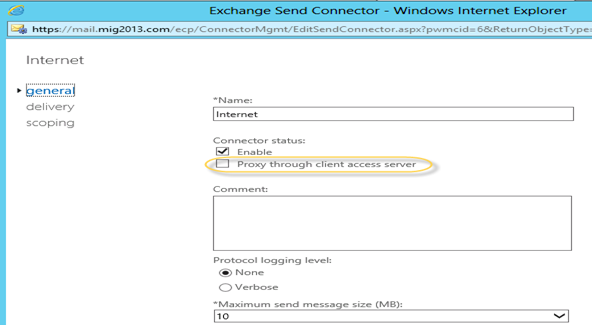
Send connector
1. Exchange 2013 reads exchange 2010/2007 send connector information. Click on the pencil icon to check and add exchange 2013 in the same send connector.
2. Click on scoping and + icon to add the server
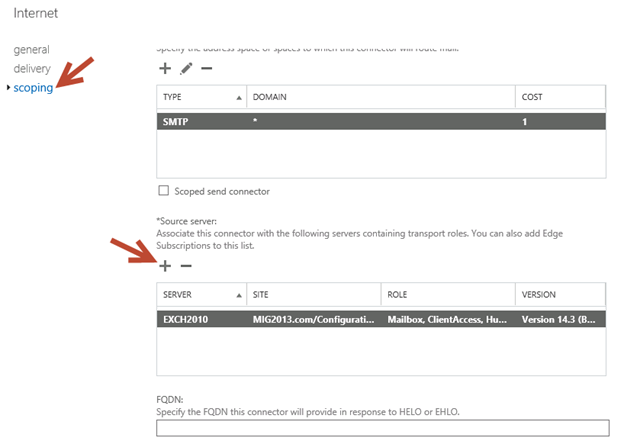
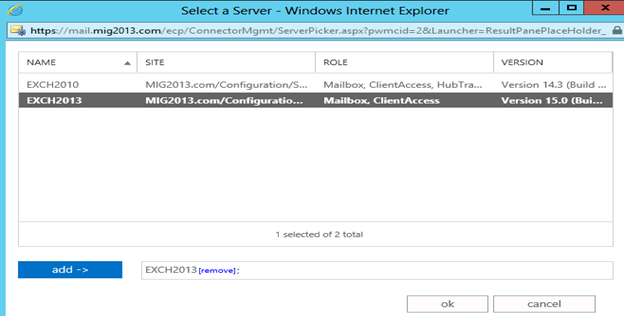
3. Select the server and add, then click on and save. Send connector configuration completed.
3. Receive Connector
1. Add a receive connector as per the current connector configuration.
2. Select the 2013 server, oh what we have 5 connectors for what. Let me explain here.
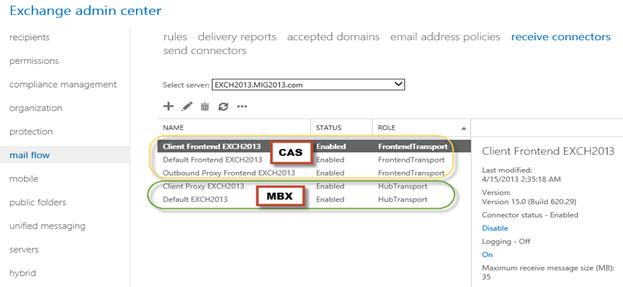
3. You can see all 5 together here as I have CAS and Mailbox on same server. First 3 are for the CAS connector and remain 2 are for mailbox role.
4. I would link to explain the transport pipe line here which consists of the following services:
Front End Transport service – This service runs on all Client Access servers and acts as a stateless proxy for all inbound and outbound external SMTP traffic for the Exchange 2013 organization. The Front End Transport service doesn’t inspect message content, only communicates with the Transport service on a Mailbox server, and doesn’t queue any messages locally.
Transport service – This service runs on all Mailbox servers and is virtually identical to the Hub Transport server role in previous versions of Exchange. The Transport service handles all SMTP mail flow for the organization, performs message categorization, and performs message content inspection. Unlike previous versions of Exchange, the Transport service never communicates directly with mailbox databases. That task is now handled by the Mailbox Transport service. The Transport service routes messages between the Mailbox Transport service, the Transport service, and the Front End Transport service.
Mailbox Transport service – This service runs on all Mailbox servers and consists of two separate services: the Mailbox Transport Submission service and Mailbox Transport Delivery service. The Mailbox Transport Delivery service receives SMTP messages from the Transport service on the local Mailbox server or on other Mailbox servers, and connects to the local mailbox database using an Exchange remote procedure call (RPC) to deliver the message. The Mailbox Transport Submission service connects to the local mailbox database using RPC to retrieve messages, and submits the messages over SMTP to the Transport service on the local Mailbox server, or on other Mailbox servers. The Mailbox Transport Submission service has access to the same routing topology information as the Transport service. Like the Front End Transport service, the Mailbox Transport service also doesn’t queue any messages locally.
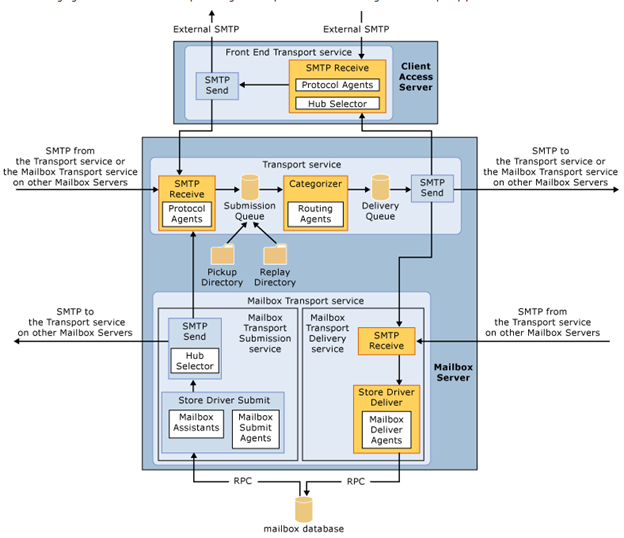 (from TechNet)
5. Here are the details about the receive connectors
When you install a Mailbox server running the Transport service, two Receive connectors are created. No additional Receive connectors are needed for typical operation, and in most cases the default Receive connectors don’t require a configuration change. These connectors are the following:
Default <server name> Accepts connections from Mailbox servers running the Transport service and from Edge servers.
Client Proxy <server name> Accepts connections from front-end servers. Typically, messages are sent to a front-end server over SMTP.
During installation, three Receive connectors are created on the Front End transport, or Client Access server. The default Front End Receive connector is configured to accept SMTP communications from all IP address ranges. Additionally, there is a Receive connector that can act as an outbound proxy for messages sent to the front-end server from Mailbox servers. Finally, there is a secure Receive connector configured to accept messages encrypted with Transport Layer Security (TLS). These connectors are the following:
Default FrontEnd <server name> Accepts connections from SMTP senders over port 25. This is the common messaging entry point into your organization.
Outbound Proxy Frontend <server name> Accepts messages from a Send Connector on a back-end server, with front-end proxy enabled.
By default we don’t route the outgoing email to CAS. If we have some mailgaurd or compliance requirement on a separate CAS server then we can use it. If we have CAS and mailbox role on the same server then we don’t need to configure this connector. We can simply disable it.
Client Frontend <server name> Accepts secure connections, with Transport Layer Security (TLS) applied.
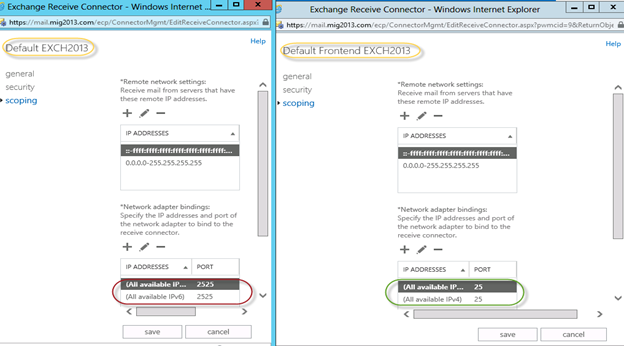
6. So we have to configure “Default Frontend Servername” connector which is accepting the emails on port 25. Yes this is very important when you have both role on one server then Frontend will be 25 and backend will be 2525
7. You might need to check email address policies, this might needs to re-apply. If we have more than 3000 mailboxes then it is suggest applying from EMS.
To understand the mailflow we can read the below article: https://msexchangeguru.com/2012/08/09/e2013-mailflow/
Exchange 2013 Certificates
Create a new Exchange certificate on Exchange 2013: https://msexchangeguru.com/2013/01/18/e2013-certificate/
Use current certificate
For Export and import of the cert Please check here – https://msexchangeguru.com/2013/06/29/import-cert-e2013/
- Export the cert from Exchange 2010
- Import the cert to Exchange 2013
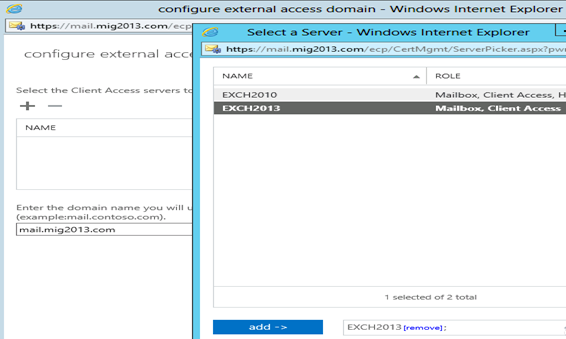
- Configure the external url. This is very simple in exchange 2013. You don’t need to go to every virtual directory property.
- Select the wrench mentioned below windows

5. Then this wizard will open, select the exchange 2013 server and give the external url and save it.
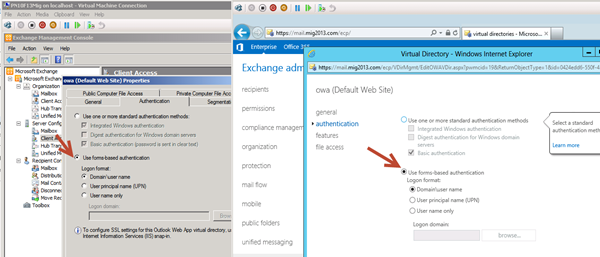
6. CAS Authentication will be “Use form-based authentication” on both Exchange 2013 and Exchange 2010/2007.
Database availability Group
We would like to configure a DAG for high availability with multiple databases. So we have 2 options.
1. DAG with IP. Check the below link to create a DAG with IP
https://msexchangeguru.com/2013/01/17/e2013-dag/
2. DAG without IP – This needs Exchange 2013 SP1 on Windows 2012 R2
Check the below link to create IP less DAG
https://msexchangeguru.com/2014/03/21/e2013sp1-ip-less-dag/
Update Feb 2015: If you have 2 datacenters expanded DAG then now you can configure your FSW in Azure which means your DAG can be configurable to 3 Data center expanded automated DAG. This will allow you to completely shut down the data center without loosing production connectivity. Here is the link to configure FSW in Azure – Using a Microsoft Azure VM as a DAG witness server
Move Arbitration and Discovery Search mailboxes
Follow the below steps to move all arbitration and discovery search mailboxes to final 2013 database.
Open EMS with run as administrator and run the following cmds
Get‐Mailbox –Arbitration | New‐MoveRequest –TargetDatabase TargetDBName
Get-Mailbox “*Discovery*” | New‐MoveRequest –TargetDatabase TargetDBName
Unified Messaging: Upgrade Exchange 2010 UM to Exchange 2013 UM
This is the optional step only for unified messaging configured organizations.
Please follow the below link to upgrade exchange 2010 UM to Exchange 2013 UM
http://technet.microsoft.com/en-us/library/dn169226(v=exchg.150).aspx
Configure Enabled Outlook Anywhere
For Exchange 2007
Set-OutlookAnywhere -Identity “2010 CasServerNameRpc (Default Web Site)” -ClientAuthenticationMethod Basic -SSLOffloading $False -ExternalHostName mail.domain.com -IISAuthenticationMethods {NTLM,Basic}
For Exchange 2010
Set-OutlookAnywhere -Identity “2010 CasServerNameRpc (Default Web Site)” -ClientAuthenticationMethod Basic -SSLOffloading $False -ExternalHostName mail.domain.com -IISAuthenticationMethods NTLM, Basic
Configure OAB
Run the below command to configure OAB for all databases
Get-MailboxDatabase | Set-MailboxDatabase -OfflineAddressBook “Default Offline Address List (Ex2013)”
Default Offline Address List (Ex2013) can be replaced by your custom named OAB.
Enabling and Configuring Outlook Anywhere
For Exchange 2007
Get-ExchangeServer | Where {($_.AdminDisplayVersion -Like “Version 8*”) -And ($_.ServerRole -Like “*ClientAccess*”)} | Get-ClientAccessServer | Where {$_.OutlookAnywhereEnabled -Eq $False} | Enable-OutlookAnywhere -ClientAuthenticationMethod Basic -SSLOffloading $False -ExternalHostName mail.domain.com -IISAuthenticationMethods NTLM, Basic
For Exchange 2010
Get-ExchangeServer | Where {($_.AdminDisplayVersion -Like “Version 14*”) -And ($_.ServerRole -Like “*ClientAccess*”)} | Get-ClientAccessServer | Where {$_.OutlookAnywhereEnabled -Eq $False} | Enable-OutlookAnywhere -ClientAuthenticationMethod Basic -SSLOffloading $False -ExternalHostName mail.domain.com -IISAuthenticationMethods NTLM, Basic
SCP – Service Connection Point Configuration:
Run the below command to configure SCP on Exchange Management Shell of 2007/2010/2013 separately:
get-ClientAccessServer | Set-ClientAccessServer -AutoDiscoverServiceInternalUri https://autodiscover.domainname/autodiscover/autodiscover.xml
SCP might be already configured on 2007/2010 server so you can also check it and use the same -AutoDiscoverServiceInternalUri. Run the below cmd to get current SCP on 2013 Shell
get-ClientAccessServer | fl name,AutoDiscoverServiceInternalUri
RemoteDomain:
Run the below cmd in EMS to allow auto forwarding, oof, auto reply and disable the possibility of winmail.dat from domino server.
Set-remoteDomain -AutoReplyEnabled $True -AutoForwardEnabled $True -TNEFEnabled $False -AllowedOOFType External
Pop/IMAP:
If you have pop3/imap4 users then you might like to configure 2013 for some addition configuration.
1. Configure the Basic authentication on EAC for CAS 2013
2. Start the services and change them to automatic.
Email address policy:
You might need this step if you organization was initially created on Exchange 2003.
1. Create a new email address policy if there is only one “Default Policy”.
2. Change the attributes of existing email address policy by running the below cmd
Get-emailaddresspolicy | Set-EmailAddressPolicy -RecipientFilter “Alias -ne $null” -IncludedRecipients AllRecipients
3. If you see the below error for the default policy then Remove “Default Policy” which was created in 2003 and will be in ready only mode in Exchange 2013.

Clean up health mailboxes:
When you remove default mailbox database, it does not remove health mailboxes which we can check by running the cmd and below warning will come. Health mailboxes are for the health service and they are specific for every database so we don’t need to move them rather we need to remove them.
Get-mailbox –monitoring
Mailboxes/HealthMailbox94863fe5394447619ec45c4e6b2dd971 has been corrupted, and it’s in an inconsistent state.
The following validation errors happened: WARNING: Database is mandatory on UserMailbox.
To fix this we need to delete user account in dsa.msc at yourdomain/Microsoft Exchange System Objects/Monitoring Mailboxes
Important: At the point configure your outlook for Exchange 2007/2010 mailbox and 2013 mailbox. If both are working from Internet then move to the next step.
CutOver :Updated 2007 part Feb 2015
Now it is the time to do cutover means point the connections to Exchange 2013. It can be done in few simple steps.
1. Create or change Public and Private DNS pointers.
a. autodiscover.domain.com will be pointing to the CAS 2010/2007 or Load balancer of CAS 2010/2007. So change the IP from Exchange 2010/2007 to 2013. In case of new installation or exchange 2007 environment we need to create new host record in DNS. This will be done on both internal and external
b. mail.domain.com (OWA/activesync/RPCoverhttp/mapioverhttp) Change the IP from Exchange 2010/2007 to Exchange 2013 CAS servers or Load balancer.
c. Create Legacy.domain.com host record in case of exchange 2007 co-existence in both public and private DNS. This will point to Exchange 2007 CAS servers or Exchange 2007 l0ad balancer CAS VIP.
2. Point your Spam Guard to forward all the emails to exchange 2013 to receive incoming mail via Exchange 2013.
3. Configure Spam Guard to accept emails from all Exchange 2013 Mailbox servers.
4. Configure all other application to send email to the Exchange 2013 Mailbox Servers.
5. Update PTR and SPF record if Exchange 2013 are sending the emails out directly.
6. In case of Exchange 2007, we need to update the following URLs and Authentications as well.
- EWS – Run the below cmd on Exchange 2007 EMS
Get-WebServicesVirtualDirectory | Set-WebServicesVirtualDirectory -ExternalUrl https://legacy.Domain.com/EWS/Exchange.asmx -internalurl https://legacy.Domain.com/EWS/Exchange.asmx
- OWA – Run the below cmd on Exchange 2007 EMS
Get-OWAVirtualDirectory | Set-OWAVirtualDirectory -ExternalUrl https://legacy.Domain.com/OWA -internalurl https://legacy.Domain.com/OWA
- OWA – Run the below command to change the authentication method in Exchange 2007 EMS
Get-owaVirtualDirectory -identity “CASName1OWA (Default web site)” | Set-OwaVirtualDirectory -ExternalAuthenticationMethods FBA,basic
Exchange 2013 Mailbox Migration
So what are we waiting for… Let us begin the mailbox migration.
- Now you can run the following cmdlet to move bulk or single mailbox
Get-Mailbox –Database “Exchange 2010/2007/2007 Database” –OrganizationUnit “DN of the OU” | New-Move Request –TargetDatabase “Exchange 2013 Database”

2. You can monitor the migration by running the following cmdlet or going to the migration tab in EAC:
Get-MoveRequest

3. Once completed it will show the below window

For Cross forest mailbox migration check this link: https://msexchangeguru.com/2013/11/02/e2013crossforestmigration/
Public Folder Migration
-
Once we complete all mailbox migration then we can start the Public Folders migration.
For Public Folder migration use the below Link:
https://msexchangeguru.com/2013/04/18/exchange2013-public-folders/
- Test everything working and shutdown Exchange 2010/2007 server for 1 production week and observe if no issue reported then go ahead with the Exchange 2010/2007 removal process.
Known Issues:
Active Sync Config without Domain Name: https://msexchangeguru.com/2013/08/06/e2013mobiledomain/
OWA redirection broken page and SSL: http://www.expta.com/2013/05/owa-2013-cu1-redirection-is-broken-for.html – This was fixed in CU3
If you have pop/imap user go for CU2: https://msexchangeguru.com/2013/08/04/e2013popimapauth/
Mailflow misconfiguration: https://msexchangeguru.com/2013/08/03/e2013-2010mailflowissue/
Certifacate and cryptographic provider Issue: http://msitpros.com/?p=1770
Legacy Removal
-
Now we are in a position to remove exchange 2010. We can follow the below link for the exchange 2010/2007 removal.
https://msexchangeguru.com/2013/09/01/e20102007decomposte2013mig/
Hit us with questions
Prabhat Nigam | MVP Exchange
Team @MSExchangeGuru
Keywords: Exchange 2010 to exchange 2013 migration, how to migrate to Exchange 2013
")


January 27th, 2016 at 10:37 pm
HI,
I installed Exchange 2016 in 2010 environment as a coexistence scenario. I am not able to send out emails externally using 2010 HUB transport server. Able to receive internal emails and external . my mailbox is located in 2016 server. what is the reason?
Thanks
Kannan
January 28th, 2016 at 12:25 am
Do we have any NDR?
February 4th, 2016 at 10:55 am
Silly question but I have seen differing answers and opinions….
Can I install Exchange 2013 in to my 2010 environment and not make any DNS changes for a few days. (Do all testing via hosts file) and have it not affect my existing Outlook clients? I want to get all the certs in place, load balancer, databases created, permissions assigned…..
I have seen where people said they were hitting the new 2013 cas servers even though they had not made any DNS changes.
Thanks
February 4th, 2016 at 6:09 pm
yes, this happens when you update the CAS urls. It goes in a loop if you have external url in both legacy and new exchange and they are same. So keep external null until you are ready for a cutover.
March 4th, 2016 at 2:49 am
When moving mailboxes. To which database is it advised to move the Administrator mailbox? The system default or the custom created database?
March 4th, 2016 at 3:07 am
When moving mailboxes to Exchange 2013 databases, where is it recommended to move the Administrator mailbox? The system default or the custom created databases?
March 4th, 2016 at 3:46 am
Custom created
May 16th, 2016 at 2:05 am
After I have completed all steps – I can login via web , however outlook will not connect
May 25th, 2016 at 3:18 pm
This should not be the case. you need to point your autodiscover to 2013. check the connection status and share.
June 19th, 2016 at 9:28 am
Hi Prabhat,
This is indeed a very informative page. I am working on E2k10 to E2k13 migration. We have Exchange spread at 2 locations under same exchange organization. Recently, i am migrated one geo E2k10 to E2k13, This Exchange server having single URL for Exchange https://mail.abc.com and autodiscover.abc.com having 30,000 users which went successfull.
Now, In this Exchange having single url https://eurcas.abc.com but having multiple smtp domains and multiplease autodiscover records pointing to OWA url.
So far i did is added all autodiscover details in SAN certificate and procure new one. Next is installation and configuration of Exchange. My questions is how do i handle multiple smtp domains and what configurations i need to do on F5 & in Internal DNS.
Please correct me ..
1. Map all autoiscover with A / CNAME on public DNS.
2. Set owa url in DNS records.
3. In Exchange SCP would be eurcas.abc.com\autodiscover\autodiscover.xml.
4. in F5 load balancer create owa and multiple autodiscover records. This will help to reach out to respective mailboxes.??
Please suggest … Thanks in Advance .. Amit kumar sinha.
July 7th, 2016 at 9:59 pm
Hi, in the section “Exchange 2013 Certificates” you said there are 2 options. One is to use current certificate, is the other option to create a new certificate? If we are creating new certificates, should we include mail, autodiscover and all the Exchange 2013 servers FQDN in the Subject alternate name?
July 8th, 2016 at 3:00 am
Yes, other option is new cert and you should all SAN names in it.
August 8th, 2016 at 6:38 am
Unfortunately I can’t get past the Mailbox Role installation service. Even after upgrading all the schema’s and /preparead etc – still fails.
Error:
The following error was generated when “$error.Clear();
if (!$RoleIsDatacenter -and !$RoleIsDatacenterDedicated)
{
$createNewOab = $false;
$oabName = $null;
$oabAddressList = $null;
$oabVdirs = $null;
$oabGlobalWebDistribution = $false;
$oabConfiguredAttributes = $null;
Write-ExchangeSetupLog -Info (“Looking for an existing default OAB”);
$defaultOab = Get-OfflineAddressBook -DomainController:$RoleDomainController | where {$_.IsDefault};
if ($defaultOab -ne $null)
{
Write-ExchangeSetupLog -Info (“Found a default OAB: ” + $defaultOab.Name + “; checking its version”);
if ($defaultOab.ExchangeVersion.CompareTo([Microsoft.Exchange.Data.ExchangeObjectVersion]::Exchange2012) -lt 0)
{
$e15Oab = Get-OfflineAddressBook -DomainController:$RoleDomainController | where {$_.ExchangeVersion.CompareTo([Microsoft.Exchange.Data.ExchangeObjectVersion]::Exchange2012) -eq 0};
if ($e15Oab -eq $null)
{
Write-ExchangeSetupLog -Info (“Existing OAB is Exchange 2010 or older; will create a new OAB”);
$createNewOab = $true;
$oabName = $defaultOab.Name + ” (Ex2013)”;
$oabAddressList = $defaultOab.AddressLists;
$oabGlobalWebDistribution = $defaultOab.GlobalWebDistributionEnabled;
$oabConfiguredAttributes = $defaultOab.ConfiguredAttributes;
}
else
{
Write-ExchangeSetupLog -Info (“Already has an existing Exchange 2013 OAB:” + $e15Oab.Name + “; will not create a new OAB”);
}
}
else
{
Write-ExchangeSetupLog -Info (“Existing OAB is Exchange 2013 or newer; will not create a new OAB”);
}
}
else
{
Write-ExchangeSetupLog -Info (“Did not find a default OAB; will create one”);
$createNewOab = $true;
$oabName = [Microsoft.Exchange.Data.Directory.SystemConfiguration.OfflineAddressBook]::DefaultName;
$nonDefaultOabWithDefaultName = Get-OfflineAddressBook $oabName -DomainController:$RoleDomainController -ErrorAction SilentlyContinue | where {$_.IsDefault -eq $false};
if ($nonDefaultOabWithDefaultName -ne $null)
{
$createNewOab = $false;
Write-ExchangeSetupLog -Warning `
(“Offline address book ” + `
$nonDefaultOabWithDefaultName.Name + `
” already exists: ” + `
$nonDefaultOabWithDefaultName.DistinguishedName + `
“. Use administrative tools to change it to default OAB.”);
}
$allGals = @(Get-GlobalAddressList -DomainController:$RoleDomainController | where {$_.IsDefaultGlobalAddressList});
if ($allGals -eq $null -or $allGals.Count -eq 0)
{
$createNewOab = $false;
Write-ExchangeSetupLog -Warning `
(“Couldn’t find the default global address list. The default offline address book can’t be created.”);
}
elseif ($allGals.Count -gt 1)
{
$createNewOab = $false;
Write-ExchangeSetupLog -Warning `
(“Found ” + $allGals.Count + ” default global address lists. You can have only one default global address list in your organization. The default offline address book will not be created.”);
}
else
{
$oabAddressList = $allGals[0];
Write-ExchangeSetupLog -Info (“OAB will be based on default GAL: ” + $oabAddressList.Name);
}
}
if ($createNewOab)
{
if ($oabGlobalWebDistribution -eq $false)
{
$currentAdSiteDn = (Get-ExchangeServer $RoleFqdnOrName -DomainController:$RoleDomainController).Site.DistinguishedName;
$allOabVdirs = @(Get-OabVirtualDirectory -ADPropertiesOnly -DomainController:$RoleDomainController);
$e15MinimumServerVersion = New-Object Microsoft.Exchange.Data.ServerVersion([Microsoft.Exchange.Data.Directory.SystemConfiguration.Server]::E15MinVersion);
if ($allOabVdirs -ne $null -and $allOabVdirs.Count -gt 0)
{
foreach ($oabVdir in $allOabVdirs)
{
if ([Microsoft.Exchange.Data.ServerVersion]::Compare($oabVdir.AdminDisplayVersion, $e15MinimumServerVersion) -gt 0)
{
$oabVdirSiteDn = (Get-ExchangeServer $oabVdir.Server -DomainController:$RoleDomainController).Site.DistinguishedName;
if ($oabVdirSiteDn -eq $currentAdSiteDn)
{
$oabVdirs = $oabVdir;
break;
}
elseif ($oabVdirs -eq $null)
{
$oabVdirs = $oabVdir;
}
}
}
}
if ($oabVdirs -ne $null)
{
Write-ExchangeSetupLog -Info (“OAB will be distributed to OAB virtual directory ” + $oabVdirs.Name);
}
else
{
Write-ExchangeSetupLog -Info (“Could not find any OAB virtual directories; OAB will be configured without distribution.”);
}
}
try
{
Write-ExchangeSetupLog -Info (“Creating new default OAB.”);
$newOab = New-OfflineAddressBook `
-Name $oabName `
-AddressLists $oabAddressList `
-VirtualDirectories $oabVdirs `
-GlobalWebDistributionEnabled $oabGlobalWebDistribution `
-IsDefault $true `
-DomainController:$RoleDomainController;
}
catch [Microsoft.Exchange.Data.Directory.ADObjectAlreadyExistsException]
{
Write-ExchangeSetupLog -Warning (“Tried to create new default OAB but the object already exists; it may have been created by another instance of setup.”);
}
if ($oabConfiguredAttributes -ne $null)
{
Write-ExchangeSetupLog -Info (“Setting OAB ConfiguredAttributes to: ” + $oabConfiguredAttributes);
Set-OfflineAddressBook $newOab -ConfiguredAttributes $oabConfiguredAttributes -DomainController:$RoleDomainController;
}
}
}
” was run: “Address list or global address list “yateleyschool.local/Configuration/Deleted Objects/All Groups
DEL:4a459ed3-d5e1-4255-8270-6eee813024b2″ was not found. Please make sure you typed the identity correctly.”.
Error:
The following error was generated when “$error.Clear();
if (!$RoleIsDatacenter -and !$RoleIsDatacenterDedicated)
{
$createNewOab = $false;
$oabName = $null;
$oabAddressList = $null;
$oabVdirs = $null;
$oabGlobalWebDistribution = $false;
$oabConfiguredAttributes = $null;
Write-ExchangeSetupLog -Info (“Looking for an existing default OAB”);
$defaultOab = Get-OfflineAddressBook -DomainController:$RoleDomainController | where {$_.IsDefault};
if ($defaultOab -ne $null)
{
Write-ExchangeSetupLog -Info (“Found a default OAB: ” + $defaultOab.Name + “; checking its version”);
if ($defaultOab.ExchangeVersion.CompareTo([Microsoft.Exchange.Data.ExchangeObjectVersion]::Exchange2012) -lt 0)
{
$e15Oab = Get-OfflineAddressBook -DomainController:$RoleDomainController | where {$_.ExchangeVersion.CompareTo([Microsoft.Exchange.Data.ExchangeObjectVersion]::Exchange2012) -eq 0};
if ($e15Oab -eq $null)
{
Write-ExchangeSetupLog -Info (“Existing OAB is Exchange 2010 or older; will create a new OAB”);
$createNewOab = $true;
$oabName = $defaultOab.Name + ” (Ex2013)”;
$oabAddressList = $defaultOab.AddressLists;
$oabGlobalWebDistribution = $defaultOab.GlobalWebDistributionEnabled;
$oabConfiguredAttributes = $defaultOab.ConfiguredAttributes;
}
else
{
Write-ExchangeSetupLog -Info (“Already has an existing Exchange 2013 OAB:” + $e15Oab.Name + “; will not create a new OAB”);
}
}
else
{
Write-ExchangeSetupLog -Info (“Existing OAB is Exchange 2013 or newer; will not create a new OAB”);
}
}
else
{
Write-ExchangeSetupLog -Info (“Did not find a default OAB; will create one”);
$createNewOab = $true;
$oabName = [Microsoft.Exchange.Data.Directory.SystemConfiguration.OfflineAddressBook]::DefaultName;
$nonDefaultOabWithDefaultName = Get-OfflineAddressBook $oabName -DomainController:$RoleDomainController -ErrorAction SilentlyContinue | where {$_.IsDefault -eq $false};
if ($nonDefaultOabWithDefaultName -ne $null)
{
$createNewOab = $false;
Write-ExchangeSetupLog -Warning `
(“Offline address book ” + `
$nonDefaultOabWithDefaultName.Name + `
” already exists: ” + `
$nonDefaultOabWithDefaultName.DistinguishedName + `
“. Use administrative tools to change it to default OAB.”);
}
$allGals = @(Get-GlobalAddressList -DomainController:$RoleDomainController | where {$_.IsDefaultGlobalAddressList});
if ($allGals -eq $null -or $allGals.Count -eq 0)
{
$createNewOab = $false;
Write-ExchangeSetupLog -Warning `
(“Couldn’t find the default global address list. The default offline address book can’t be created.”);
}
elseif ($allGals.Count -gt 1)
{
$createNewOab = $false;
Write-ExchangeSetupLog -Warning `
(“Found ” + $allGals.Count + ” default global address lists. You can have only one default global address list in your organization. The default offline address book will not be created.”);
}
else
{
$oabAddressList = $allGals[0];
Write-ExchangeSetupLog -Info (“OAB will be based on default GAL: ” + $oabAddressList.Name);
}
}
if ($createNewOab)
{
if ($oabGlobalWebDistribution -eq $false)
{
$currentAdSiteDn = (Get-ExchangeServer $RoleFqdnOrName -DomainController:$RoleDomainController).Site.DistinguishedName;
$allOabVdirs = @(Get-OabVirtualDirectory -ADPropertiesOnly -DomainController:$RoleDomainController);
$e15MinimumServerVersion = New-Object Microsoft.Exchange.Data.ServerVersion([Microsoft.Exchange.Data.Directory.SystemConfiguration.Server]::E15MinVersion);
if ($allOabVdirs -ne $null -and $allOabVdirs.Count -gt 0)
{
foreach ($oabVdir in $allOabVdirs)
{
if ([Microsoft.Exchange.Data.ServerVersion]::Compare($oabVdir.AdminDisplayVersion, $e15MinimumServerVersion) -gt 0)
{
$oabVdirSiteDn = (Get-ExchangeServer $oabVdir.Server -DomainController:$RoleDomainController).Site.DistinguishedName;
if ($oabVdirSiteDn -eq $currentAdSiteDn)
{
$oabVdirs = $oabVdir;
break;
}
elseif ($oabVdirs -eq $null)
{
$oabVdirs = $oabVdir;
}
}
}
}
if ($oabVdirs -ne $null)
{
Write-ExchangeSetupLog -Info (“OAB will be distributed to OAB virtual directory ” + $oabVdirs.Name);
}
else
{
Write-ExchangeSetupLog -Info (“Could not find any OAB virtual directories; OAB will be configured without distribution.”);
}
}
try
{
Write-ExchangeSetupLog -Info (“Creating new default OAB.”);
$newOab = New-OfflineAddressBook `
-Name $oabName `
-AddressLists $oabAddressList `
-VirtualDirectories $oabVdirs `
-GlobalWebDistributionEnabled $oabGlobalWebDistribution `
-IsDefault $true `
-DomainController:$RoleDomainController;
}
catch [Microsoft.Exchange.Data.Directory.ADObjectAlreadyExistsException]
{
Write-ExchangeSetupLog -Warning (“Tried to create new default OAB but the object already exists; it may have been created by another instance of setup.”);
}
if ($oabConfiguredAttributes -ne $null)
{
Write-ExchangeSetupLog -Info (“Setting OAB ConfiguredAttributes to: ” + $oabConfiguredAttributes);
Set-OfflineAddressBook $newOab -ConfiguredAttributes $oabConfiguredAttributes -DomainController:$RoleDomainController;
}
}
}
” was run: “Cannot bind argument to parameter ‘Identity’ because it is null.”.
Please help – Microsoft help websites have been shocking!
Thanks,
Mike
August 8th, 2016 at 11:48 am
Please share the error from setup.log
August 25th, 2016 at 3:41 pm
Great read Prabhat!
I’m TRYING to co-exist with a very basic 2010 setup and have 2 questions.
1)We don’t have outlook anywhere enabled in 2010, do I still need to enable it to co-exist with 2013?
We are not exposing email to the outside world, only internal outlook 2010 mail clients can connect.
2)Certs- We are using the 2010 servers ‘self signed certs’ to cert the outlook 2010 clients on their desktops.
I noticed 3 different certs on the 2013 server, do you know which cert I should export to my client desktop so that the 2013 servers will accept their connections?
Thanks,
Roger
August 31st, 2016 at 4:10 am
1. no
2. For external access it should be 3rd part cert. If your requirement is just outlook internally then you need to obtain a cert from internal root CA for 2013 CAS connection for outlook anywhere or mapi-http. There is no RPC-mapi in 2013/2016 so you need a cert.
April 21st, 2017 at 12:07 am
Hi PN:
Can you assit with this issue please. I migrated active mailboxes from exch2010 b/d last year already and removed the databases, but now 2-3 users coming back to me that their emails can’t connect.
Actually their mailboxes I mentioned are on those removed d/b which are no longer available.
What are the fixes here?
thank you.