How to perform patching for Exchange 2010 in DAG Environment
Let’s take a look at how to effectively patch Exchange 2010 DAG environment.
Windows and Exchange Application patching is an important regular requirement for the any Environment and this also requires a proper planning and regularity. If we don’t follow the process and don’t patch our servers then we leave our servers open for security risk and application bugs. Following the article will help in patching windows OS and Exchange application on an exchange server.
Permissions
The following permissions will be required.
- Windows Patching: Local Administrator
- Exchange Patching: The following group membership will be required:
Local Administrator;
Schema Admins;
Enterprise Admins;
Domain Admins;
Organization management.
Windows Patching Scope and execution cycle
- Cycle Time – Every Month
- Day – 2nd and 3rd Weekends
- Only one server at a time
Exchange Patching Scope and execution cycle
- Cycle Time – Every Quarter
- Day – 4th and Next Weekends
- Only one server at a time
Preparation
- Test the patches in the Lab
- Raise a change and wait for the approval. Also write tested in the lab.
- Once Change has been approved go ahead with further steps.
- Place servers in the maintenance mode Scom/Tivoli/other monitoring tool
-
On Exchange Server Move PAM to other Exchange server
- Open Exchange management shell
-
Run the following cmdlet
cluster.exe “DagName” group “Cluster Group” /MoveTo:”destinationServer”
- Open Exchange management shell
-
Place servers in the DAG maintenance mode
- Open Exchange management shell
-
Run the below cmdlet :
Set-ExecutionPolicy Unrestricted
- Cd “Exchange ServerScripts”
- Run ‘maintenancewrapper’ script
-
If you don’t find the script at the above location then download from the below link.
.maintenanceWrapper.ps1 –server <SERVERNAME> –action START
-
Verify the server is in maintenance mode and database has moved to the other server.
To check maintenance mode run the below cmdlet:
Get-DatabaseAvailabilityGroup -Status | fl Name,serversinmaintenance
- Open Exchange management shell
To check the Database mounted on which server run the below cmdlet:
Get-MailboxDatabase | fl name,Server
If the above cmdlet cause any issue and server does not go in to the maintenance mode then follow this manual process to move database. On Exchange Server Move the Exchange Databases to other Exchange Servers
Open Exchange management shell and run the following cmdlet
Move-ActiveMailboxDatabase -Identity ‘DBNAme’ -ActivateOnServer ‘DestinationServer’ -MountDialOverride ‘None’
Patching Procedure
-
Login to the server
-
For Windows Patching
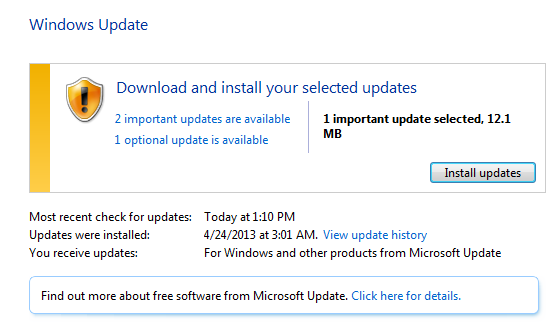
- Go to start à All Programs à Windows Update

- Go to start à All Programs à Windows Update
2. Click on the blue where it says numbers of updates are available.

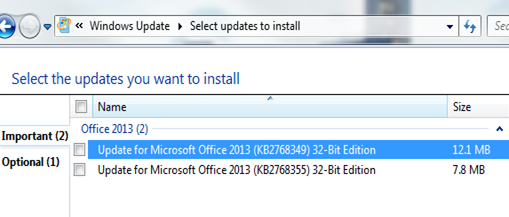
3. Ensure that there is no Exchange rollup/hotfix/ServicePack, if there is a rollup checked then UNCHECK the Exchange rollup/hotfix/ServicePack
4. Then Click ok and then click on Install Updates
5. Once completed click finished and restart the server.
3. For Exchange Patching
- Download the patch or service pack from Microsoft link only.
-
This “service pack/ roll up” will be preferred to download to one server and copied to all other server.
-
Install the Exchange patch.
- Restart the server once Exchange patching has completed
Post Patching Activity
-
Stop the maintenance mode
- Open Exchange management shell
-
Run the below cmdlet :
Set-ExecutionPolicy Unrestricted
- Cd “Exchange ServerScripts”
- Run ‘maintenancewrapper’ script
-
If you don’t find the script at the above location then download from the below link.
.maintenanceWrapper.ps1 –server <SERVERNAME> –action STOP
-
Verify the server is in maintenance mode and database has moved to the other server.
To check maintenance mode run the below cmdlet:
Get-DatabaseAvailabilityGroup -Status | fl Name,serversinmaintenance
To check the Database mounted on which server run the below cmdlet:
Get-MailboxDatabase | fl name,Server
- Open Exchange management shell
-
On Exchange Server Move the Exchange Databases to other Exchange Servers
- Open Exchange management shell
- Run the following cmdlet
Move-ActiveMailboxDatabase -Identity ‘DBNAme’ -ActivateOnServer ‘DestinationServer’ -MountDialOverride ‘None’
- Open Exchange management shell
-
On Exchange Server Move PAM to other Exchange server
- Open Exchange management shell
-
Run the following cmdlet
cluster.exe “DagName” group “Cluster Group” /MoveTo:”destinationServer”
- Open Exchange management shell
Verification Tests
Run the following tests on all Exchange servers
-
Get-queue | ? {$_.MessageCount –gt 5}
Queue should be less than 10 mails
-
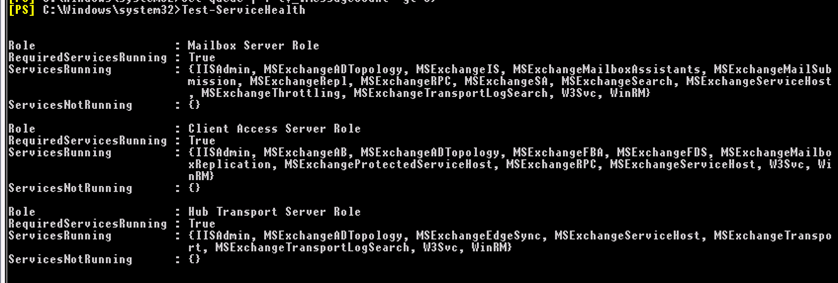
Test-ServiceHealth
No service should show in ServiceNotRunning under any role.

3. Test-ReplactionHealth
Replication should show Passed for all
4. Test-OutlookWebServices
No Error should come except the Id 1104
5. Test-Mapiconnectivity
This should come success
6. Get-mailboxdatabasecopystatus **
Databases should show healthy and mounted.
7. Login to OWA using test account and test send and receive of the email.
Prabhat Nigam | MVP Exchange
Team @MSExchangeGuru


May 13th, 2013 at 8:50 am
[…] How to perform patching for Exchange 2010 in DAG Environment […]
September 18th, 2013 at 3:36 am
Great post, so is it wise to leave windows patching frequency so long i.e Monthly ?
September 18th, 2013 at 9:08 am
@Wayne,
-This blog is a step by step process for patching Exchange servers in DAG cluster.
-We would recommend following security teams guideline of your environment.
-Microsoft releases the patches on 2nd Tuesday of every month so 2nd weekend of every month can be good for patching on lab/test servers.
-If lab/test servers works well then you can choose 3rd weekend of the Month for the Patch on production servers.
September 18th, 2013 at 9:41 am
Thanks for advice