Exchange 2010/2007 to 2013 Migration and Co-existence Guide
We don’t have a lot of guides out there helping with a step by step guide for the migration and co-existence of Exchange 2010/2007 to Exchange 2013So, here you go !!!

Update:
If you are planning to employ a third party product for migration – look no further. CodeTwo is a mature and reliable product for full blown Exchange migraiton from
Exchange 2003/2007/2010 – cross forest or cross domain migration:
Take a look here:
CodeTwo Exchange migration for Exchange 2003 to 2010/2013: Operational review: https://msexchangeguru.com/2013/11/24/codetwo-exchange-migration/
Download here:
Download Codetwo for free: http://www.codetwo.com/exchange-migration/
Before you proceed with the actual migration steps, these articles may be of interest to you:
Exchange 2013 CAS Role Demystified: https://msexchangeguru.com/2013/05/22/exchange-2013-cas/
Exchange 2013 High Availability demystified: https://msexchangeguru.com/2013/05/23/e2013-ha-demystified/
Load Balancing Exchange Server 2013 – Good to know stuff: https://msexchangeguru.com/2013/06/05/load-balancing/
Public Folders Migration from Exchange 2007/2010 to Exchange 2013: https://msexchangeguru.com/2013/04/18/exchange2013-public-folders/
Upgrade from Exchange 2013 CU1 or RTM to CU2: https://msexchangeguru.com/2013/07/10/install-e2013-cu2/
Monitoring and troubleshooting Exchange using powershell: https://msexchangeguru.com/2013/07/23/monitoring-powershell/
For Complex Exchange 2007 migration check the common errors here – http://blogs.technet.com/b/exchange/archive/2007/09/10/3403885.aspx
Check our multisite url and authentication blog here – https://msexchangeguru.com/2015/08/22/e20132007-urlsauth-multiadsite/
Preparing Exchange 2010/2007
-
Install the hotfix 2550886 for DAG failover improvements on Exchange 2010/2007 DAG servers.
-
Login to the Exchange 2010/2007 server with Schema Admins, enterprise admins, domain admins and organization management group member id as SP 3 will extend the schema.
-
Install Exchange 2010/2007 SP3 on all the exchange 2010/2007 servers in CAS then HT then mailbox role order if they are not on the same server
SP3 can be downloaded from the below link:
http://www.microsoft.com/en-us/download/details.aspx?id=36768
-
Check the below link for SP3 installation steps
https://msexchangeguru.com/2013/04/03/exchange-2010/2007-sp3/
Installing Exchange 2013
-
I would suggest going for Windows 2012 for Exchange 2013 but you can use windows 2008 R2 SP1 as well.
-
Install the windows 2012 server or Windows 2008 R2 SP1 on a new server and join the domain. It can be virtual or physical. Now Microsoft support virtualized mailbox role.
-
Run the windows update and install all the recommended updates.
-
You might like to configure windows NLB if you don’t have NLB hardware. Check the below blog on it. (optional) https://msexchangeguru.com/
2013/08/14/windowsnlb/ - For Active Directory preparation check the “step 3 preparing active directory” at the blog mentioned below: https://msexchangeguru.com/2013/04/29/install-e2013/
- Install the following prerequisites for Exchange 2013
For Windows 2012:
-
Open Windows PowerShell.
-
Run the following command to install the required Windows components.
Install-WindowsFeature AS-HTTP-Activation, Desktop-Experience, NET-Framework-45-Features, RPC-over-HTTP-proxy, RSAT-Clustering, RSAT-Clustering-CmdInterface, RSAT-Clustering-Mgmt, RSAT-Clustering-PowerShell, Web-Mgmt-Console, WAS-Process-Model, Web-Asp-Net45, Web-Basic-Auth, Web-Client-Auth, Web-Digest-Auth, Web-Dir-Browsing, Web-Dyn-Compression, Web-Http-Errors, Web-Http-Logging, Web-Http-Redirect, Web-Http-Tracing, Web-ISAPI-Ext, Web-ISAPI-Filter, Web-Lgcy-Mgmt-Console, Web-Metabase, Web-Mgmt-Console, Web-Mgmt-Service, Web-Net-Ext45, Web-Request-Monitor, Web-Server, Web-Stat-Compression, Web-Static-Content, Web-Windows-Auth, Web-WMI, Windows-Identity-Foundation
-
Restart the server.
-
http://www.microsoft.com/en-us/download/details.aspx?id=34992
-
http://www.microsoft.com/en-us/download/details.aspx?id=17062
-
http://www.microsoft.com/en-us/download/details.aspx?id=26604
For Windows 2008:
-
Open Windows PowerShell.
-
Run the following command to load the Server Manager module.
Import-Module ServerManager
-
Run the following command to install the required Windows components.
Add-WindowsFeature Desktop-Experience, NET-Framework, NET-HTTP-Activation, RPC-over-HTTP-proxy, RSAT-Clustering, RSAT-Web-Server, WAS-Process-Model, Web-Asp-Net, Web-Basic-Auth, Web-Client-Auth, Web-Digest-Auth, Web-Dir-Browsing, Web-Dyn-Compression, Web-Http-Errors, Web-Http-Logging, Web-Http-Redirect, Web-Http-Tracing, Web-ISAPI-Ext, Web-ISAPI-Filter, Web-Lgcy-Mgmt-Console, Web-Metabase, Web-Mgmt-Console, Web-Mgmt-Service, Web-Net-Ext, Web-Request-Monitor, Web-Server, Web-Stat-Compression, Web-Static-Content, Web-Windows-Auth, Web-WMI
-
Restart the server
-
http://msdn.microsoft.com/en-us/library/5a4x27ek(VS.110).aspx
-
http://www.microsoft.com/en-us/download/details.aspx?id=34595
-
Microsoft Unified Communications Managed API 4.0, Core Runtime 64-bit
http://www.microsoft.com/en-us/download/details.aspx?id=34992
-
http://www.microsoft.com/en-us/download/details.aspx?id=17062
-
http://www.microsoft.com/en-us/download/details.aspx?id=26604
6. Restart the server
7. Exchange 2013 Installation – Please follow the below link for the Exchange 2013 installation: https://msexchangeguru.com/2013/04/29/install-e2013/or Exchange 2013 SP1installation: https://msexchangeguru.com/2014/03/02/e2013sp1-installationupgrade/
Imp: You can directly install Exchange 2013 CU1 as well. If you directly install CU1 then you can skip step 12 – Testing mailbox move without CU1. If you are installing CU2 make sure you are installing CU2 V2.
If you are doing new installation then you can directly install Exchange 2013 CU1 which itself is a full setup. You can follow same schema update and AD preparation steps.
After Exchange 2013 installation the biggest challenge will be how to login to the EAC, there is no mailbox on Exchange 2013 and redirection or proxy is not configured to use the existing Exchange admin user.
If you are trying to access EAC for the first time and your mailbox is on Exchange 2010, you need to use the URL in the format:
https://Exchange2013ServerName/ecp?ExchClientVer=15
This is because in a co-existence scenario, your mailbox is still housed on the Exchange 2010 mailbox server, the browser will default to the Exchange Server 2010 ECP. Now if you want to access the Exchange 2010 ECP and your mailbox resides on an Exchange 2013 mailbox server, use the following URL:
https://Exchange2010ServerName/ecp?ExchClientVer=14.
Take a look at:
Working with EAC or Exchange administration center in Exchange 2013 – Part1: https://msexchangeguru.com/2013/01/16/eac-exchange-2013/
So you need to create a mailbox to administer Exchange 2013. We will follow the below steps:
- Create a mailbox in Exchange 2013 mailbox database.
- “New-Mailbox –name 2013Admin –userPrincipalName 2013Admin@domain.com –Database “2013 DBName””
-
Run Get-mailboxdatabase to check the database name

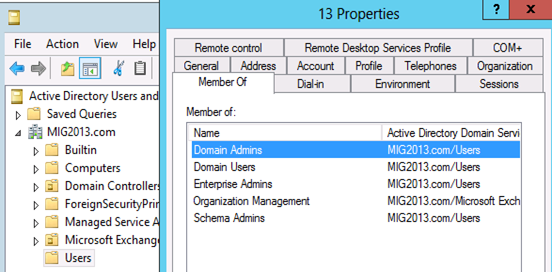
4. Give the permission to the mailbox to Administrate EAC.
Add the following group membership:
Domain Admins
Schema Admins
Enterprise Admins
Organization Management
Test mailbox migration without CU1 for Exchange 2013
-
Now, you should be able to login to EAC by going to the url https://localhost/ECP. If you will test the mailbox migration from Exchange 2010/2007 to Exchange 2013 before CU1 for Exchange 2013, it will be working but full co-existence will not work so it is a necessity to install CU1. As an example my Servers are mentioned below:
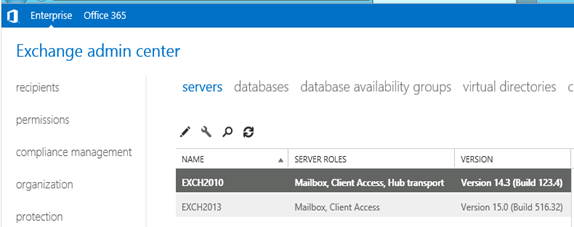
- EAC will show Databases from both the servers
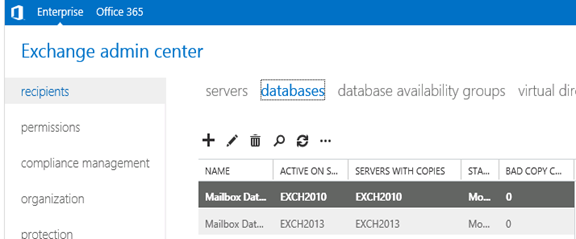
- Now I am migrating the mailbox being Exchange 2010/2007 on SP3 and Exchange 2013 without CU1.
Created new mailbox in Exchange 2010/2007, you can see 2013 database is not showing here
- Database before move
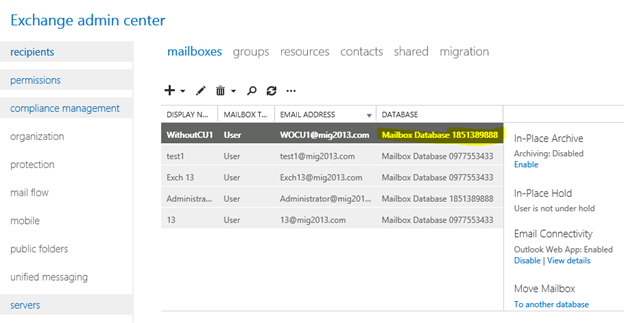
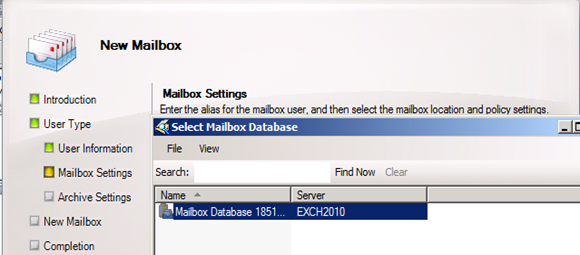
- I have moved the mailbox from Exchange 2013 EAC to Exchange 2013 database. Now click on migration to check the status
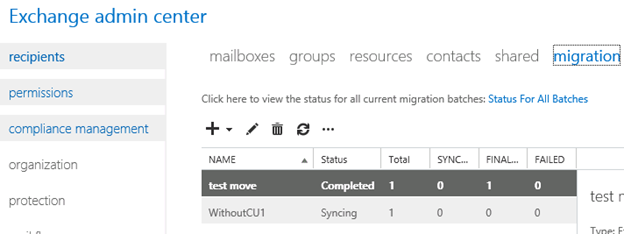
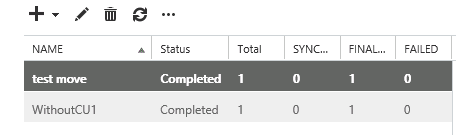
- Now Refresh and you will see completed depends on the size of mailbox.
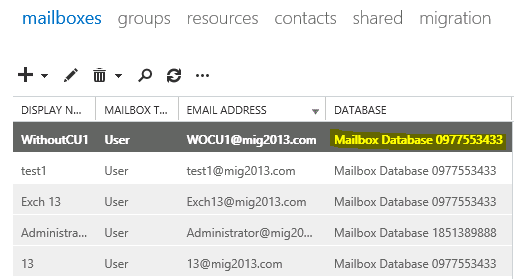
- Check the Database name has changed
Continue the Exchange 2013 CU1 installation
5. If you have not install CU1 version of exchange 2013 then this is the time to install Exchange 2013 Cumulative update 1 so that we avoid any co-existence issue. If you are doing new installation then you can directly install Exchange 2013 CU1 which itself is a full setup. You can follow same schema update and AD preparation steps mentioned in the Exchange 2013 installation article
Update 4/7/2014: Now – We can go for SP1 – https://msexchangeguru.com/2014/03/02/e2013sp1-installationupgrade/
6. Download the Exchange 2013 from the below link which is an Exchange 2013 setup with Cumulative update
http://www.microsoft.com/en-us/download/details.aspx?id=38176
7. Install the Exchange 2013 CU 1 with the help of below link:
https://msexchangeguru.com/2013/04/15/e2013-cu1-2/
Configuring Exchange 2013 and network
-
Transport Configuration
-
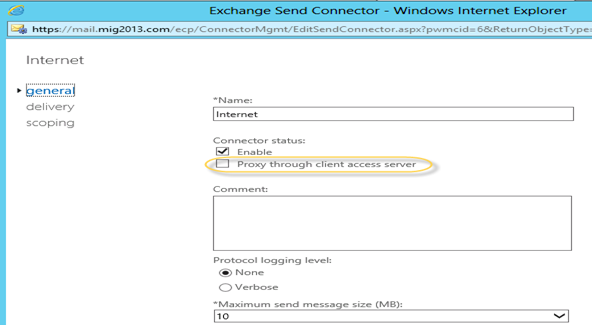
Send connector
1. Exchange 2013 reads exchange 2010/2007 send connector information. Click on the pencil icon to check and add exchange 2013 in the same send connector.
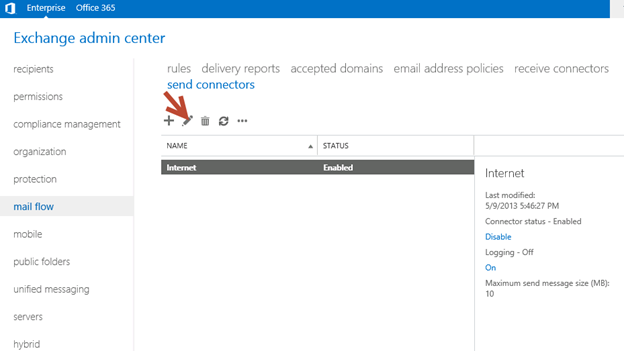
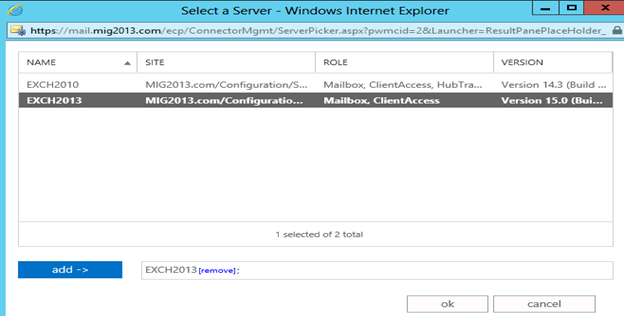
2. Click on scoping and + icon to add the server
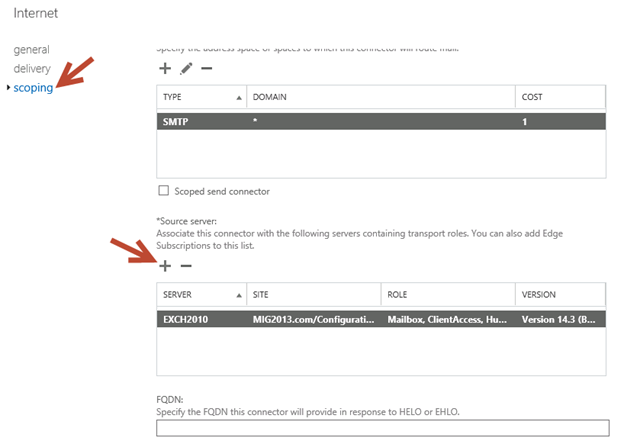
3. Select the server and add, then click on and save. Send connector configuration completed.
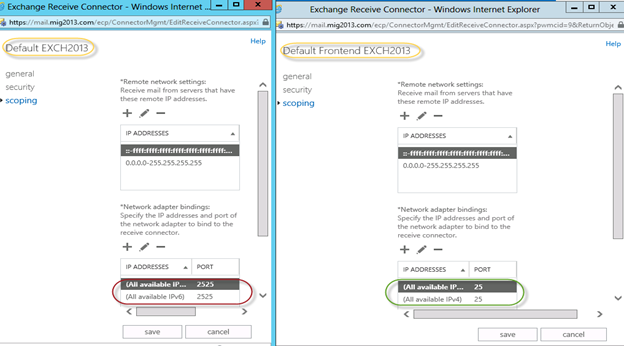
3. Receive Connector
1. Add a receive connector as per the current connector configuration.
2. Select the 2013 server, oh what we have 5 connectors for what. Let me explain here.
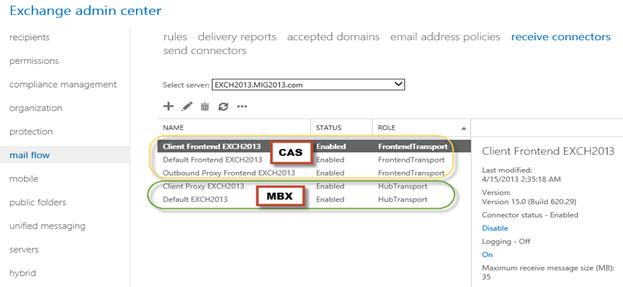
3. You can see all 5 together here as I have CAS and Mailbox on same server. First 3 are for the CAS connector and remain 2 are for mailbox role.
4. I would link to explain the transport pipe line here which consists of the following services:
Front End Transport service – This service runs on all Client Access servers and acts as a stateless proxy for all inbound and outbound external SMTP traffic for the Exchange 2013 organization. The Front End Transport service doesn’t inspect message content, only communicates with the Transport service on a Mailbox server, and doesn’t queue any messages locally.
Transport service – This service runs on all Mailbox servers and is virtually identical to the Hub Transport server role in previous versions of Exchange. The Transport service handles all SMTP mail flow for the organization, performs message categorization, and performs message content inspection. Unlike previous versions of Exchange, the Transport service never communicates directly with mailbox databases. That task is now handled by the Mailbox Transport service. The Transport service routes messages between the Mailbox Transport service, the Transport service, and the Front End Transport service.
Mailbox Transport service – This service runs on all Mailbox servers and consists of two separate services: the Mailbox Transport Submission service and Mailbox Transport Delivery service. The Mailbox Transport Delivery service receives SMTP messages from the Transport service on the local Mailbox server or on other Mailbox servers, and connects to the local mailbox database using an Exchange remote procedure call (RPC) to deliver the message. The Mailbox Transport Submission service connects to the local mailbox database using RPC to retrieve messages, and submits the messages over SMTP to the Transport service on the local Mailbox server, or on other Mailbox servers. The Mailbox Transport Submission service has access to the same routing topology information as the Transport service. Like the Front End Transport service, the Mailbox Transport service also doesn’t queue any messages locally.
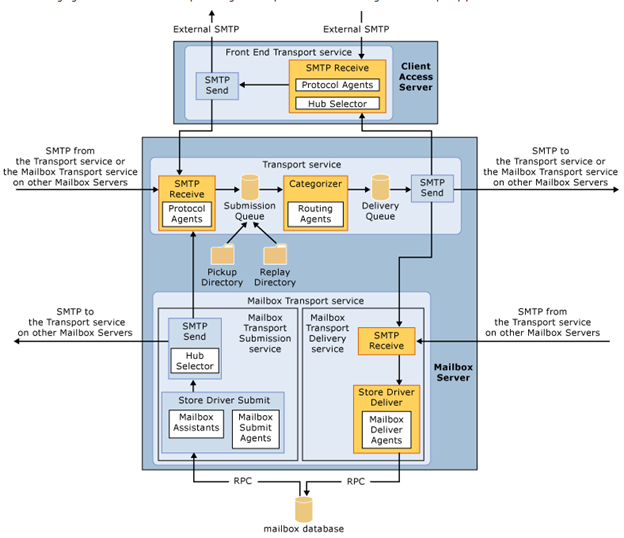 (from TechNet)
5. Here are the details about the receive connectors
When you install a Mailbox server running the Transport service, two Receive connectors are created. No additional Receive connectors are needed for typical operation, and in most cases the default Receive connectors don’t require a configuration change. These connectors are the following:
Default <server name> Accepts connections from Mailbox servers running the Transport service and from Edge servers.
Client Proxy <server name> Accepts connections from front-end servers. Typically, messages are sent to a front-end server over SMTP.
During installation, three Receive connectors are created on the Front End transport, or Client Access server. The default Front End Receive connector is configured to accept SMTP communications from all IP address ranges. Additionally, there is a Receive connector that can act as an outbound proxy for messages sent to the front-end server from Mailbox servers. Finally, there is a secure Receive connector configured to accept messages encrypted with Transport Layer Security (TLS). These connectors are the following:
Default FrontEnd <server name> Accepts connections from SMTP senders over port 25. This is the common messaging entry point into your organization.
Outbound Proxy Frontend <server name> Accepts messages from a Send Connector on a back-end server, with front-end proxy enabled.
By default we don’t route the outgoing email to CAS. If we have some mailgaurd or compliance requirement on a separate CAS server then we can use it. If we have CAS and mailbox role on the same server then we don’t need to configure this connector. We can simply disable it.
Client Frontend <server name> Accepts secure connections, with Transport Layer Security (TLS) applied.
6. So we have to configure “Default Frontend Servername” connector which is accepting the emails on port 25. Yes this is very important when you have both role on one server then Frontend will be 25 and backend will be 2525
7. You might need to check email address policies, this might needs to re-apply. If we have more than 3000 mailboxes then it is suggest applying from EMS.
To understand the mailflow we can read the below article: https://msexchangeguru.com/2012/08/09/e2013-mailflow/
Exchange 2013 Certificates
Create a new Exchange certificate on Exchange 2013: https://msexchangeguru.com/2013/01/18/e2013-certificate/
Use current certificate
For Export and import of the cert Please check here – https://msexchangeguru.com/2013/06/29/import-cert-e2013/
- Export the cert from Exchange 2010
- Import the cert to Exchange 2013
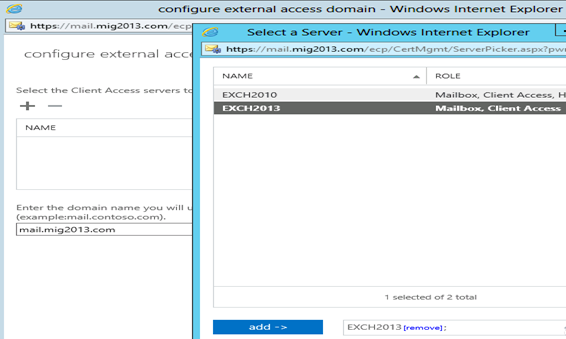
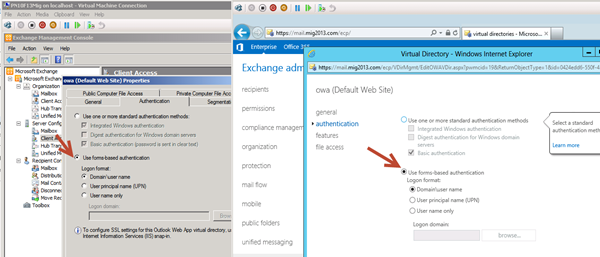
- Configure the external url. This is very simple in exchange 2013. You don’t need to go to every virtual directory property.
- Select the wrench mentioned below windows

5. Then this wizard will open, select the exchange 2013 server and give the external url and save it.
6. CAS Authentication will be “Use form-based authentication” on both Exchange 2013 and Exchange 2010/2007.
Database availability Group
We would like to configure a DAG for high availability with multiple databases. So we have 2 options.
1. DAG with IP. Check the below link to create a DAG with IP
https://msexchangeguru.com/2013/01/17/e2013-dag/
2. DAG without IP – This needs Exchange 2013 SP1 on Windows 2012 R2
Check the below link to create IP less DAG
https://msexchangeguru.com/2014/03/21/e2013sp1-ip-less-dag/
Update Feb 2015: If you have 2 datacenters expanded DAG then now you can configure your FSW in Azure which means your DAG can be configurable to 3 Data center expanded automated DAG. This will allow you to completely shut down the data center without loosing production connectivity. Here is the link to configure FSW in Azure – Using a Microsoft Azure VM as a DAG witness server
Move Arbitration and Discovery Search mailboxes
Follow the below steps to move all arbitration and discovery search mailboxes to final 2013 database.
Open EMS with run as administrator and run the following cmds
Get‐Mailbox –Arbitration | New‐MoveRequest –TargetDatabase TargetDBName
Get-Mailbox “*Discovery*” | New‐MoveRequest –TargetDatabase TargetDBName
Unified Messaging: Upgrade Exchange 2010 UM to Exchange 2013 UM
This is the optional step only for unified messaging configured organizations.
Please follow the below link to upgrade exchange 2010 UM to Exchange 2013 UM
http://technet.microsoft.com/en-us/library/dn169226(v=exchg.150).aspx
Configure Enabled Outlook Anywhere
For Exchange 2007
Set-OutlookAnywhere -Identity “2010 CasServerNameRpc (Default Web Site)” -ClientAuthenticationMethod Basic -SSLOffloading $False -ExternalHostName mail.domain.com -IISAuthenticationMethods {NTLM,Basic}
For Exchange 2010
Set-OutlookAnywhere -Identity “2010 CasServerNameRpc (Default Web Site)” -ClientAuthenticationMethod Basic -SSLOffloading $False -ExternalHostName mail.domain.com -IISAuthenticationMethods NTLM, Basic
Configure OAB
Run the below command to configure OAB for all databases
Get-MailboxDatabase | Set-MailboxDatabase -OfflineAddressBook “Default Offline Address List (Ex2013)”
Default Offline Address List (Ex2013) can be replaced by your custom named OAB.
Enabling and Configuring Outlook Anywhere
For Exchange 2007
Get-ExchangeServer | Where {($_.AdminDisplayVersion -Like “Version 8*”) -And ($_.ServerRole -Like “*ClientAccess*”)} | Get-ClientAccessServer | Where {$_.OutlookAnywhereEnabled -Eq $False} | Enable-OutlookAnywhere -ClientAuthenticationMethod Basic -SSLOffloading $False -ExternalHostName mail.domain.com -IISAuthenticationMethods NTLM, Basic
For Exchange 2010
Get-ExchangeServer | Where {($_.AdminDisplayVersion -Like “Version 14*”) -And ($_.ServerRole -Like “*ClientAccess*”)} | Get-ClientAccessServer | Where {$_.OutlookAnywhereEnabled -Eq $False} | Enable-OutlookAnywhere -ClientAuthenticationMethod Basic -SSLOffloading $False -ExternalHostName mail.domain.com -IISAuthenticationMethods NTLM, Basic
SCP – Service Connection Point Configuration:
Run the below command to configure SCP on Exchange Management Shell of 2007/2010/2013 separately:
get-ClientAccessServer | Set-ClientAccessServer -AutoDiscoverServiceInternalUri https://autodiscover.domainname/autodiscover/autodiscover.xml
SCP might be already configured on 2007/2010 server so you can also check it and use the same -AutoDiscoverServiceInternalUri. Run the below cmd to get current SCP on 2013 Shell
get-ClientAccessServer | fl name,AutoDiscoverServiceInternalUri
RemoteDomain:
Run the below cmd in EMS to allow auto forwarding, oof, auto reply and disable the possibility of winmail.dat from domino server.
Set-remoteDomain -AutoReplyEnabled $True -AutoForwardEnabled $True -TNEFEnabled $False -AllowedOOFType External
Pop/IMAP:
If you have pop3/imap4 users then you might like to configure 2013 for some addition configuration.
1. Configure the Basic authentication on EAC for CAS 2013
2. Start the services and change them to automatic.
Email address policy:
You might need this step if you organization was initially created on Exchange 2003.
1. Create a new email address policy if there is only one “Default Policy”.
2. Change the attributes of existing email address policy by running the below cmd
Get-emailaddresspolicy | Set-EmailAddressPolicy -RecipientFilter “Alias -ne $null” -IncludedRecipients AllRecipients
3. If you see the below error for the default policy then Remove “Default Policy” which was created in 2003 and will be in ready only mode in Exchange 2013.

Clean up health mailboxes:
When you remove default mailbox database, it does not remove health mailboxes which we can check by running the cmd and below warning will come. Health mailboxes are for the health service and they are specific for every database so we don’t need to move them rather we need to remove them.
Get-mailbox –monitoring
Mailboxes/HealthMailbox94863fe5394447619ec45c4e6b2dd971 has been corrupted, and it’s in an inconsistent state.
The following validation errors happened: WARNING: Database is mandatory on UserMailbox.
To fix this we need to delete user account in dsa.msc at yourdomain/Microsoft Exchange System Objects/Monitoring Mailboxes
Important: At the point configure your outlook for Exchange 2007/2010 mailbox and 2013 mailbox. If both are working from Internet then move to the next step.
CutOver :Updated 2007 part Feb 2015
Now it is the time to do cutover means point the connections to Exchange 2013. It can be done in few simple steps.
1. Create or change Public and Private DNS pointers.
a. autodiscover.domain.com will be pointing to the CAS 2010/2007 or Load balancer of CAS 2010/2007. So change the IP from Exchange 2010/2007 to 2013. In case of new installation or exchange 2007 environment we need to create new host record in DNS. This will be done on both internal and external
b. mail.domain.com (OWA/activesync/RPCoverhttp/mapioverhttp) Change the IP from Exchange 2010/2007 to Exchange 2013 CAS servers or Load balancer.
c. Create Legacy.domain.com host record in case of exchange 2007 co-existence in both public and private DNS. This will point to Exchange 2007 CAS servers or Exchange 2007 l0ad balancer CAS VIP.
2. Point your Spam Guard to forward all the emails to exchange 2013 to receive incoming mail via Exchange 2013.
3. Configure Spam Guard to accept emails from all Exchange 2013 Mailbox servers.
4. Configure all other application to send email to the Exchange 2013 Mailbox Servers.
5. Update PTR and SPF record if Exchange 2013 are sending the emails out directly.
6. In case of Exchange 2007, we need to update the following URLs and Authentications as well.
- EWS – Run the below cmd on Exchange 2007 EMS
Get-WebServicesVirtualDirectory | Set-WebServicesVirtualDirectory -ExternalUrl https://legacy.Domain.com/EWS/Exchange.asmx -internalurl https://legacy.Domain.com/EWS/Exchange.asmx
- OWA – Run the below cmd on Exchange 2007 EMS
Get-OWAVirtualDirectory | Set-OWAVirtualDirectory -ExternalUrl https://legacy.Domain.com/OWA -internalurl https://legacy.Domain.com/OWA
- OWA – Run the below command to change the authentication method in Exchange 2007 EMS
Get-owaVirtualDirectory -identity “CASName1OWA (Default web site)” | Set-OwaVirtualDirectory -ExternalAuthenticationMethods FBA,basic
Exchange 2013 Mailbox Migration
So what are we waiting for… Let us begin the mailbox migration.
- Now you can run the following cmdlet to move bulk or single mailbox
Get-Mailbox –Database “Exchange 2010/2007/2007 Database” –OrganizationUnit “DN of the OU” | New-Move Request –TargetDatabase “Exchange 2013 Database”

2. You can monitor the migration by running the following cmdlet or going to the migration tab in EAC:
Get-MoveRequest

3. Once completed it will show the below window

For Cross forest mailbox migration check this link: https://msexchangeguru.com/2013/11/02/e2013crossforestmigration/
Public Folder Migration
-
Once we complete all mailbox migration then we can start the Public Folders migration.
For Public Folder migration use the below Link:
https://msexchangeguru.com/2013/04/18/exchange2013-public-folders/
- Test everything working and shutdown Exchange 2010/2007 server for 1 production week and observe if no issue reported then go ahead with the Exchange 2010/2007 removal process.
Known Issues:
Active Sync Config without Domain Name: https://msexchangeguru.com/2013/08/06/e2013mobiledomain/
OWA redirection broken page and SSL: http://www.expta.com/2013/05/owa-2013-cu1-redirection-is-broken-for.html – This was fixed in CU3
If you have pop/imap user go for CU2: https://msexchangeguru.com/2013/08/04/e2013popimapauth/
Mailflow misconfiguration: https://msexchangeguru.com/2013/08/03/e2013-2010mailflowissue/
Certifacate and cryptographic provider Issue: http://msitpros.com/?p=1770
Legacy Removal
-
Now we are in a position to remove exchange 2010. We can follow the below link for the exchange 2010/2007 removal.
https://msexchangeguru.com/2013/09/01/e20102007decomposte2013mig/
Hit us with questions
Prabhat Nigam | MVP Exchange
Team @MSExchangeGuru
Keywords: Exchange 2010 to exchange 2013 migration, how to migrate to Exchange 2013
")


April 2nd, 2015 at 8:39 am
one more thing the source database passive copy server is offline does it impact ?
April 2nd, 2015 at 9:26 am
@Prabhat:
thanks.. currently facing the issue with mailboxes on the Exch2013 – password prompt everytime outlook starts. I think this is an authentication settings issue of the VDs. My guess: OA, havent activated it yet. any guess? thx
April 2nd, 2015 at 10:18 am
Frank- add ntlm/ window integrated authentication
April 2nd, 2015 at 12:09 pm
thx – to owa and ecp?
April 2nd, 2015 at 12:10 pm
Outlook anywhere – which might be giving the popup
April 2nd, 2015 at 12:11 pm
You need to activate OA otherwise how will outlook connect to Exchange 2013. There is no mapi in Exchange 2013.
April 2nd, 2015 at 12:12 pm
ah ok thx. I did not realize that OA is relevant for internal access!
April 2nd, 2015 at 12:12 pm
@amit.
Why and when passive db went down. Was it after you initiated the migration?
April 2nd, 2015 at 1:03 pm
No that’s server is on maintenance for long time before initiated the migration it was offline but the source and target server are online
April 2nd, 2015 at 1:12 pm
Then check the description and event viewer. Run get-moverequest | fl might give some description.
April 2nd, 2015 at 4:10 pm
Currently my OA looks like this:
Get-OutlookAnywhere | fl
ServerName : Exch2013
SSLOffloading : True
ExternalHostname :
InternalHostname : lab.local
ExternalClientAuthenticationMethod : Negotiate
InternalClientAuthenticationMethod : Ntlm
IISAuthenticationMethods : {Basic, Ntlm, Negotiate}
So I add to the InternalClientAuth Windows Integrated like you recommended?
Also my ECP/OWA looks like this – would you recommend the settings like this? I also want to use ADFS (WAP) – should I use the AdfsAuthentication switch for WAP?
Name : owa (Default Web Site)
Url : {}
SetPhotoURL :
Exchange2003Url :
FailbackUrl :
InternalUrl : https://exch2013.lab.local/owa
ExternalUrl :
ClientAuthCleanupLevel : High
InternalAuthenticationMethods : {Basic, Fba}
BasicAuthentication : True
WindowsAuthentication : False
DigestAuthentication : False
FormsAuthentication : True
LiveIdAuthentication : False
AdfsAuthentication : False
OAuthAuthentication : False
ExternalAuthenticationMethods : {Ntlm, WindowsIntegrated}
Normally I used configured it like this, but that did not work – got an blank page after login – thoughts?
Set-owaVirtualDirectory -Identity “owa (Default Web Site)” -BasicAuthentication $true -FormsAuthentication $false -ExternalAuthenticationMethods ‘Ntlm’, ‘WindowsIntegrated’ -WindowsAuthentication $true
Thank you!
Frank
April 2nd, 2015 at 6:33 pm
Frank
Is it working now?
April 3rd, 2015 at 2:30 am
With the settings that I have posted unfortunately not!
April 3rd, 2015 at 2:50 am
Follow the steps as per blog. It should work.
April 3rd, 2015 at 10:21 am
I did follow the steps of your blog. found the issue is only with Outlook 2010 – that hotfix solved the problem: http://www.microsoft.com/de-de/download/details.aspx?id=46396
Outlook 2013 had no problems at all! Thanks!
BTY – I moved a mailbox from 2010 to 2013 – inbound messages to that box return 5.2.0 mailbox unavailable. MX points to the Exchange 2010. Do I need a receive connector on the Exchange 2013 or why is the mail not beeing forwarded? Accepted Domain is Authoritive! thx
April 3rd, 2015 at 12:28 pm
Glad to hear it worked.
5.2.0 mailbox unavailable is not receive connector error but something else.
Check if there is any 3rd party on your 2013 or 2010 exchange. Stop or disable this 3rd party and see if this fix the issue.
April 8th, 2015 at 7:16 pm
Hi PN:
Do you have a blog/technote to restore a exchange 2013 mailbox items? I have a user who accidently deleted a folder containing mails and would like to restore them. I have Symantec backup exec 2012 for backup.
thanks
April 14th, 2015 at 9:48 am
Hi Prabhat,
We have existing Exchange 2007 SP3, and we just installed 2 Exchange 2013 SP1 in DAG configuration to co-exist with Exchange 2007. Everything went smoothly with the installation and configuration.
The OWA is working perfectly fine BUT our problem is with the Outlook anywhere, All new users(Outlook 2010,outlook 2013) cannot connect to the new Exchange server 2013. The Error is “The action cannot be completed. The connection to Microsoft Exchange is unavailable.Outlook must be online to complete this action.” The exchange 2007 clients are still ok connected to exchange 2007.
Below is the details with Outlook anywhere and the Autodiscovery for your reference.
[PS] C:\Windows\system32>Get-OutlookAnywhere
RunspaceId : 48713c0e-2595-4e35-b93c-3818d5cba867
ServerName : MAIL2
SSLOffloading : False
ExternalHostname : mail2.—–.com.sa
InternalHostname :
ExternalClientAuthenticationMethod : Ntlm
InternalClientAuthenticationMethod : Ntlm
IISAuthenticationMethods : {Ntlm}
XropUrl :
ExternalClientsRequireSsl : True
InternalClientsRequireSsl : False
MetabasePath : IIS://mail2.—–/W3SVC/1/ROOT/Rpc
Path : C:\WINDOWS\System32\RpcProxy
ExtendedProtectionTokenChecking : None
ExtendedProtectionFlags : {}
ExtendedProtectionSPNList : {}
AdminDisplayVersion : Version 8.3 (Build 83.6)
Server : MAIL2
AdminDisplayName :
ExchangeVersion : 0.1 (8.0.535.0)
Name : Rpc (Default Web Site)
DistinguishedName : CN=Rpc (Default Web Site),CN=HTTP,CN=Protocols,CN=MAIL2,CN=Servers,CN=Exchange
Administrative Group (FYDIBOHF23SPDLT),CN=Administrative
Groups,CN=—–,CN=Microsoft
Exchange,CN=Services,CN=Configuration,DC=atheeb-ingr,DC=com
Identity : MAIL2\Rpc (Default Web Site)
Guid : 490e456f-b450-4711-a2ea-a1e14b6d4f9b
ObjectCategory : atheeb-ingr.com/Configuration/Schema/ms-Exch-Rpc-Http-Virtual-Directory
ObjectClass : {top, msExchVirtualDirectory, msExchRpcHttpVirtualDirectory}
WhenChanged : 11/9/2014 3:43:40 PM
WhenCreated : 9/28/2010 12:46:33 AM
WhenChangedUTC : 11/9/2014 12:43:40 PM
WhenCreatedUTC : 9/27/2010 9:46:33 PM
OrganizationId :
OriginatingServer : dc2.—–.com
IsValid : True
ObjectState : Changed
RunspaceId : 48713c0e-2595-4e35-b93c-3818d5cba867
ServerName : MAIL3
SSLOffloading : False
ExternalHostname :
InternalHostname : mail5.—–.com
ExternalClientAuthenticationMethod : Ntlm
InternalClientAuthenticationMethod : Ntlm
IISAuthenticationMethods : {Basic, Ntlm, Negotiate}
XropUrl :
ExternalClientsRequireSsl : False
InternalClientsRequireSsl : True
MetabasePath : IIS://Mail3.—–.com/W3SVC/1/ROOT/Rpc
Path : C:\Program Files\Microsoft\Exchange Server\V15\FrontEnd\HttpProxy\rpc
ExtendedProtectionTokenChecking : None
ExtendedProtectionFlags : {}
ExtendedProtectionSPNList : {}
AdminDisplayVersion : Version 15.0 (Build 847.32)
Server : MAIL3
AdminDisplayName :
ExchangeVersion : 0.20 (15.0.0.0)
Name : Rpc (Default Web Site)
DistinguishedName : CN=Rpc (Default Web Site),CN=HTTP,CN=Protocols,CN=MAIL3,CN=Servers,CN=Exchange
Administrative Group (FYDIBOHF23SPDLT),CN=Administrative
Groups,CN=—–,CN=Microsoft
Exchange,CN=Services,CN=Configuration,DC=atheeb-ingr,DC=com
Identity : MAIL3\Rpc (Default Web Site)
Guid : 488b632e-ae52-48b3-b9f1-74faccf48eef
ObjectCategory : atheeb-ingr.com/Configuration/Schema/ms-Exch-Rpc-Http-Virtual-Directory
ObjectClass : {top, msExchVirtualDirectory, msExchRpcHttpVirtualDirectory}
WhenChanged : 4/14/2015 7:21:40 AM
WhenCreated : 4/10/2015 10:31:36 AM
WhenChangedUTC : 4/14/2015 4:21:40 AM
WhenCreatedUTC : 4/10/2015 7:31:36 AM
OrganizationId :
OriginatingServer : dc2.atheeb-ingr.com
IsValid : True
ObjectState : Changed
RunspaceId : 48713c0e-2595-4e35-b93c-3818d5cba867
ServerName : MAIL4
SSLOffloading : False
ExternalHostname :
InternalHostname : mail5.—–.com
ExternalClientAuthenticationMethod : Ntlm
InternalClientAuthenticationMethod : Ntlm
IISAuthenticationMethods : {Basic, Ntlm, Negotiate}
XropUrl :
ExternalClientsRequireSsl : False
InternalClientsRequireSsl : True
MetabasePath : IIS://—–/W3SVC/1/ROOT/Rpc
Path : C:\Program Files\Microsoft\Exchange Server\V15\FrontEnd\HttpProxy\rpc
ExtendedProtectionTokenChecking : None
ExtendedProtectionFlags : {}
ExtendedProtectionSPNList : {}
AdminDisplayVersion : Version 15.0 (Build 847.32)
Server : MAIL4
AdminDisplayName :
ExchangeVersion : 0.20 (15.0.0.0)
Name : Rpc (Default Web Site)
DistinguishedName : CN=Rpc (Default Web Site),CN=HTTP,CN=Protocols,CN=MAIL4,CN=Servers,CN=Exchange
Administrative Group (FYDIBOHF23SPDLT),CN=Administrative
Groups,CN=—–,CN=Microsoft
Exchange,CN=Services,CN=Configuration,DC=atheeb-ingr,DC=com
Identity : MAIL4\Rpc (Default Web Site)
Guid : 55199969-d73c-4c70-bdf2-d3b4b6245c70
ObjectCategory : —–/Configuration/Schema/ms-Exch-Rpc-Http-Virtual-Directory
ObjectClass : {top, msExchVirtualDirectory, msExchRpcHttpVirtualDirectory}
WhenChanged : 4/14/2015 7:22:09 AM
WhenCreated : 4/10/2015 12:12:33 PM
WhenChangedUTC : 4/14/2015 4:22:09 AM
WhenCreatedUTC : 4/10/2015 9:12:33 AM
OrganizationId :
OriginatingServer : dc2.—–.com
IsValid : True
ObjectState : Changed
[PS] C:\Windows\system32>Get-ClientAccessServer | FL AutoDiscoverServiceInternalUri
AutoDiscoverServiceInternalUri : https://mail2.—–.com/autodiscover/autodiscover.xml
AutoDiscoverServiceInternalUri : https://autodiscover.—–.com/autodiscover/autodiscover.xml
AutoDiscoverServiceInternalUri : https://autodiscover.—–.com/autodiscover/autodiscover.xml
Hoping for your help so that we can complete with 2007 migration to 2013.
April 18th, 2015 at 12:19 pm
Hi,
I am looking for possible solution on how to consolidate 2 URLS of Exchange 2010 to Exchange 2013. At present we have 8 E2k10 servers configured to use two URLS mail.abc.com and mail2.abc.com. These two URLs has been hosted in same DC and use by users in two different geographic locations. The user base is 5000 and we have plan to upgrade it to Exchange 2013. We don’t want to put more hardware to accommodate two URLs. Can you please suggest how to achieve thisand also, we have F5 load balancer & reverse proxy is factored.
Note: I donot want to disturb users settings as this may lead more efforts and OWA, ActiveSync and outlook should work after migrations.
April 18th, 2015 at 8:55 pm
Hey Felix,
I think this one will help you – https://msexchangeguru.com/2013/04/04/backup-exec/
Sorry for late reply.
April 18th, 2015 at 9:05 pm
Hey Boyet,
1. One of your server is resolving mail2 in place of autodiscover when you are run Get-ClientAccessServer | FL AutoDiscoverServiceInternalUri
Fix this.
2. Make sure we have dns host record for autodiscover.domain.com in your AD dns for internal IP and in Public dns for the Public IP of the CAS servers. you can create multiple dns records with same name and different IPs if you don’t have load balancer. you should be able to ping autodiscover.domain.com.
3. You can check the urls here. https://msexchangeguru.com/2013/12/31/e20132007-urlsauth/
4. Don’t forget to test your records as exrca.com
Let me know if this helps
April 18th, 2015 at 9:09 pm
Hey Amit,
It is simple. Just use same urls in Exchange 2013 and point your dns pointers to Exchange 2013.
Exchange 2010 works better than 2007 as it accepts all praxy from 2013 so you can configure and test everything internally before the cutover.
April 19th, 2015 at 11:53 pm
Hi Prabhat,
Sorry to put my question once again but, Can you pls. explain in details as I want to understand how to move forward to consolidate 2 URLs.
What DNS changes required in case if I have mail.abc.com (10.1.1.1) & mail2.abc.com (10.1.10.1). I want to set mail.abc.com in exchange 2013 but also want that all users of mail2.abc.com must resolve active /sync, owa and other functionality smoothly.
April 19th, 2015 at 11:53 pm
Thanks prabhat,
Sorry to put my question once again but, Can you pls. explain in details as I want to understand how to move forward to consolidate 2 URLs.
What DNS changes required in case if I have mail.abc.com (10.1.1.1) & mail2.abc.com (10.1.10.1). I want to set mail.abc.com in exchange 2013 but also want that all users of mail2.abc.com must resolve active /sync, owa and other functionality smoothly.
April 20th, 2015 at 12:05 am
Hi PN:
Do you have any Exchange 2013 & Exchange 2010: Mixed URLs and Auth details?
April 20th, 2015 at 11:21 am
hi prabhat,
thanks for your reply, mail2 is our exchange 2007 outlook anywhere. i already added 2 autodiscover record in the DNS with the ips of 2 exchange 2013 servers. i can ping now autodiscover BUT still has the ERROR. We also run the EXRCA tool and it fails to Autodiscover. Please help setup the correct autodiscover.
mail2 – exchange 2007 outlook anywhere
mail3 – exchange 2013 SP1 server
mail4 – exchange 2013 SP1 server
mail5 – outlook anywhere for the 2 exchange 2013(single namespace for the 2 exchange 2013 server)
Awaiting for your help…thanks
April 23rd, 2015 at 7:04 pm
I have Exchange 2007 with a mailbox server and a front end server with both HT and CAS roles. I am a little confused on the proper upgrade steps for the new Exchange 2013. I want to use two server setup like existing so there will be a 2013 mailbox server and a front end CAS box. Looks like HT is now part of the mailbox server and the transport part of the CAS box is really a forwarder- sort of like the old Exchange 5.5 front end back end setup? They used to say build the HT and CAS servers first and then the mailbox. Exchange 2013 no, correct? Does not matter? Looks like I can build out the two 2013 servers and have them integrated into the Exchange 2007 existing setup without screwing things up until I start to move send connectors, etc?
Thanks.
April 27th, 2015 at 9:19 am
Great post!
I did an Exchange 2007 to 2013 not long ago (still in coexistence) and I did not modify my send connectors to add my Exchange 2013 server. I’m assuming I can do that at any time with no impact correct? Also, regarding certificates does your exchange 2007 need a cert for SMTP services?
Thanks!
April 27th, 2015 at 10:36 am
Yes, you can add/remove source servers in the send connector any time but make sure ports are open and outgoing IP is not blacklisted or there is out 1-1 Nat configured so that it uses the IPs listed in SPF record.
Transport servers (SMTP) use self signed certificate.
April 27th, 2015 at 10:52 am
Yes Babalou,
You can install exchange 2013 without hurting production but remember you still need to do scheme update, AD prep and domain prep.
May 6th, 2015 at 4:44 pm
Hi Prabhat,
Thank you so much for this walkthrough. I would have had a lot more trouble getting this to work with out your help!!
I have one problem that I can’t figure out and I am hoping you can point me in the right direction. My 2007 server shows up under servers but does the database does not show up under databases. Only the 2013 Database shows up. I have Migrated a mailbox and mailflow is working good. I have not changed all the Virtual Directories on 2007 yet because of the Cert errors they will get and most our mailboxes are still on 2007. I am not planning on keeping 2007 very long.
2007 – Version 8.3 (Build 83.6)
2013 – Version 15.0 (Build 1076.9)
Thank you again,
Todd
May 6th, 2015 at 5:24 pm
Perfect. Thanks. I have around 300 users. As said earlier, I have a back end 2007 MB server and a 2007 front end server running HT/CAS. Would it be better to run the new Exchange 2013 server all in one or should I set it up like current by setting up a CAS/mail forward front end? Currently, my Anti-spam server receives inbound emails and forwards to my HTCAS box. I would like to keep it that way, in a way. The new 2013 CAS box can also send the mail out. I would just change the IP address internally to what the current IP of the 2007 HTCAS box and give the current HTCAS box a different IP. that way the public address and DNS/SPF will stay the same. What about my app connector? This is for any servers that have apps on them internally that require relaying through our mail server. I assume these would point to the new back end MB server? Sorry for the questions. Guess I am so used to doing it one way that it is hard to think outside the box on this LOLOL
May 7th, 2015 at 3:17 am
If you have a load balancer then we can merge CAS+MBX in one server you don’t need to waste one OS license and an exchange license.
At the same time there is no harm in keeping both separate. I would always recommend 1 server for both role and a load balancer.
App connectors needs to be configured on Exchange 2013 servers. If you use both roles together then you will have to use port 2525 for a mailbox role receive connector and do the same change in the application. Cas receive connect will receive on port 25. If it will be separate CAS and MBX then port 25. New backend mailbox role server will be fine to receive app emails.
May 7th, 2015 at 3:22 am
Hi Todd,
You can’t manage Exchange 2007 from Exchange 2013 management EAC or EMS. Same for Exchange 2013. So if you dont seen Exchange 2007 database in the Exchange 2013 EAC then it is by design.
Install the certificate before changing the urls.
Exchange 2013 will redirect OWA and EWS traffic to Exchange 2007 for exchange 2007 mailboxes so you need to have different urls for these. They can’t be same.
May 7th, 2015 at 9:54 am
Thanks again Prabhat,
That is probably why I couldn’t find any solutions for it missing out there 🙂
Todd
May 7th, 2015 at 10:18 am
You won’t be able to see the databases from the EAC, but if you create a new user in the EAC you can choose databases from either 2007 or 2013. So there is some management when either migrating from 2007 or create a new user.
May 7th, 2015 at 12:25 pm
Hi Prabhat,
We are doing the transition from 2007 (one server) to 2013 (2 CAS and 2 Mailbox in DAG)
On 2007 box the SSL certificate is *.domain.com
So does this mean we don’t have to add any thing for 2007 like legacy.domain.com right?
Does wildcard certificate will cause any issue?
Many thanks
Vicky
May 7th, 2015 at 1:34 pm
you don’t need to have legacy.domain.com in the cert. just configure for owa and ews on Exchange 2007.
Wildcard cert is supported. It should be fine.
May 7th, 2015 at 6:23 pm
Prabhat:
I installed 2013 and updated it. I managed to migrate two test mailboxes, which everything carried over fine. I am able to send and receive mail internally fine, however when mailing from a test mailbox on 2013 to an external email (gmail and outlook in this case) after some time I will get an error that message was delayed returned 400 4.4.7 Error.
I have not configured any send connectors on the 2013 exchange server and our 2007 exchange server is still in production and functioning correctly. I haven’t touched anything in our DNS records. I haven’t done anything with certificates.
This is a new project for me so if you can give me a rough idea on where to look that would be great. Thank for your time and article!
May 7th, 2015 at 6:34 pm
Looks like DNS resolution issue or exchange 2007 is not accepting connection from 2013. Are you able to send and receive email with exchange 2007 mailbox.
May 7th, 2015 at 6:36 pm
yes, the exchange 2007 is our production server so everything is working fine on that end. Just wanting to test as much as possible the exchange 2013 so we have minimal downtime. But can’t send emails to the internet.
If it’s a DNS issue, do i need to add in records for the 2013 server?
May 14th, 2015 at 4:01 pm
Dear Prabhat, we are in coexistence of 2010 and 2013 before going for cutover of DNS we are testing through Host file the Exchange 2013 proxy Exchange 2010 outlook client but it ask password from exchange 2010 users setting are below
outlook version = 2013
Exchange 2010
externalclientauthenticaion =basic
internalclientauthentication=ntlm
iisauthenticationmethods= basic,ntlm
Exchange 2013
externalclientauthenticaion =Ntlm
internalclientauthentication=Ntlm
iisauthenticationmethods= basic,ntlm
Please help thanks
May 15th, 2015 at 3:32 am
Chadd
We need to resolve and telnet from exchange 2013 server to see what is blocked and where.
May 15th, 2015 at 3:35 am
You need to change the following:
Exchange 2013
externalclientauthenticaion =basic
internalclientauthentication=ntlm
iisauthenticationmethods= basic,ntlm
Exchange 2010
externalclientauthenticaion =Ntlm
internalclientauthentication=Ntlm
iisauthenticationmethods= basic,ntlm
May 19th, 2015 at 11:28 am
Dear Prabhat, I have a two part question. Thanks for the previous answers. They have been valuable. As stated prior, I have a front end Ex2k7 box running both CAS and HT roles. The backend Ex2k7 box is just a mailbox role. When I build out the two new Ex2k13 servers, They should be sort of the same setup. I know the front end really will just be a forwarder. I am about to renew my Ex2k7 cert. When I do install the two new servers, they will not be used at first. You said that was fine. So, I would like to move from the HTCAS Ex2k7 server to the front end CAS/HTproxy front end Ex2k13 server first. Can that server forward to the Ex2k7 mailbox server? Or do I have to also move the HT role from the Ex2k7 server to the new Ex2k13 mailbox server at the same time I change over to the new Ex2k13 front end? I do not want to add a Legacy.company.com entry into the cert. Will it be needed? The slow migration would be for mailboxes. I have three mailbox stores based on end user role within the company. Thanks. I just do not want mail flow to get hung up….I also would like to have the mail flow back out the new Ex2k13 front end server as before. What I want to do is just change the IP of the current Ex2k7 HTCAS box and make the new front end Ex2k13 server have that original IP. That way I do not have to change SPF, PTR, and other records. That ok?
Thanks.
May 19th, 2015 at 11:51 am
Can that server forward to the Ex2k7 mailbox server?
Yes, exchange 2013 can forward mails to Exchange 2007 and 2007 can forward to 2013
I do not want to add a Legacy.company.com entry into the cert. Will it be needed?
Yes, you need it or you can use another url. Basically u need 2nd url for 2007 owa and ews.
What I want to do is just change the IP of the current Ex2k7 HTCAS box and make the new front end Ex2k13 server have that original IP. That way I do not have to change SPF, PTR, and other records. That ok?
This is the right way which is mentioned inthe cut over part of the blog.
May 19th, 2015 at 12:05 pm
so, I need that Legacy in the cert due to the Ex2k13 OWA will need to have a 2k7 CAS box running if the mailbox is on E2k7?
May 19th, 2015 at 3:37 pm
On step 6, do I run that powershell command on both the mailbox and front end CAS Ex2k13 servers?
May 21st, 2015 at 7:05 am
Yes, for 2007 mailbox to use owa, you need legacy or any other url.
May 21st, 2015 at 7:06 am
Which step you are talking about, please paste here